Breaking into East Front Series with Barbarossa: Kiev to Rostov
This is a first game, which means learning game. The East Front Series (EFS) is a very rich simulation of Germany’s 1941 advance into the Soviet Union.
One of the nicest things about the game is the small scenarios which ship with it. Not just one mapper scenarios, there are those as well, but two scenarios on a reversible 8 1/2 by 11 page, with map, OOB and rule exceptions printed right on the sheet.
This game plays through Scenario #4, some mechanized action near Sumy, some miles west of Kharkov.
Turn 1
A. Strategic Segment
1. Weather Determination Phase
Determine weather from scenario instructions or table (5.1); if storm, all air to Ready Box, reinforcements and replacements to Flown Box.
Weather is dry per Scenario #4 instructions.
2. Supply Determination Phase
a. Axis players decides whether to conduct Logistics Pause (PB 5.1).
b. Trace supply to all on-map units (6.1). Remove Fuel Shortage, Emergency Supply and Out of Supply markers for hexes now in General Supply (6.62); Emergency Supply turns to Out of Supply (6.64); place new Emergency Supply markers (6.63).
c. Remove MSUs or turn over Dumps serving as one-turn supply sources. Remove Emergency Supply and Out of Supply markers from hexes now in General Supply (6.62).
d. Both players emplace Bridge units with their Under Construction side face up (PB 4.55a).
e. Receive Attack Supply Points (ASPs) (6.81); convert ASPs into MSUs or Dumps; set these aside until the friendly movement phase (6.83, 6.84).
f. Resolve Axis fuel shortage (PB 5.2) for certain Axis units which are OoS.
No supply considerations for this scenario.
3. Replacements Phase
a. Soviet player refers to the scenario Set-Up Card or Replacements Chart for:
b. Spend Type I RPs to move Zap units from the cadre Box to the Active Box (7.22.c.3)
c. Axis player refers to the scenario Set-Up Card for:
No replacements for either side in this scenario.
4. Reinforcement and Withdrawal Phase
a. Victory Plan determination (PB 10.75).
b.
c.
No reinforcements for either side on Turn 1.
5. Air Readiness Phase
a. Resolve Readiness for units in Flown Boxes (9.11).
b. Resolve Readiness for units in Damaged Boxes (9.11).
All air is Ready for Turn 1.
6. Axis Air Interdiction Phase
a. Axis designates Interdiction mission hexes.
b. Place Air units from Ready Box face down on Interdiction mission hexes (17.23).
c. Soviets place fighter from Ready Box on mission hex(es) as desired (17.23).
d. Axis player reveals units declares which units are mission and firing units (17.31.b.2).
e. Resolve air combat (17.33).
f. Soviet player resolves AA against surviving mission units (17.4).
g. Place Interdiction markers on mission hexes with surviving German air units (13.14), return air units to Flown Box.
No Air Interdiction for Axis Turn 1. We’ll try that later.
B. Axis Player Segment
1. Axis Movement phase
a.
b.
c.
d.
e.
2. Axis Attack Declaration Phase
Declare all attacks and mark Defender Hexes with Declared Attack markers (12.0).
3. Soviet Reaction Phase
a. Motorized units conduct Reaction Movement at 1/2 MA (14.11).
b. Artillery support for defender hexes (14.2).
c. Issue Retreat or No Retreat orders.
4. Axis Combat Phase
a. CAS Missions
b. Provide Attack Supply from designated dumps.
There is a lot here. For now, the He111 performs CAS on an attacked hex.
The Soviets counter with a fighter. Axis rolls 5 for initiative, rolls
6 at +1 for an Abort A result. Soviets roll a 3 to also get an A, so
no German CAS this turn. That’s too bad, as the CAS would have
contributed -2 DRM.
Combats:
-
16M against 295th ID at 3:1 with -1 Mot. Integrity bonus, roll 9 - 1 net 8 for
1*/R, not a great result for the Axis. -
Elements of 9 Pz against reduced 11+96/5, roll 7 at 4:1 with -1 DRM,
2/1result, horrible for Axis. Not sure the Axis can win at this point, they don’t have enough combat strength, most of the Soviets are at full strength.
5. Axis Motorized Movement phase
a. Motorized and Cav units allowed 1/2 MA. See movement chart.
Germans in the north shift slightly south. In the south, Germans press the Russians.
b. Allowed movements are Overrun (11.4), Reinforcement Entry (10.13.g) and One hex movement (11.9).
None.
c. Adjust VP Track for any VP hexes captured (25.15).
None.
6. Axis Engineering Phase
a.
C. Soviet Player Segment
Similar to Germans in specific sections, Soviets have slightly different capabilities.
1. Motorized Movement phase
a. Reinforcement… of which there are 4 units coming on the board at hex 2202.
b.
c. Adjust VP Track for any VP hexes captured (25.15).
The 40 HQ activates the 227 ID, which moves in north of 20M. Other Soviet armor and cav units close with the Germans to see about punching them in the nose. This has left a gaping hole in the Soviet line, which the Soviets need to patch up during regular movement phase, after combat.
2. Soviet Attack Declaration phase
3. Axis Reaction Phase
No reaction movement by Germans this phase.
4. Soviet Combat Phase
I’m going to make this fairly simple, and call it two attacks:
- Against 20M at 6:4 which is 3:2, roll 2 for
1*/2, 20M is out of the game! - Against 9 Pz, 11:5 is 2:1, roll 1 for
1*/2R, 9 Pz is eviscerated! Retreats to south of Nedrigaylov. This is going to be very hard for 9 Pz to hold.
Soviets scored really big.
5. Soviet Movement phase
a. Turn Bridge units from their Under Construction side to their active side if across non-major river (PB 4.55d).
b. Conduct ground unit movement:
-
All unit types are allowed to move except: Units with Activation markers; Units with Receiving Replacements markers; Armored trains that moved in the motorized movement phase.
- Movement procedures allowed: Reinforcement Entry (10.13.g); Armored Train (10.14); One-hex movement (10.5.3.exception); Railroad (11.1); Overrun (11.4); Strategic (11.3); Infiltration (Cavalry) (11.52.b).
- Zap Unit Infantry Rebuilding. A Zap unit may add one Type I step to an eligible unit during the Soviet Movement Ohase (7.22.c.2).
Note motorized units move at one-half MA (See Movement Phase Chart).
c. Air Transport movement (11.7).
d. Adjust VP Track for VP hexes regained (25.12).
6. Soviet Engineering Phase
Same as Axis engineering phase except:
a. Soviet engineers speed strongpoint construction (23.11) and are required for Soviet railroad conversion.
b. Cutting Axis rail lines (19.4).
c. Remove Overrun markers from Axis units (11.44 note).
d. Destroy Dnepr River bridges printed on the map (PB 4.53).
e. Spend Soviet RPs to remove Receiving Replacements markers from on map units (7.4.1) and increase each receiving unit by one step.
f. Spend Soviet RPs to move units from the Cadre Box to the Active Box, or the map (7.4.3.d).
g. Spend Soviet RPs to move units from the Eliminated Box to the Cadre Box.
h. Eliminate excess ASPs at Kiev (PB 10.2.4.b).
7. Soviet Surrender Phase
a. Perform surrender chekcs. Units that fail are placed in the Eliminated Box (21.0).
b. Adjust Step Loss and VP Tracks as needed (25.13).
D. Game-Turn Record Interphase
-
Remove all Activated markers.
-
Soviet player performs Non-op HQ recovery or disbandment (22.26.b).
-
Axis player converts each Mandated Attack not yet made into VPs for any VP hex captured during the turn and still held at the end of the Soviet Player Segment; adust the VP Track (7.26.a.2).
-
Move the Game-Turn marker ahead by one box on the Turn Record Track.
End of Turn 1
Turn 2
Looks like the Germans are in a lot of trouble from the losses they took on Turn 1.
A. Strategic Segment
1. Weather Determination Phase
Determine weather from scenario instructions or table (5.1); if storm, all air to Ready Box, reinforcements and replacements to Flown Box.
Weather is dry per Scenario #4 instructions.
2. Supply Determination Phase
a. Axis players decides whether to conduct Logistics Pause (PB 5.1).
b. Trace supply to all on-map units (6.1). Remove Fuel Shortage, Emergency Supply and Out of Supply markers for hexes now in General Supply (6.62); Emergency Supply turns to Out of Supply (6.64); place new Emergency Supply markers (6.63).
c. Remove MSUs or turn over Dumps serving as one-turn supply sources. Remove Emergency Supply and Out of Supply markers from hexes now in General Supply (6.62).
d. Both players emplace Bridge units with their Under Construction side face up (PB 4.55a).
e. Receive Attack Supply Points (ASPs) (6.81); convert ASPs into MSUs or Dumps; set these aside until the friendly movement phase (6.83, 6.84).
f. Resolve Axis fuel shortage (PB 5.2) for certain Axis units which are OoS.
No supply considerations for this scenario.
3. Replacements Phase
a. Soviet player refers to the scenario Set-Up Card or Replacements Chart for:
b. Spend Type I RPs to move Zap units from the cadre Box to the Active Box (7.22.c.3)
c. Axis player refers to the scenario Set-Up Card for:
No replacements for either side in this scenario.
4. Reinforcement and Withdrawal Phase
a. Victory Plan determination (PB 10.75).
b. Remove available Axis/Soviet reinforcements and chosen Pool Groups from Set-Up Cards. Adjust Axis VP marker if necessary. Set aside ground units but place air units on the Air Unit Status Charts (8.21-8.23).
c. Withdraw required units (or their substitutes) or pay VPs (8.7); adjust VP marker on the VP track (25.1).
German and Soviet air units placed in Ready Box.
5. Air Readiness Phase
Refer to Air Unit Status Cards.
a. Resolve Readiness for units in Flown Boxes (9.11).
Soviet unit rolls for ready with success, one German unit moves from Flown to Ready, other German unit (Dummy) stays in Flown Box for this turn, having failed the the ready roll.
b. Resolve Readiness for units in Damaged Boxes (9.11).
Nothing in Damaged Box.
6. Axis Air Interdiction Phase
a. Axis designates Interdiction mission hexes.
b. Place Air units from Ready Box face down on Interdiction mission hexes (17.23).
c. Soviets place fighter from Ready Box on mission hex(es) as desired (17.23).
d. Axis player reveals units declares which units are mission and firing units (17.31.b.2).
e. Resolve air combat (17.33).
f. Soviet player resolves AA against surviving mission units (17.4).
g. Place Interdiction markers on mission hexes with surviving German air units (13.14), return air units to Flown Box.
No Air Interdiction for Axis Turn 2. We’ll try that later.
B. Axis Player Segment
The Germans are in a real bind already, having had 3 units eliminated in Turn 1. (Somehow I think I’m doing something wrong here, bad rolls don’t help either.)
1. Axis Movement phase
a. Turn bridge units from their Under Construction side to their active side if across non-major river (PB 4.55d).
No bridge units this scenario.
b. Place Receiving Replacements markers on desired on-map units (10.12).
No Replacement thisi scenario.
c. Conduct ground unit movement. All unit types are allowed to move. Movement procedures allowed: 1. Reinforcement entry (10.13.g); 2. One-hex movement (11.9); 3. Railroad (11.1); 4. Strategic (11.3); 5. Overrun (11.4); 6. Infiltration (11.5).
d. Conduct Air Transport missions (11.7).
No Air Transport this scenario.
e. Adjust VP Track for VP hexes occupied.
German movement:
- 9 Pz Recon battalion moves north to engage Soviet 131 Recon.
- 619 regimental arty moves south to support 16M, which is stuck on an EZOC maintained by 295 ID.
Everything else holds.
2. Axis Attack Declaration Phase
Declare all attacks and mark Defender Hexes with Declared Attack markers (12.0).
- Element of 9 Pz attacking 131
- 16 Mech and 619 arty attacking 295 ID.
3. Soviet Reaction Phase
a. Motorized units within 3 hexes of defending units may conduct Reaction Movement at 1/2 MA (14.11).
Soviets have 12/1 Gd armor regiment, will move two hexes to support 131, decreasing the attack odds.
b. Artillery support for defender hexes (14.2).
None.
c. Issue Retreat or No Retreat orders (14.3).
None.
4. Axis Combat Phase
a. CAS Missions. Procedure: 1. Axis moves air units to defender hex placing them face down (17.23); 2. Soviet player moves air units from Ready Box to defender hex, face done (17.23); 3. Axis reveals units declaring each mission or firing (17.31.b.2); 4. Axis player resolves air combat in any order (17.33); 5. Both players resolve AA fire (17.4); 6. Convert net remaining CAS points in each mission hex to convert into combat die roll.
9 Pz attacking:
Germans bringing on 1 bomber for CAS, and 1 fighter for air combat support of the bomber.
Axis rolls 3 for Air Initiative, will engage the I-16 defender. The Air Combat Rating for the Bf109F is 4, and 1 for the I-16, net +3 for airc combat differential, Axis rolls 3 and the I-16 is destroyed. This is the first thing which has gone right for the Axis this game. Soviets roll 5 for no effect.
The Soviets do not have AA capable units in the defending hex or any of the 6 surrounding hexes.
He111 provides -1 DRM to combat roll.
b. Provide Attack Supply from designated dumps.
Axis player resolves Declared Attacks in any order (15.2). See playbook for extended sequence of play for combat.
Starting with 9 Pz: no arty support, 5 total attacking, 5 Soviet
defending, final odds 1:1 with -1 net DRM, Axis rolls 2 - 1 for 0/2R
which is a spectacular result, both units take step losses. Soviets
retreat to 1707. Germans advance after combat into hex 1508. (Mistake
here, the CRT goes to 0, and this should have been a 0/1R result.
16 Mech attacking 295 ID:
No CAS from the Germans, the 619 will cannot move the odds to 3:1 so it
will sit out. No DRM for 16M as there is no Pz division handy. Final
odds look like 2:1 with no DRM, roll 5 for 2/0, dang, 16M is mauled
taking the step loss out of 341 Recon Bn and eliminating 156 motorized.
That’s it for German attacks.
5. Axis Motorized Movement phase
a. Motorized and Cav units allowed 1/2 MA. See movement chart.
No motorized movement seems useful at the moment.
b. Allowed movements are Overrun (11.4), Reinforcement Entry (10.13.g) and One hex movement (11.9).
None.
c. Adjust VP Track for any VP hexes captured (25.15).
None.
6. Axis Engineering Phase
a. Turn over on-map Strongpoint Under Construction markers; place new Strongpoint Under Construction markers in allowed hexes (18.31-18.35).
b. Conduct Axis Railroad Conversion (19.2).
c. Place Fortified Line Destroyed markers and remove Strongpoints (18.13).
d. Remove Overrun markers from Soviet Units (11.44).
e. Expend Axis RPs; remove Receiving Replacements markers (7.41). Increase receiving units by number of steps.
f.
g.
h.
i.
j.
C. Soviet Player Segment
The Soviets are in a really good position here to wipe the Germans right off the map. Actually, they don’t really need to do anything at all, as there is pretty much no way the Germans will be able to acheive anything close to victory conditions.
I’m going to play it out through the Soviet turn just to see what happens. I may call the game after this turn, especially if the Germans lose any more steps or any more ground.
Similar to Germans in specific sections, Soviets have slightly different capabilities.
1. Motorized Movement phase
a. Place Receiving Replacements markers on desired on-map units (10.12).
b. Conduct ground unit movement: See Playbook for now, refer to Section 11 in Rulebook.
c. Adjust VP Track for any VP hexes captured (25.15).
2. Soviet Attack Declaration phase
Declare all attacks and mark Defender Hexes with Declared Attack markers (12.0).
Three attacks, 129 and 72 against 33/9, and 1 armor Bg, 12/1 Gd against mechanized units in 9 Pz, lastly 6/1 Gd and 295 ID against 16 Mech.
3. Axis Reaction Phase
No reaction movement by Germans this phase.
4. Soviet Combat Phase
-
129 Bg and 72 Cav against 33/9 Pz, 3:1 roll 1,
0/3Rand the Germans just don’t get a break at all. -
Gd and 1 Bg armor lose CAS from German AA, odds 2:1 roll 3
0/1again for the Soviets! -
6/1 and 175/1 Gd with 295 ID against 341/16 and 60/16, with 619 in defensive support (ha!), final odds 10:5 which is 2:1 roll 9 for
1R/0, finally, a roll for the Germans, way too little and way too late for this game.
5. Soviet Movement phase
a. Turn Bridge units from their Under Construction side to their active side if across non-major river (PB 4.55d).
b. Conduct ground unit movement:
-
All unit types are allowed to move except: Units with Activation markers; Units with Receiving Replacements markers; Armored trains that moved in the motorized movement phase.
- Movement procedures allowed: Reinforcement Entry (10.13.g); Armored Train (10.14); One-hex movement (10.5.3.exception); Railroad (11.1); Overrun (11.4); Strategic (11.3); Infiltration (Cavalry) (11.52.b).
- Zap Unit Infantry Rebuilding. A Zap unit may add one Type I step to an eligible unit during the Soviet Movement Ohase (7.22.c.2).
Note motorized units move at one-half MA (See Movement Phase Chart).
c. Air Transport movement (11.7).
d. Adjust VP Track for VP hexes regained (25.12).
6. Soviet Engineering Phase
Same as Axis engineering phase except:
a. Soviet engineers speed strongpoint construction (23.11) and are required for Soviet railroad conversion.
b. Cutting Axis rail lines (19.4).
c. Remove Overrun markers from Axis units (11.44 note).
d. Destroy Dnepr River bridges printed on the map (PB 4.53).
e. Spend Soviet RPs to remove Receiving Replacements markers from on map units (7.4.1) and increase each receiving unit by one step.
f. Spend Soviet RPs to move units from the Cadre Box to the Active Box, or the map (7.4.3.d).
g. Spend Soviet RPs to move units from the Eliminated Box to the Cadre Box.
h. Eliminate excess ASPs at Kiev (PB 10.2.4.b).
7. Soviet Surrender Phase
a. Perform surrender chekcs. Units that fail are placed in the Eliminated Box (21.0).
b. Adjust Step Loss and VP Tracks as needed (25.13).
D. Game-Turn Record Interphase
-
Remove all Activated markers.
-
Soviet player performs Non-op HQ recovery or disbandment (22.26.b).
-
Axis player converts each Mandated Attack not yet made into VPs for any VP hex captured during the turn and still held at the end of the Soviet Player Segment; adust the VP Track (7.26.a.2).
-
Move the Game-Turn marker ahead by one box on the Turn Record Track.
AAR
Ok, that was pretty brutal for the Germans. The CRT is bloody at low odds, and has a weird structure such that DRMs may not always be useful. The Germans rolled very badly in both turns, while the Soviets rolled really well in both turns. If this were to play out all four turns, I suspect the Germans would be annihilated.
Not sure what to think about this yet. I suspect it requires playing out much larger scenarios to see the balance.
Here’s what it looked at the end:
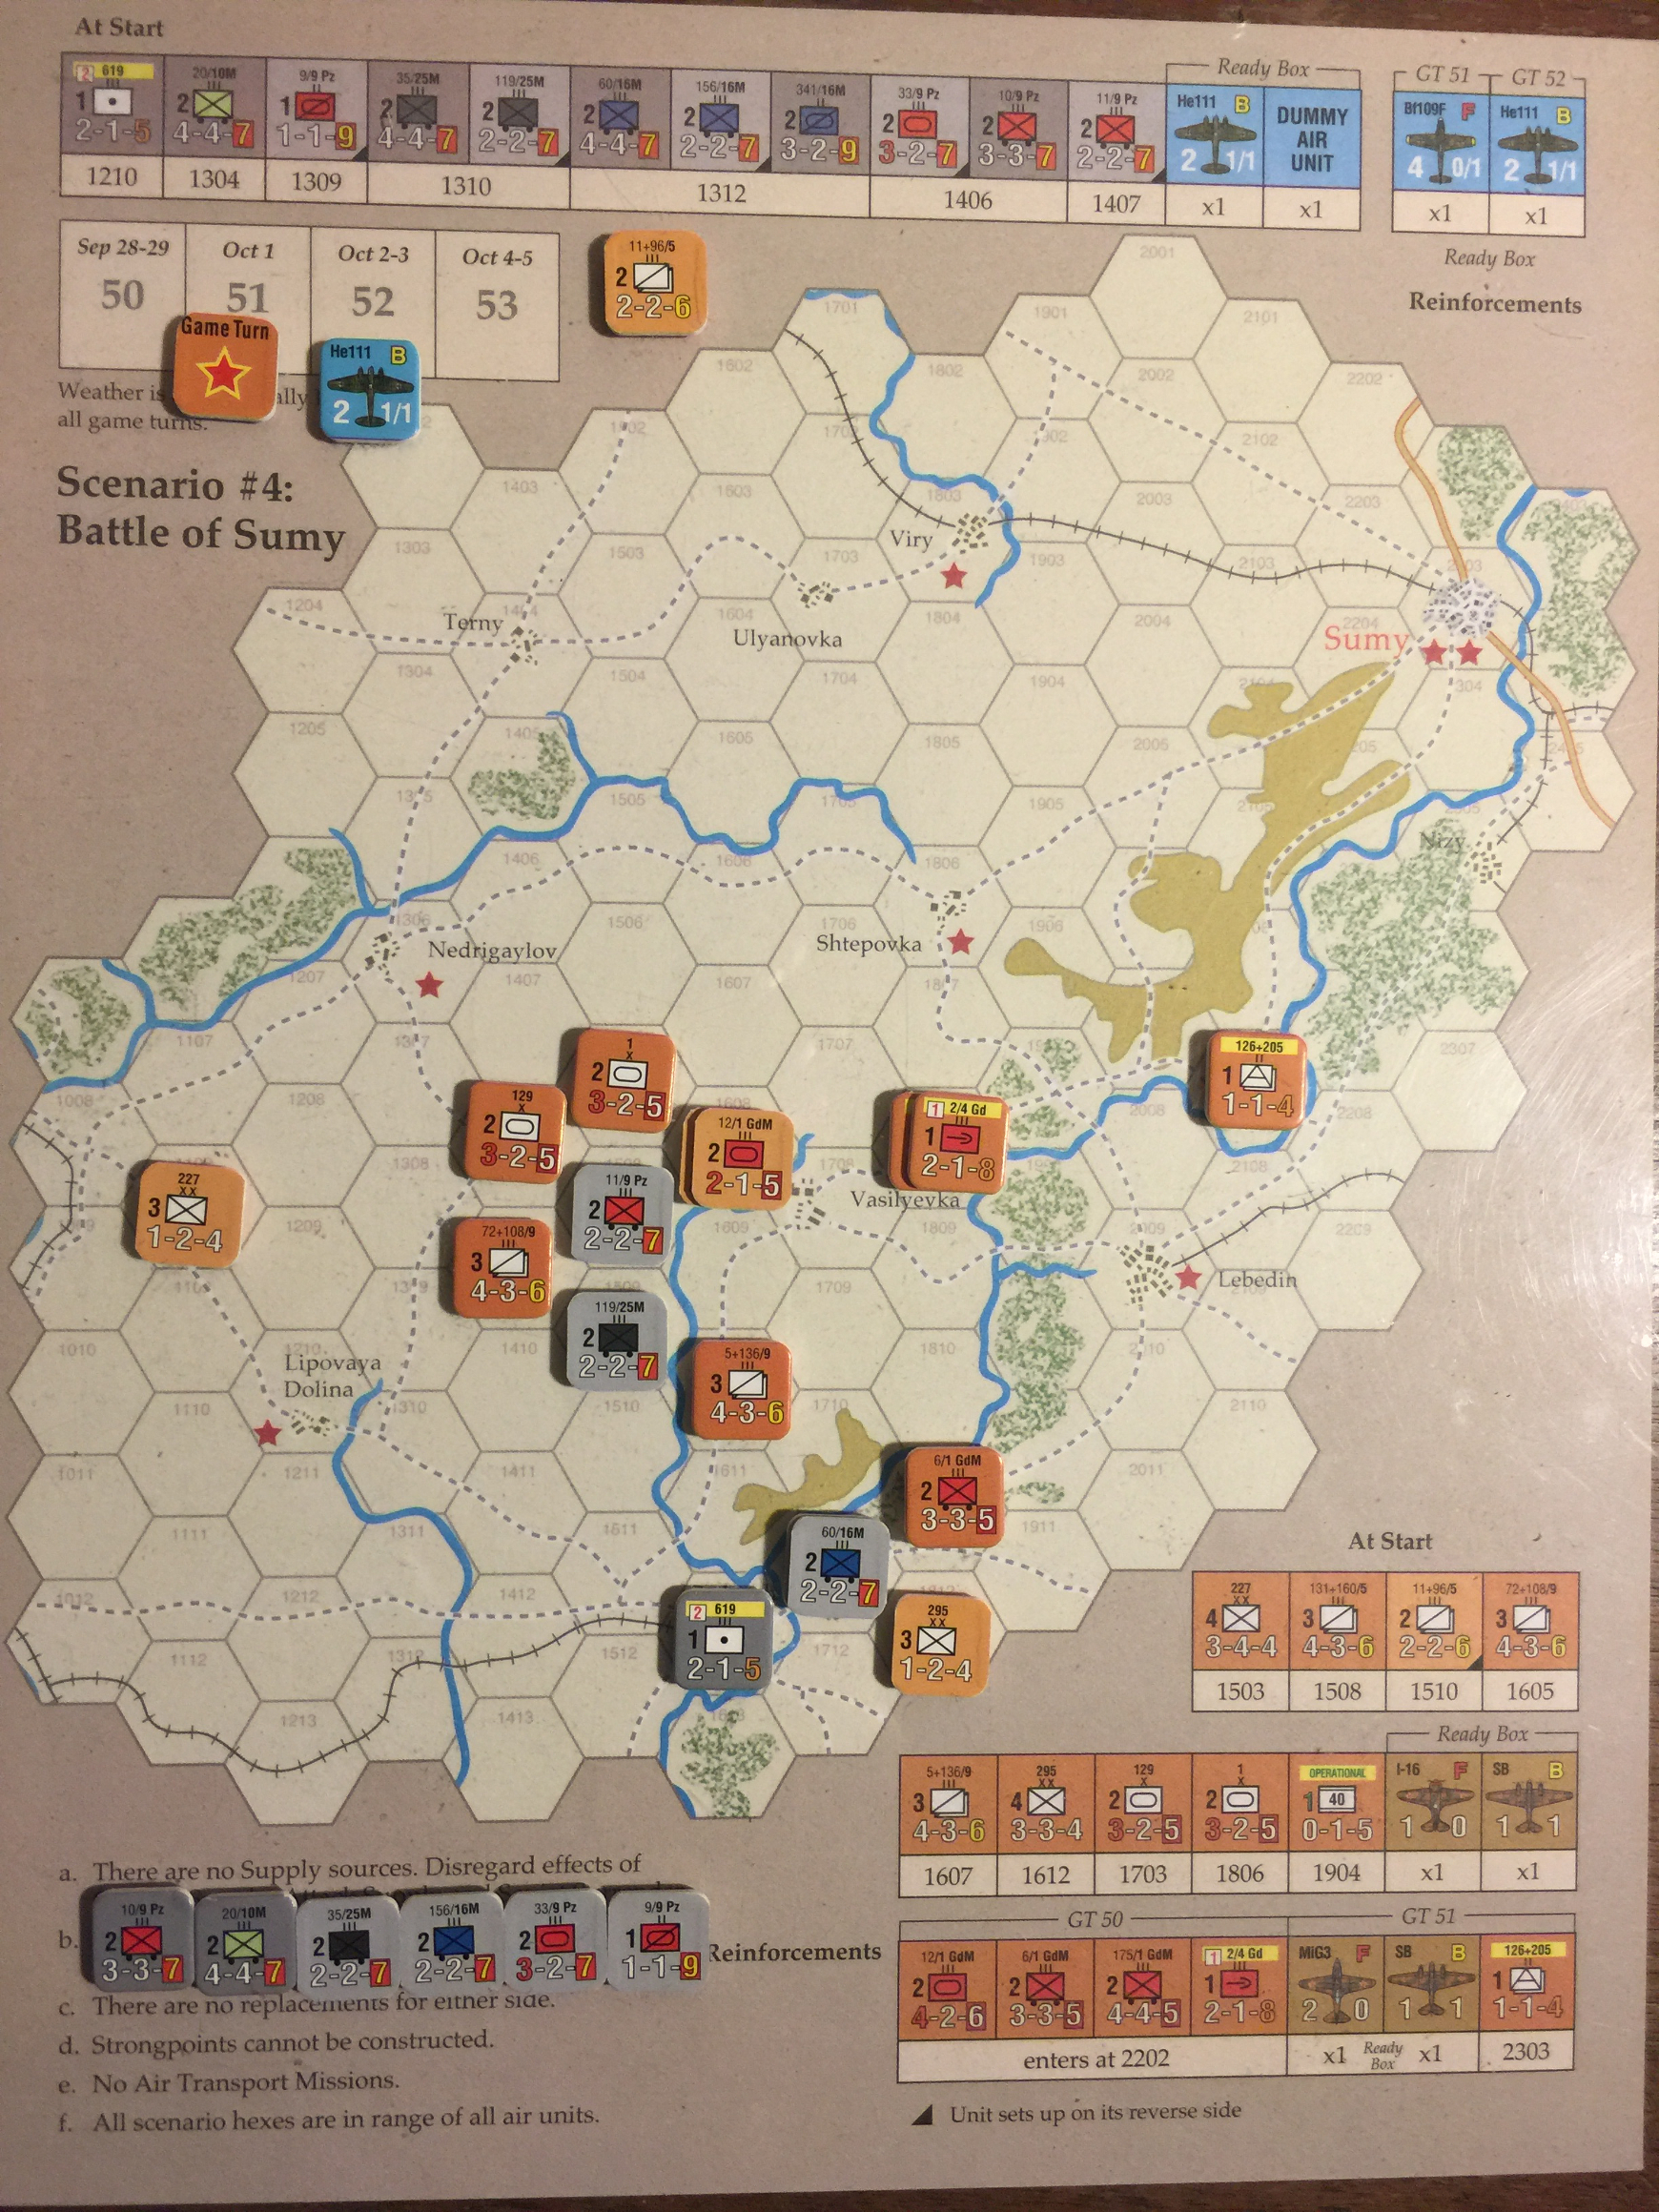
The row of German counters at the bottom are the eliminated units. Compare to the single Soviet eliminated unit up by the Turn Track.