StarForce 15 - The Colonization War (1)
Update: 2023-08-27: I don’t believe I played combat correctly. There should have been more CBR losses than I recorded.
From contributor John Garrett, a solitaire scenario:
I feel that the major drawback of the Starforce game is that there is only the one solitaire scenario (Rescue Mission 38.0) even though the basic game utilises a simple CRT. Therefore, the following scenario came into being. (42.0) The colonisation war.
Here are the accompanying rules.
(42.0) The Colonization War
(42.1) Introduction
In 2227. before the advent of the Solar Hemogeny and the L’Chal-dah, Rare starships had explored and colonised many of the surrounding star systems. However, there was a great deal of dissent against the home-orientated government (C.B.R.) and in 2229, incensed by the high level of taxation on mineral exploration, a committee of a new colonial rights council (C.R.C.) was established on HR 7703. Terrified at the unity this group had achieved, the C.B.R. asked for a delegation to be sent to discuss terms. The C.R.C. however unwittingly sent all their major leaders to the conference in a single starship as an act of good faith and the perfidious C.B.R. destroved the ship and taking advantage of the C.R.C.’s mornentary disunity, attacked at once and in a short campaign ruthlessiv subdued the revolt. However, the loss of so many telesthenics was a severe setback to colonisation plans, the government itself being overthrown in the people’s war the following year.
(42.2) Orders of battle and deployment
C.B.R. player
| Star systems and stargates | Starforces | I.D.code |
|---|---|---|
| 2036/+1 (70 Ophiuchi) | 4 | (1) |
| 1734/+14 (BD + 45) | 2 | |
| 1636/-8 (36 Ophiuchi) | 2 | (4) |
| 1637/-8 (CD - 26 ) | 0 | (3) |
| 1938/-7 (CD - 21 ) | 0 | (2) |
C.R.C. forces
| Star systems and stargate | Starforces | I.D.code |
|---|---|---|
| 2833/-11 (HR 7703) | 5 | (B) |
| 2734/42 (Altair) | 3 | (C) |
| 2537/42 (BD + 4) | 2 | (E) |
| 2433/-14 (Luyten 347-14) | 0 | (D) |
| 2832/-14 (CD 45) | 0 | (A) |
(42.3) Special rules
Only the Strategic CRT is used. The C.B.R, player moves all of his units first and then rolls for each C.R.C. starforce individually and moves them all before combat is resolved.
(42.4) Victory conditions
The C.B.R. plaver must neutralise all the C.R.C. stargates by game-turn 6 or he auto. matically loses the game. The C.B.R. player also loses any of his stargates are neutralised.
(42.5) C.R.C. movement table
| Starting point | ID | 0 | 1 | 2 | 3 | 4 | 5 | 6 | 7 | 8 | 9 |
|---|---|---|---|---|---|---|---|---|---|---|---|
| CD-45 | (A) | A | B | D | E | C | D | B | C | E | D |
| HR 7703 | (B) | E | 2 | A | D | B | 2 | A | D | B | C |
| Altair | (C) | B | E | 1 | C | A | 1 | C | E | 1 | D |
| Luyten 347 | (D) | A | 2 | D | 4 | B | E | A | 3 | C | B |
| BD + 4 | (E) | D | 1 | A | 1 | C | E | B | C | E | 1 |
Explanation For everv starforce a chit is drawn individually and is cross referenced on the table with its starting point to find the I.D, code of its new position. The chit is then replaced and another one drawn for the next starforce. If the stargate at the point of destination has been neutralised the starforce stays put.
(42.6) Rationale
This game was devised to be played quickly and simply yet still provide a challenge to a more experienced player. It is also intended to present a position not unlike standard 2-D with a few diversified strategies.
Here’s the setup:
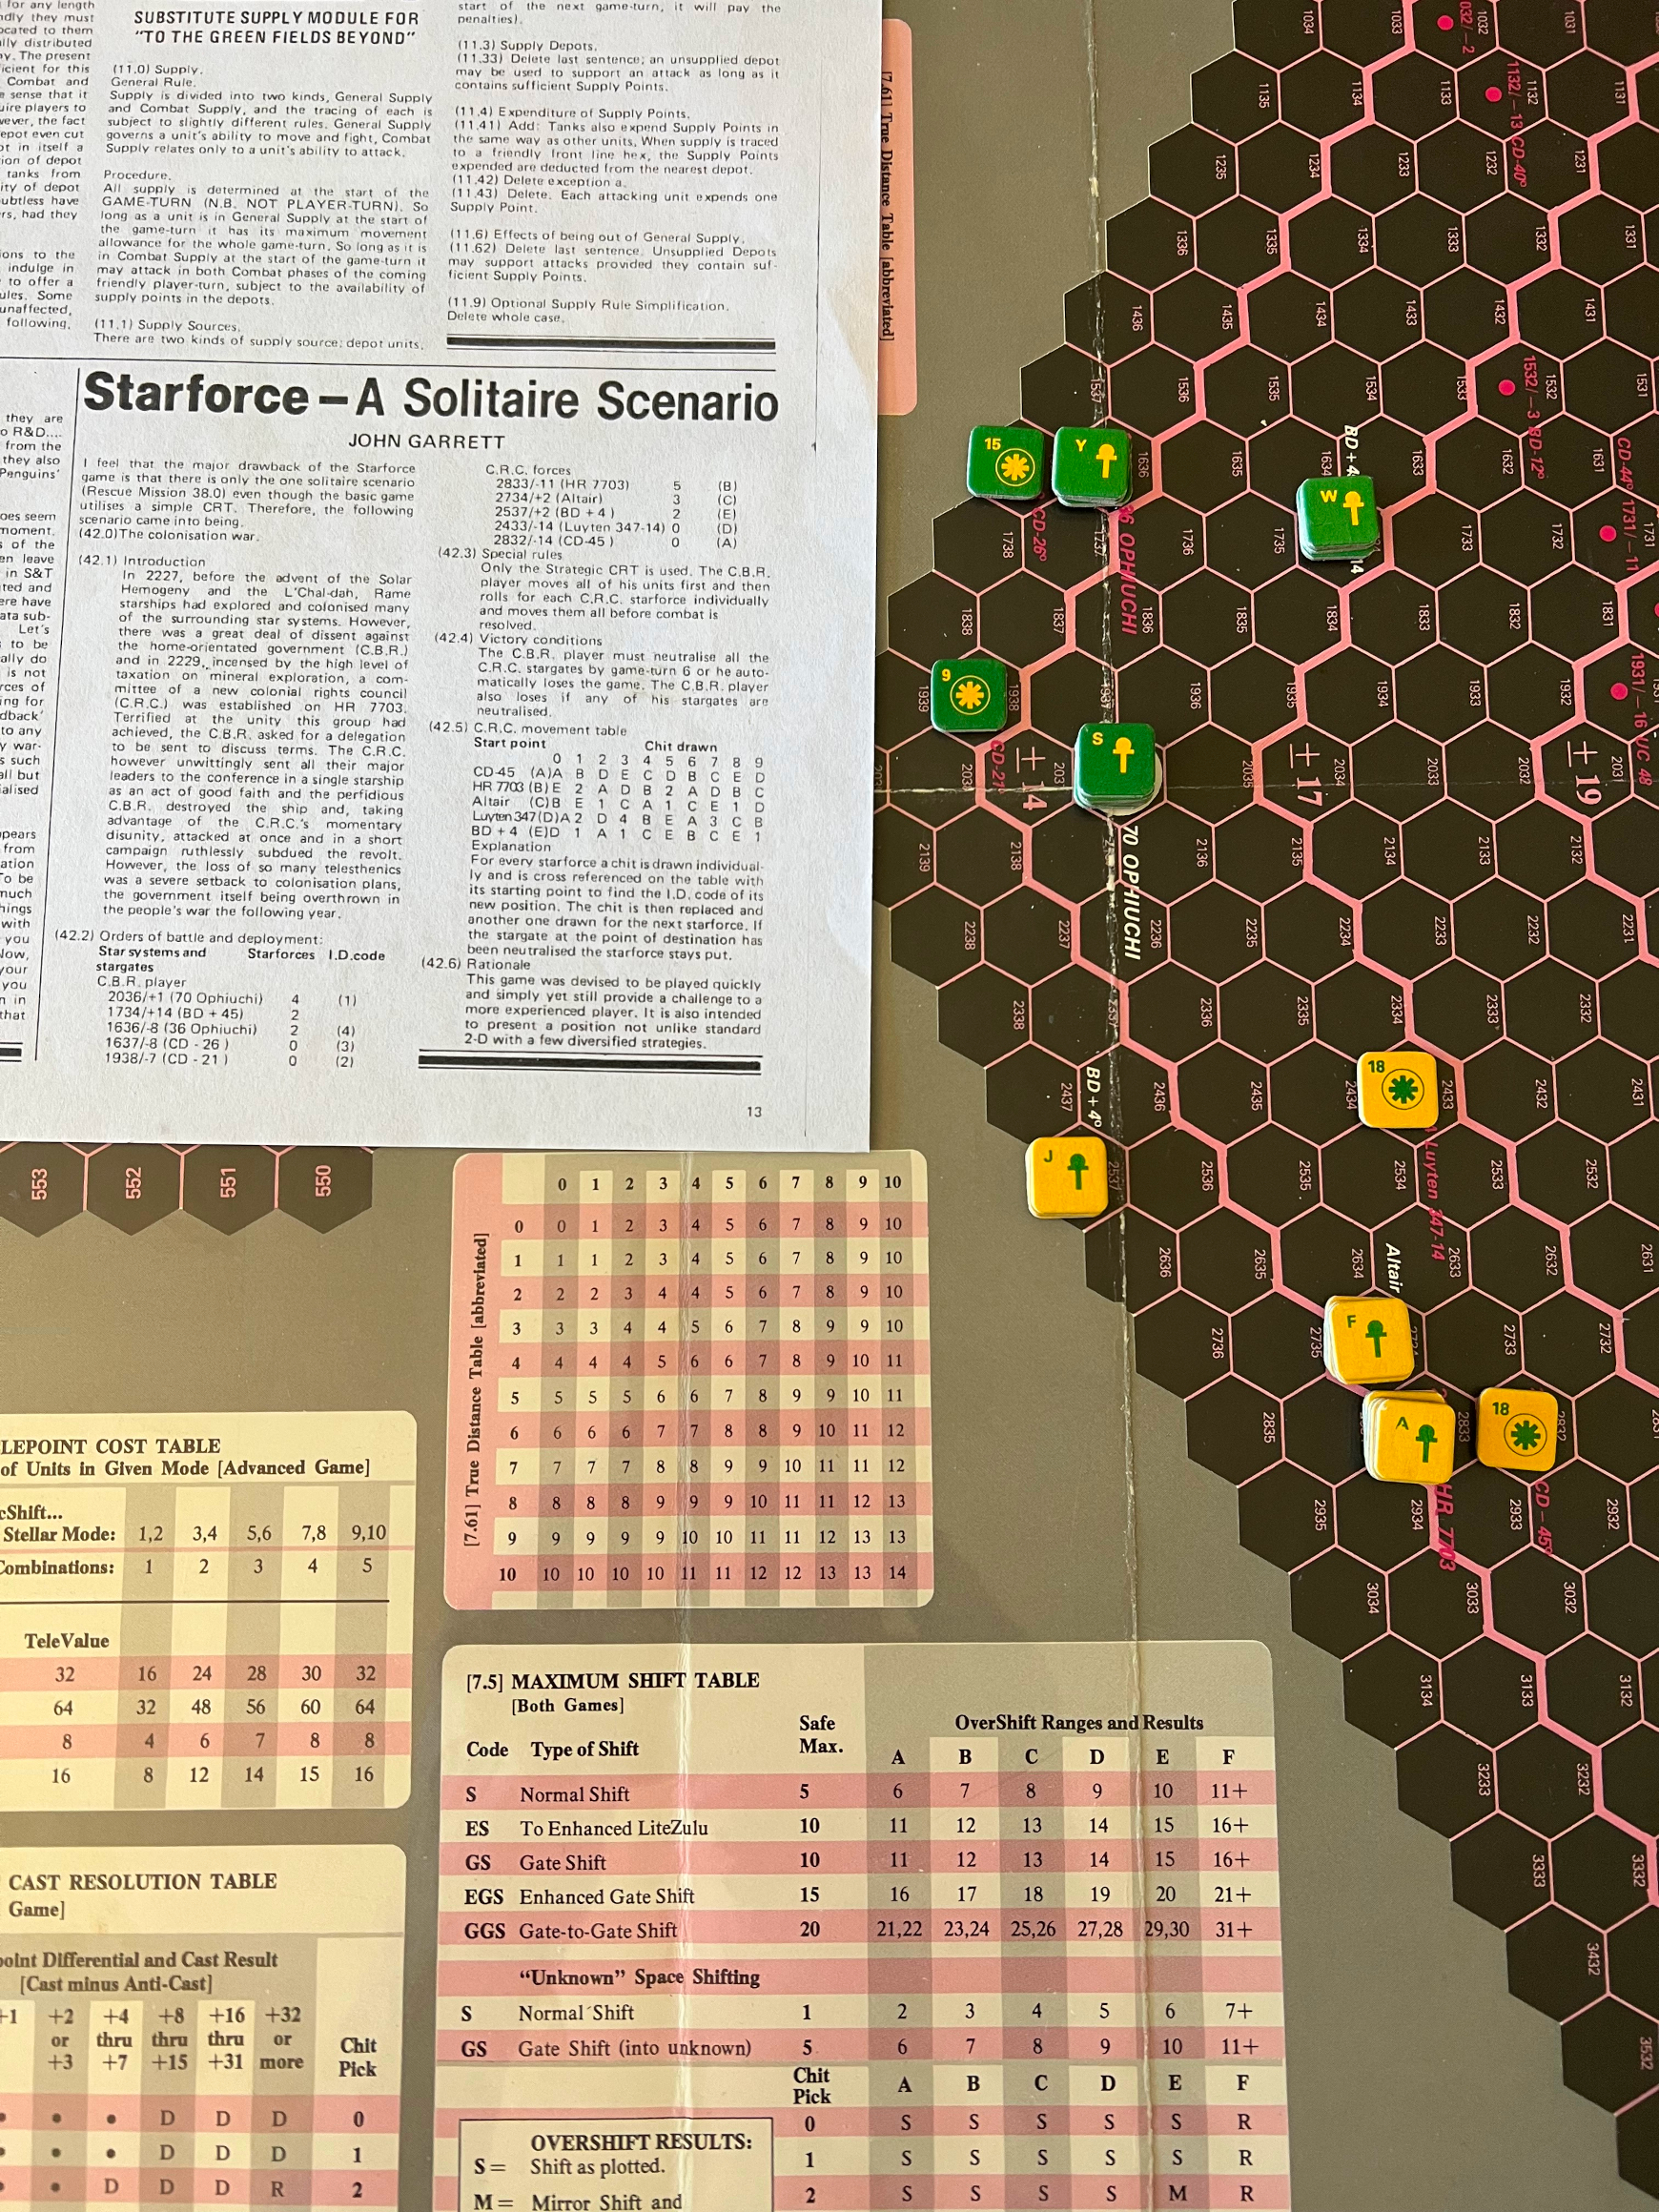
The player takes the role of the CBR faction, shown as the green counters, and moves first. They need to neutralize all the CRC stargates in 6 turns. Given the distance, I think this might be difficult.
The CRC is shown with yellow counters with the chart above governing the movement of the CRC.
Turn 1
Moved everything, but it’s hard to keep track of which starforces moved where, and which systems are called what. Had to take some time to figure out how to log it, and made some map markers.
Combat will be at Locations 2 and E.
Location 2: This is a bare stargate with strength 5 after the first round.
- Round 2: SG defend 3, attack 2, CRC B attack 3, defend 0. SG roll 2 for elimination of B, who cannot damage SG as it needs a result of 2 to be neutralized.
Location E: There are 4 CRC units and 1 CBR.
- First round: CBR defend 5, attack 3; CRC attack 2, defend 0. CBR roll eliminates D automatically, CRC roll 0 for no effect.
- Second round: CBR 8 defense, 4 attack; CRC SG 5 attack 0 defense. CRC roll 4 for no effect, CBR roll 7 for 3 which neutralizes Stargate at Location E.
And that’s it for Turn 1.
Turn 2
Moves are much smoother this turn. Combat at Locations 2, 4, and E.
Location 2: With the Stargate, there is no first round combat.
- Round 2: SG defend 3, attack 2; starforce F attack 3 defend 0. No effect from CRC attack, CBR roll 3 to eliminate F.
Location 4: defending starforce present.
-
Round 1: CBR attack 0, defend 2; CRC attack 2, defend 0. CBR roll 0 for no effect, CRC roll 7 to eliminate Z.
-
Round 2: SG defend 3, attack 2; CRC unit C attack 3 defend 0. CRC roll for no effect. CBR roll 2 elininate unit C.
Location C: There is a defender and a stargate.
-
Round 1: CBR defend 3, attack 3; CRC attack 3, defend 0. CBR roll 0 eliminate J. CRC roll 5 for no effect.
-
Round 2: CBR defend 8, attack 4; stargate attack 5, defend 0. CBR roll 3 to eliminate stargate, CRC roll 5 for no effect.
Two stargates down, three to go. I think it’s going to require overshifting to get to the remaining.
Let’s try another turn.
Turn 3
I’ve been Doing It Wrong. It costs 4 movement to enter a hostile stargate, which means overshifting, or stopping right next to it then shifting in next turn. Will continue the play doing it correctly from here out.
There is only combat at Location 2, with only a stargate there.
Location 2:
- Round 2: Defend 3, attack 2; CRC H attack 3, defend 0. CBR roll 2 which eliminates.
That’s Turn 3. Onward.
Turn 4
I’ll be lucky if I can get my starforces close enough for next turn, otherwise it will come down to the last turn.
Location 1: CRC ships A and K defended by CRB Y.
- Round 1: CRB attack 2, defened 0; CRC attack 4, defend 0. CBR roll 8 eliminates both A and K, CRC roll 9 eliminates Y.
This is interesting, as there is a chance of getting 2 more CRC ships at 1, which would be very bad news for the stargate there.
But that’s the turn. Onward.
Turn 5
I could still lose this game.
Location D: 2 CBR take on a stargate, and probably lose.
- Round 1: stargate defend 5, attack 0; CBR attack 6, defend 0. CBR roll 8, stargate eliminated.
Let’s crank it out.
Turn 6
Location A: no enemy starforces, proceed to round 2.
- Round 2: Stargate defend 5, attack 0; CBR attack 6, defend 0. CBR roll 2, no effect. This continues until rolling 7, 8. 9, which took two more rolls.
Location B:
- Round 2: stargate defend 5, attack 0; CBR attack 9, defend 0. This is an auto kill.
A notional win, but I played movement wrong. This was interesting enough to play again, at least one more time.
AAR
Here is a conundrum. Suppose I have two starforces who shift into an lz with only a hostile stargate. Combat will ensure, starting “round 2.” Suppose the stargate declares defense 5 and attack 0, and my starforces declare attack 6 and defense 0.
On the face of it, no problem.
However, the CRT states “Attacking Strength Points less Defending Strength Points.”
0 - 0 = 0.
Examining the 0 column, the stargate can whittle down the attackers.
I’m probably missing something in the rules, but I don’t see it, and it’s odd and entertaining enough I thought I’d toss it out to see what anyone might think.
Update 2023-08-27: See the discussion here, and Case 8.53 in the rules.