OCS Luzon
I haven’t played any OCS since Burma Black Cats White Tigers in 2020. The events of 2020 (covid, puke) put me off of a lot of games in general, and haven’t mustered the time or energy to deal with OCS since then. But I like the OCS system a lot, and would really like to get at least one OCS game in per year, so let’s take a look at Luzon.
Game Turn 1 December 22, 1941
Briefly summarize the upcoming turn for both sides.
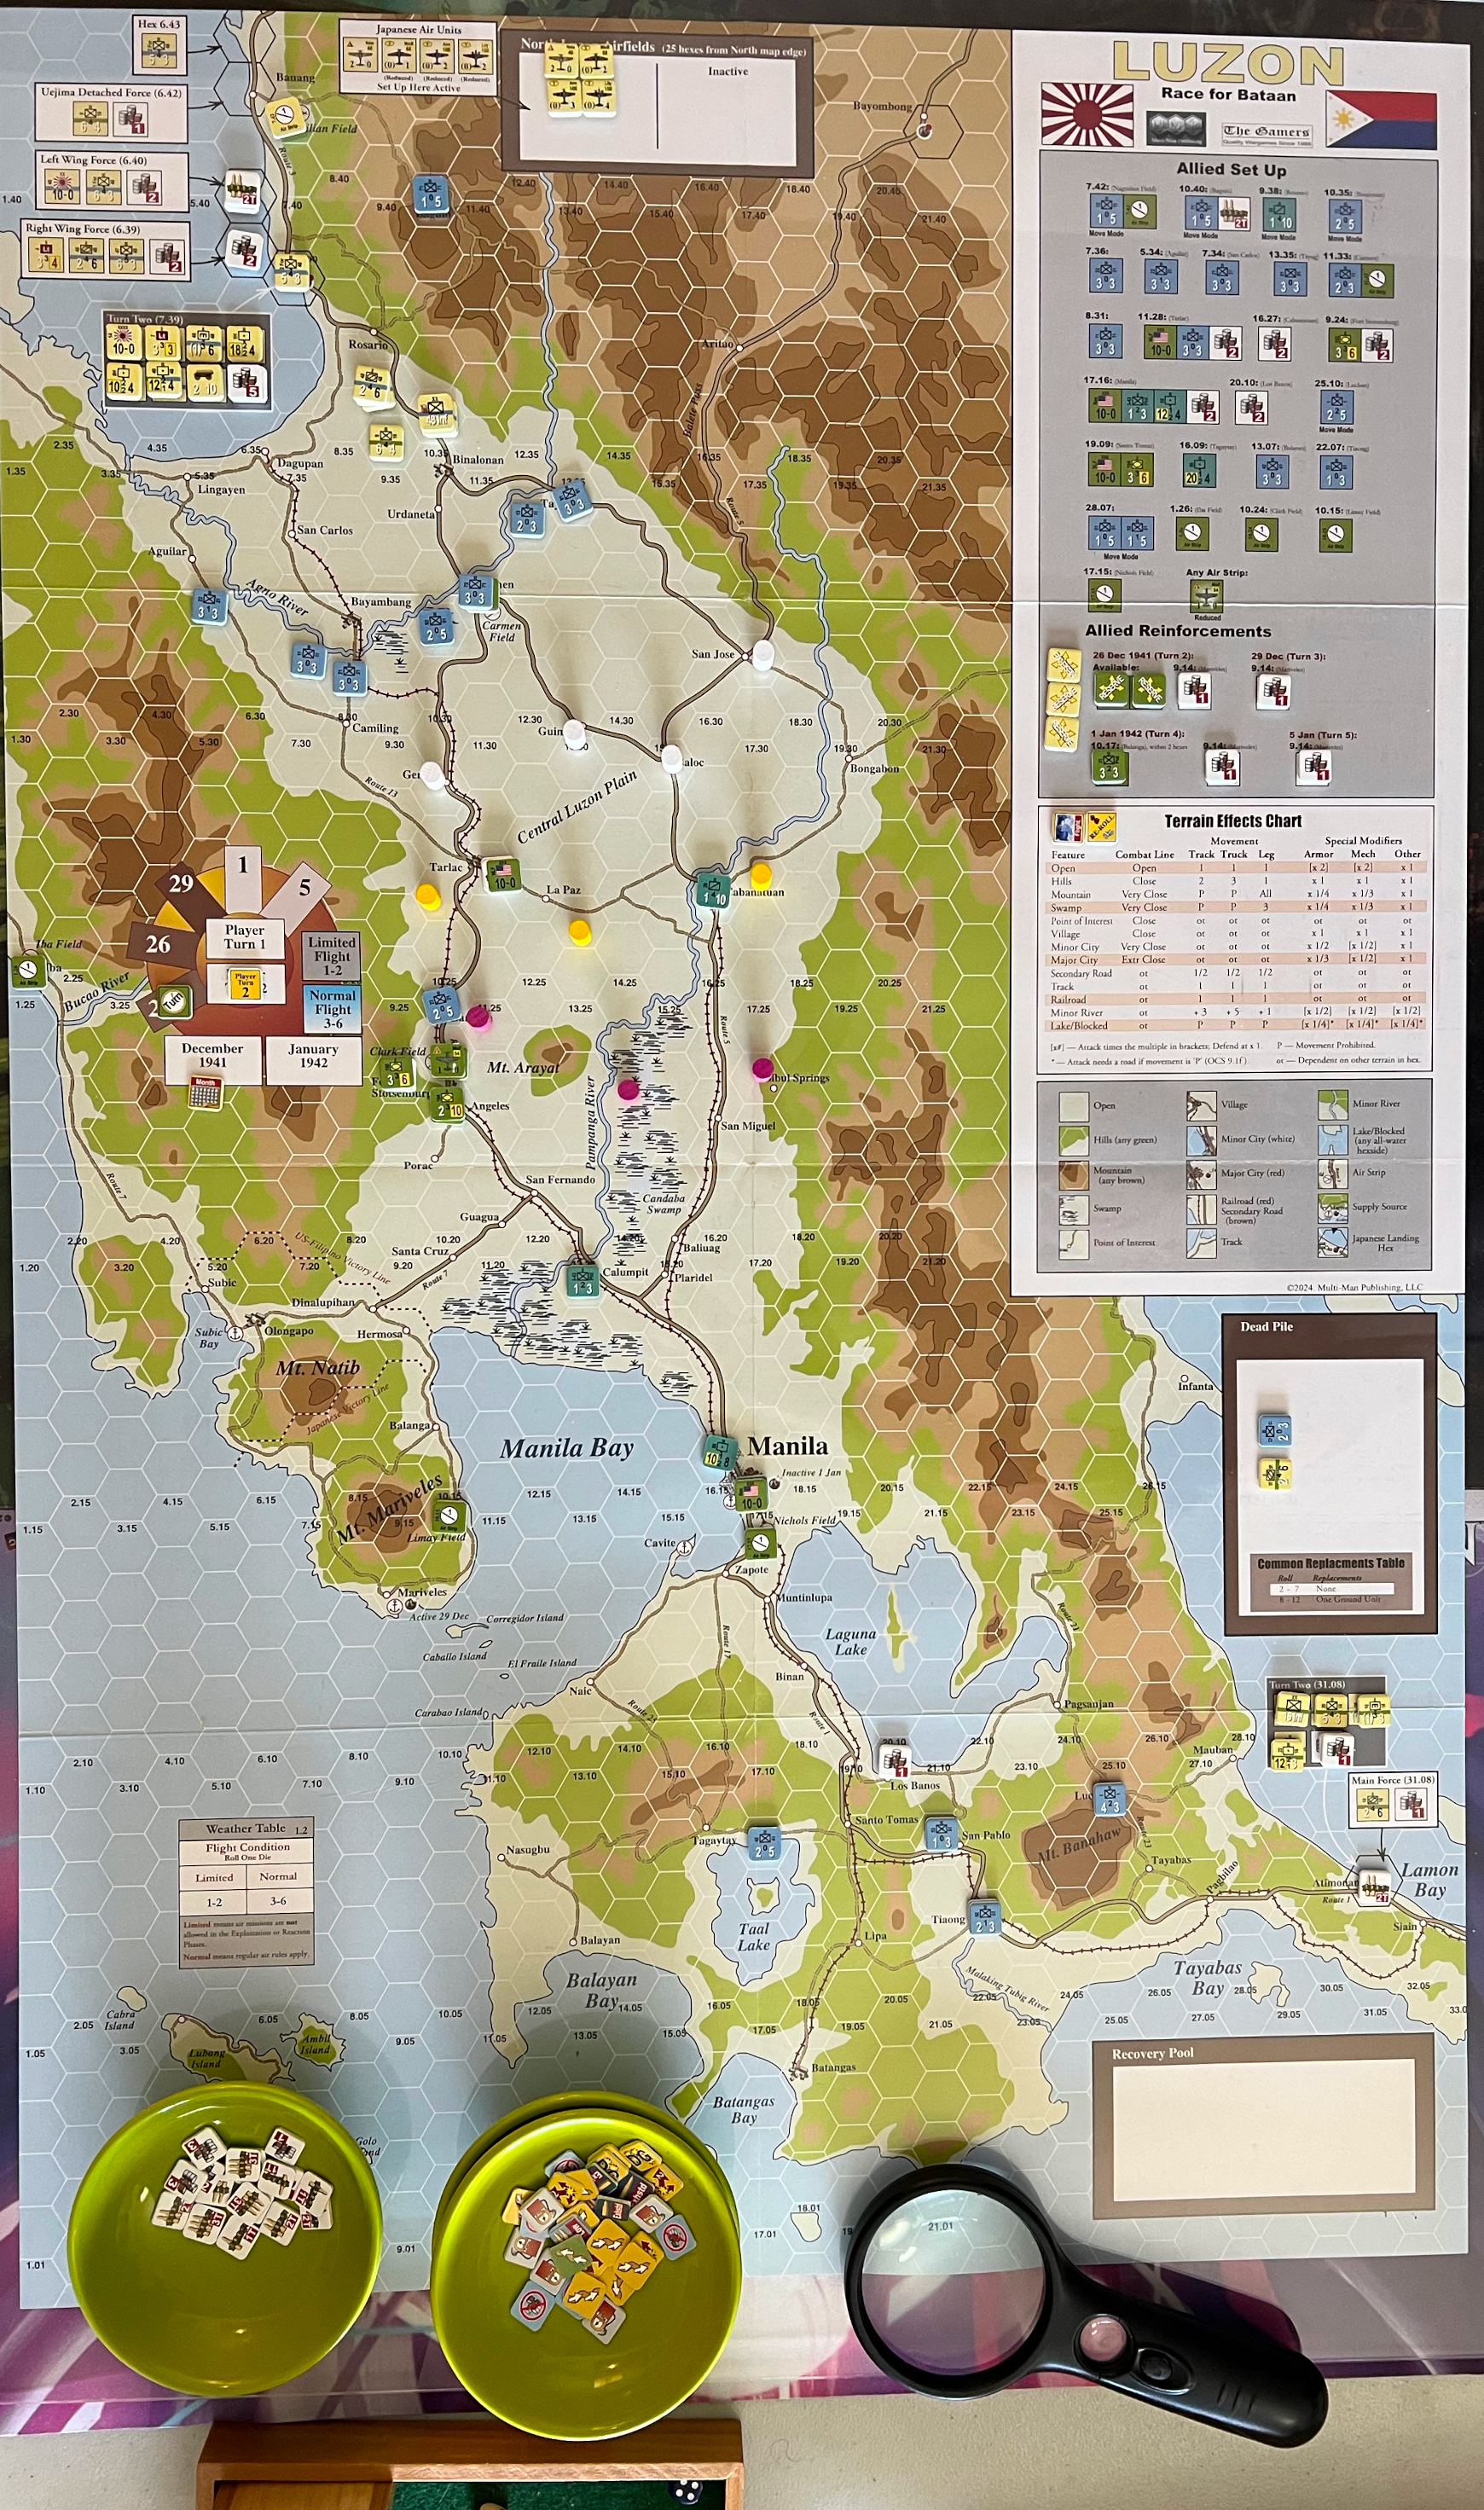
It’s December 22, 1941. The Japanese have landed at Lingayen Gulf, a bay northwest of Manila on the island of Luzon, The Philippines.
Pre-Turn Phase
- Weather determination (2.3, probably on map)
- First player determination, roll d6 highest has initiative, reroll for tie (2.3).
Weather roll 6 for clear weather.
The Japanese have the initiative for Turn 1 by the game-specific rules.
Japanese Turn 1
Brief summary of Japanese goal this turn.
This is split between the 48th division (Sea) in the north landing at Lingayen, and the 48th division (Hedge) landing at Lamon Bay in the south.
Lingayen Gulf forces primary objective is getting everyone as far south as possible to ensure the remainder of the forces will be able to land unimpeded on Turn 2.
Lamon Bay forces pursue a similar strategy, get everyone out of the way to allow Turn 2 landings by the remainder of the force.
Reinforcement
Per scenario specification or reinforcement track.
No reinforcements Turn 1.
Movement
- Movement segment (6.0): 1/2 for DG (5.10), 1/4 for Reserve (5.7)
48th division All onshore and moving south to contact.
16th division, onshore and moving to Pagbilao since the defenders there are not in position (defenders are in Move mode). This will be a 1-1 fight, but the morale difference will matter.
- Air/Naval Barrage segment (10.2, 10.3)
Will hold off on Air barrage this turn in favor of attempting to get some Exploit results from combat, which would allow further movement.
Trace Supply
Japanese are in trace on the first turn.
Reaction phase
- Non-phasing player releases Reserves (5.7), destroy dumps (12.11).
- Non-phasing player barrage (all types, 10.0) and transport.
US forces have nothing in Reserve.
Combat phase
- Artillery barrage (10.1, no Air or Naval barrage)
- Combat segment (9.0, artillery units strength [1] per 13.4b)
Starting from the south:
-
The 16/16 attacks the 51/51 and 52/51 east of Pagbilao. Odds are 1-1 with 4 shift on Action Rating. Terrain is Close due to defenders being in a Hill hex. Surprise roll is 7 + 4 which is Surprise, roll 1 for right shift. Bummer. Roll 3 + 4 for 7 (dang!) for
AL1o1andDo1. This is an attacker eliminated result. The defenders take the retreat anyways. -
Dagupan: Odds 4:1 in Open terrain, Surprise roll 5 + 4 for no Surprise, roll 4 + 4 = 8 with result
Ao1andD1Lo1. Really crap rolls! Chewing through supply for no benefit! -
Rosario: Odds 12-1, defender in hills, but the Action Ratings are both 4. Surprise roll 7 for no surprise. Combat roll 11 (finally!) for
Ae3andDL2o2DG, which is of course an elimination for the Philippine scouts, but they’ll be back. -
Naguilian Field: Odds 5:1 with defenders in hills which is Close terrain. Surprise roll 10 + 4 which is surprise with a 5 shift right. This will be on the 15:1 column, roll 7 + 4 (Action Rating) which is 11, result
Ae3andD2L2oDG. Excellent results, this is what I’ve wanting, lots of Exploit results.
Exploitation phase
Binalonan: the forces at Rosario advance, will engage a
defender in the village, which is Close terrain. Odds are 12:2
which is 6:1, roll 6 + 4 for Attacker Surprise, with shift 6 right.
This is column 18:1. Dang. Roll 10 + 4 for Ae2 and DL2o3DG.
I don’t think I’ve ever been this far to the right on the OCS
CRT before. That’s an elimination of course. Chewing down that
supply, will be interesting to see how far it goes.
Japanese clean Up phase
- Remove DG and Exploitation markers.
- Flip or remove Fueled markers.
- Remove train-busting placed by Allied player.
US Turn 1
Brief summary of Allies goal this turn.
Per the historical situation, Allies will start the “fighting retreat,” attempt to protect Manila from the south as best as possible, and delay Japanese entry to Manila from the north until after Turn 3. They might try to get some of the southern forces over to Bataan while it’s still possible. We’ll see how it plays out.
Aircraft refit
Cost 1T to refit any air base regardless of level or number of aircraft (15.1B)
None.
Reinforcement
Per scenario specification or reinforcement track.
No reinforcements Turn 1, but might be able to score some Replacements.
-
Luzon-specific rules: Combat and attrition elimination goes into Recovery Pool, whence a unit may be drawn randomly. In this case, draw 26 Scouts regiment, which is exactly what I wanted. Place in 16.17 2 hexes north of Manila. Remaining units go to Dead Pool.
-
Replaments roll 8 for 1 replacement unit, will rebuild the 23/21. Place in Hermosa 9.19, 2 hexes north of Balanga.
This is awesome.
Movement
- Movement segment (6.0): 1/2 for DG (5.10), 1/4 for Reserve (5.7)
- Southern units moved towards Manila, with some moved beyond Manila try and get as far north as possible to slow down the Japanese advance.
- Air/Naval Barrage segment (10.2, 10.3)
No Air barrage this turn, will save supply and there no adjacant units useful for spotting.
Trace Supply
This phase does:
- Determine which units are in or out of Trace Supply (12.6)
- Replenish low or exhausted internal stocks (12.10)
All Allied units are in Trace.
Reaction phase
The Japanese need to consider putting some units in Reserve next turn.
Combat phase
No combat, it’s a fighting retreat! Might stay engaged next turn, we’ll see.
Exploitation phase
None.
US clean up phase
- Remove DG and Exploitation markers.
- Flip or remove Fueled markers.
- Remove train-busting placed by Axis player.
Nothing to do.
End of Turn 1
Briefly recap the turn for both sides.
Overall, not too shabby for the Allies considering they pulled an excellent Scout regiment back from the dead pool, and got lucky on the die rolls to rebuild another unit.
The Japanese had a bit more of fitful start, rolling stupid bad on the first few combats, which induced both losses and retreats when the expected outcome was Exploit.
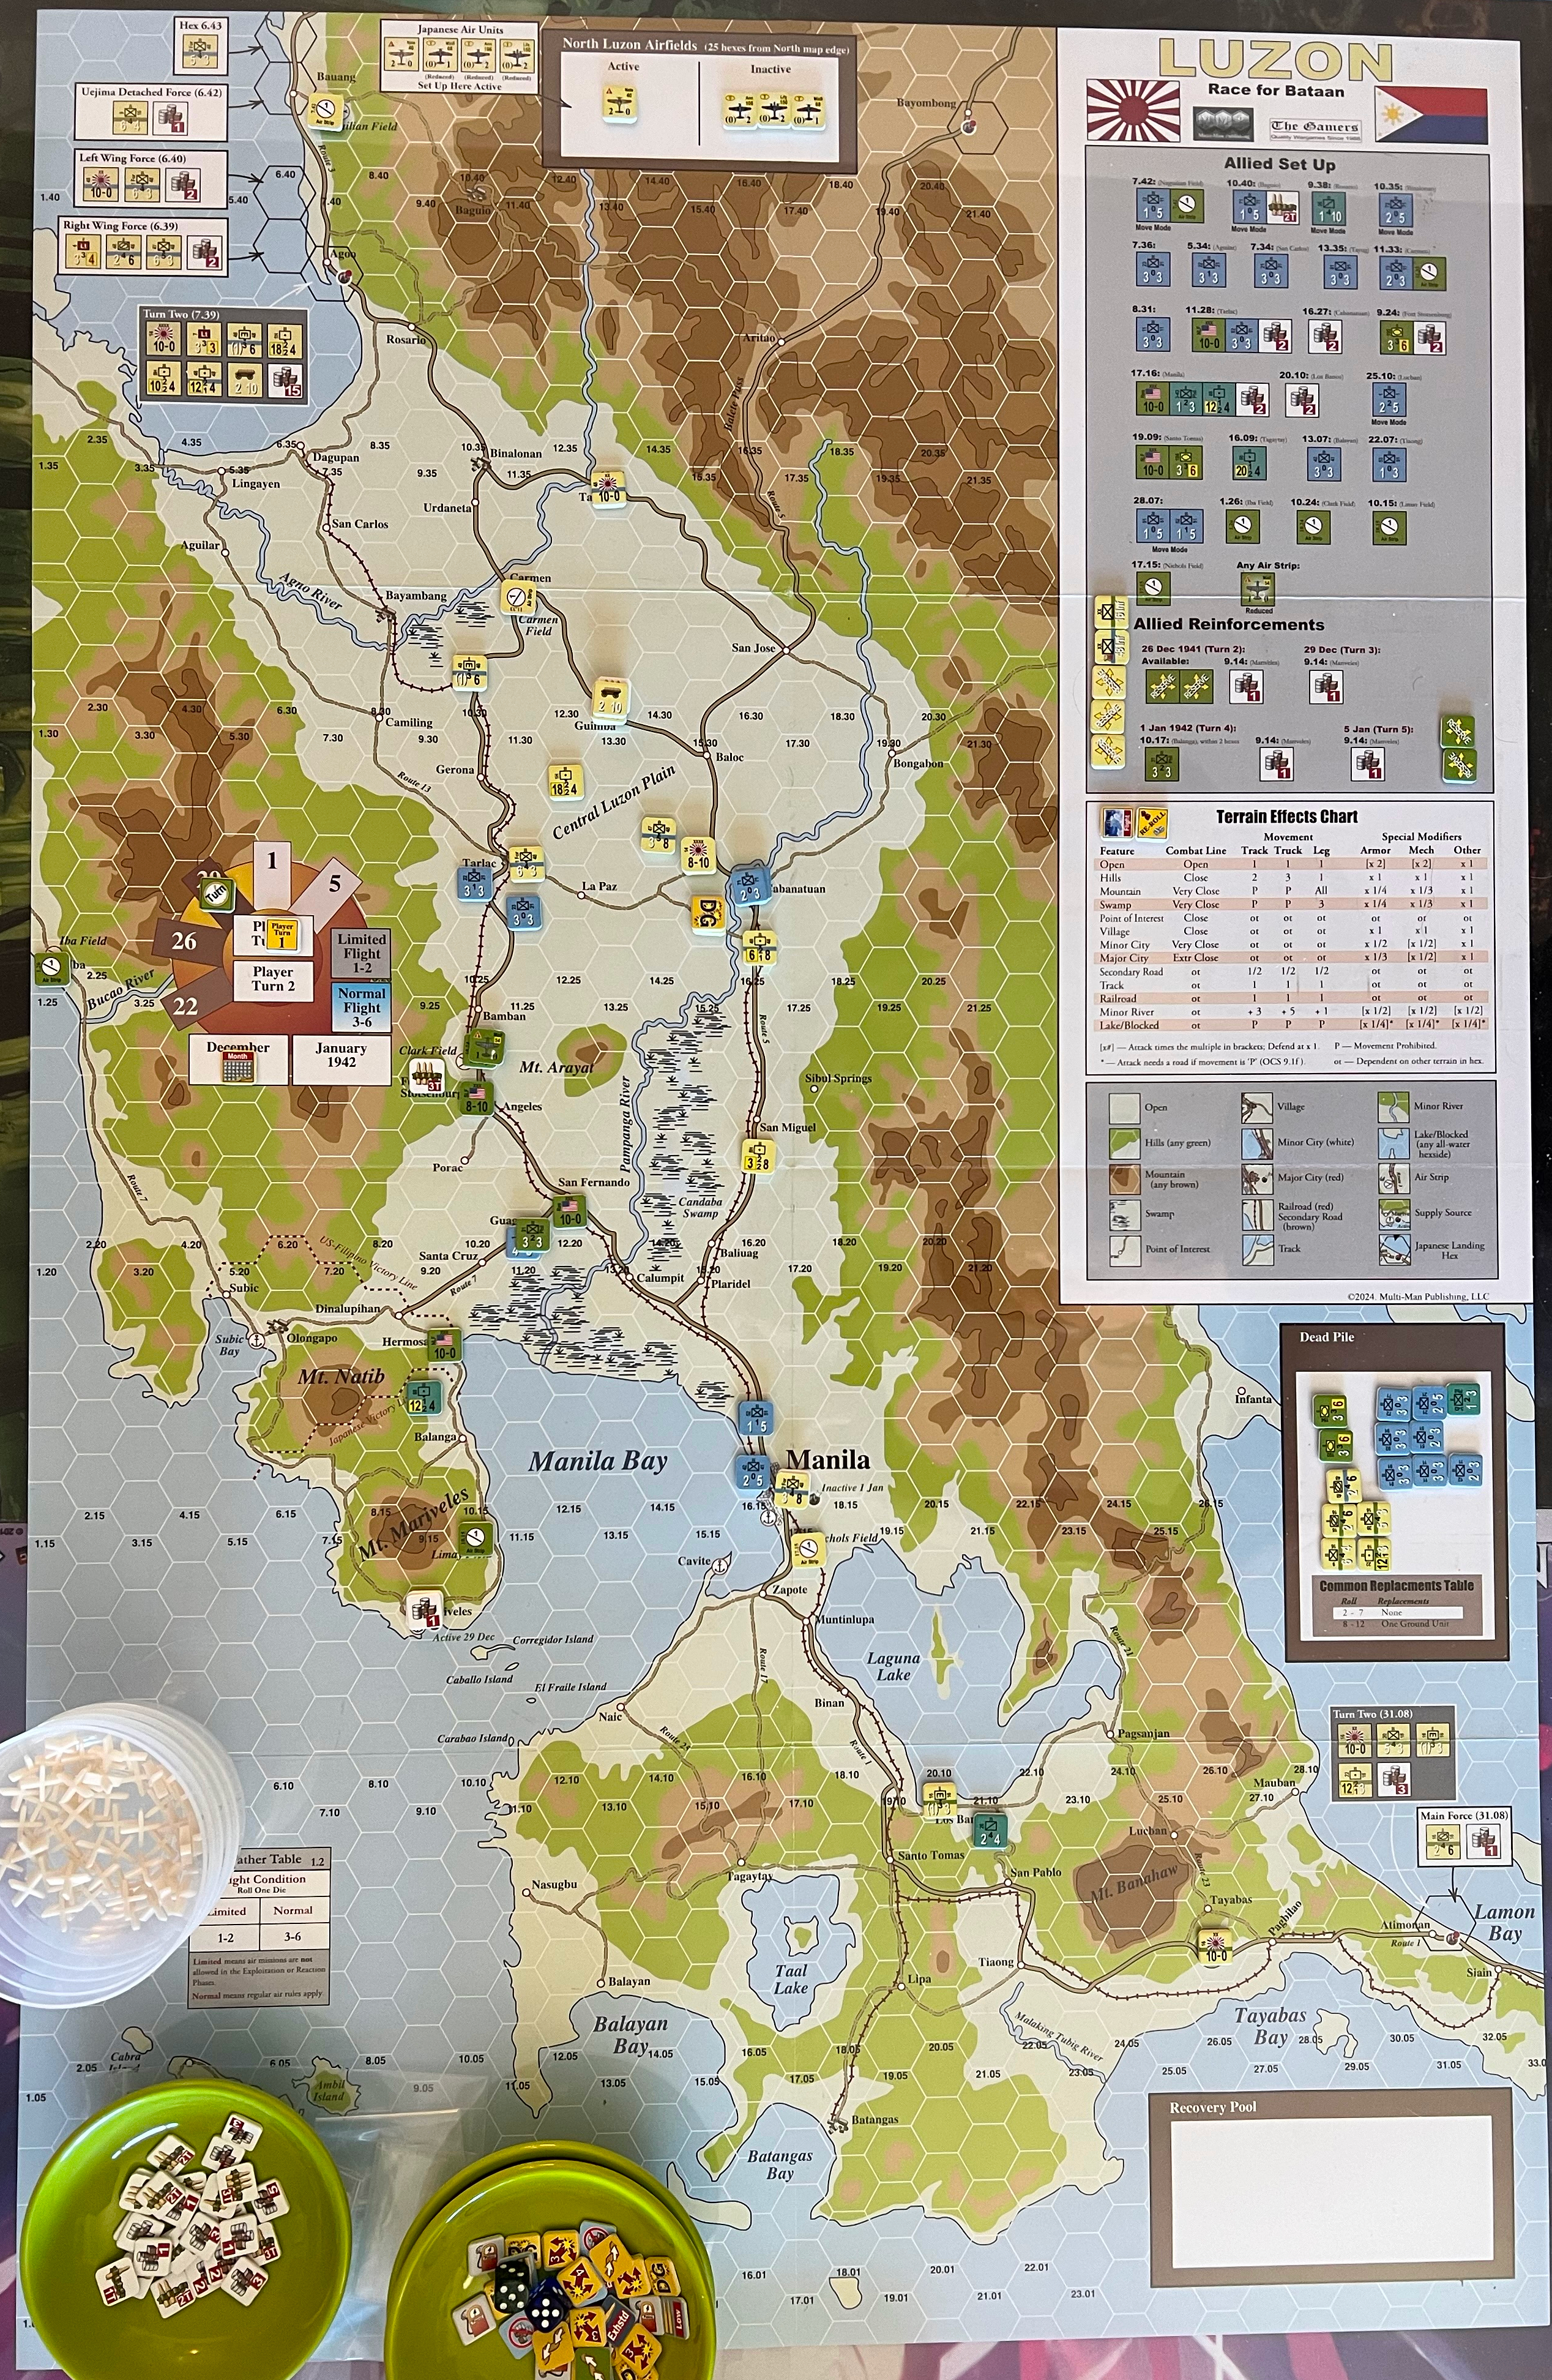
Here’s what the end of Turn 2 looks like:
Game Turn 2
Briefly summarize the upcoming turn for both sides.
The Allies will continue to protect Manila vigorously for this next turn, leaving just enough forces to prevent an easy capture in the next turn.
The Japanese need to shake a leg, or they will time out.
Pre-Turn Phase
- Weather determination (2.3, probably on map)
- First player determination, roll d6 highest has initiative, reroll for tie (2.3).
Weather roll 4 clear to fly.
Japanese go first again on Turn 2.
Japanese Turn 2
Brief summary of Japanese goal this turn.
Close in on Manila as fast as possible from the South and north. Worry less about destroying weak units, just ensure that any Allied units behind the Japanese line do not endanger trace or throw supply.
Aircraft refit
Cost 1T to refit any air base regardless of level or number of aircraft (15.1B)
None.
Reinforcement
Per scenario specification or reinforcement track.
Roll 5 for replacements, fail.
Movement
- Movement segment (6.0): 1/2 for DG (5.10), 1/4 for Reserve (5.7)
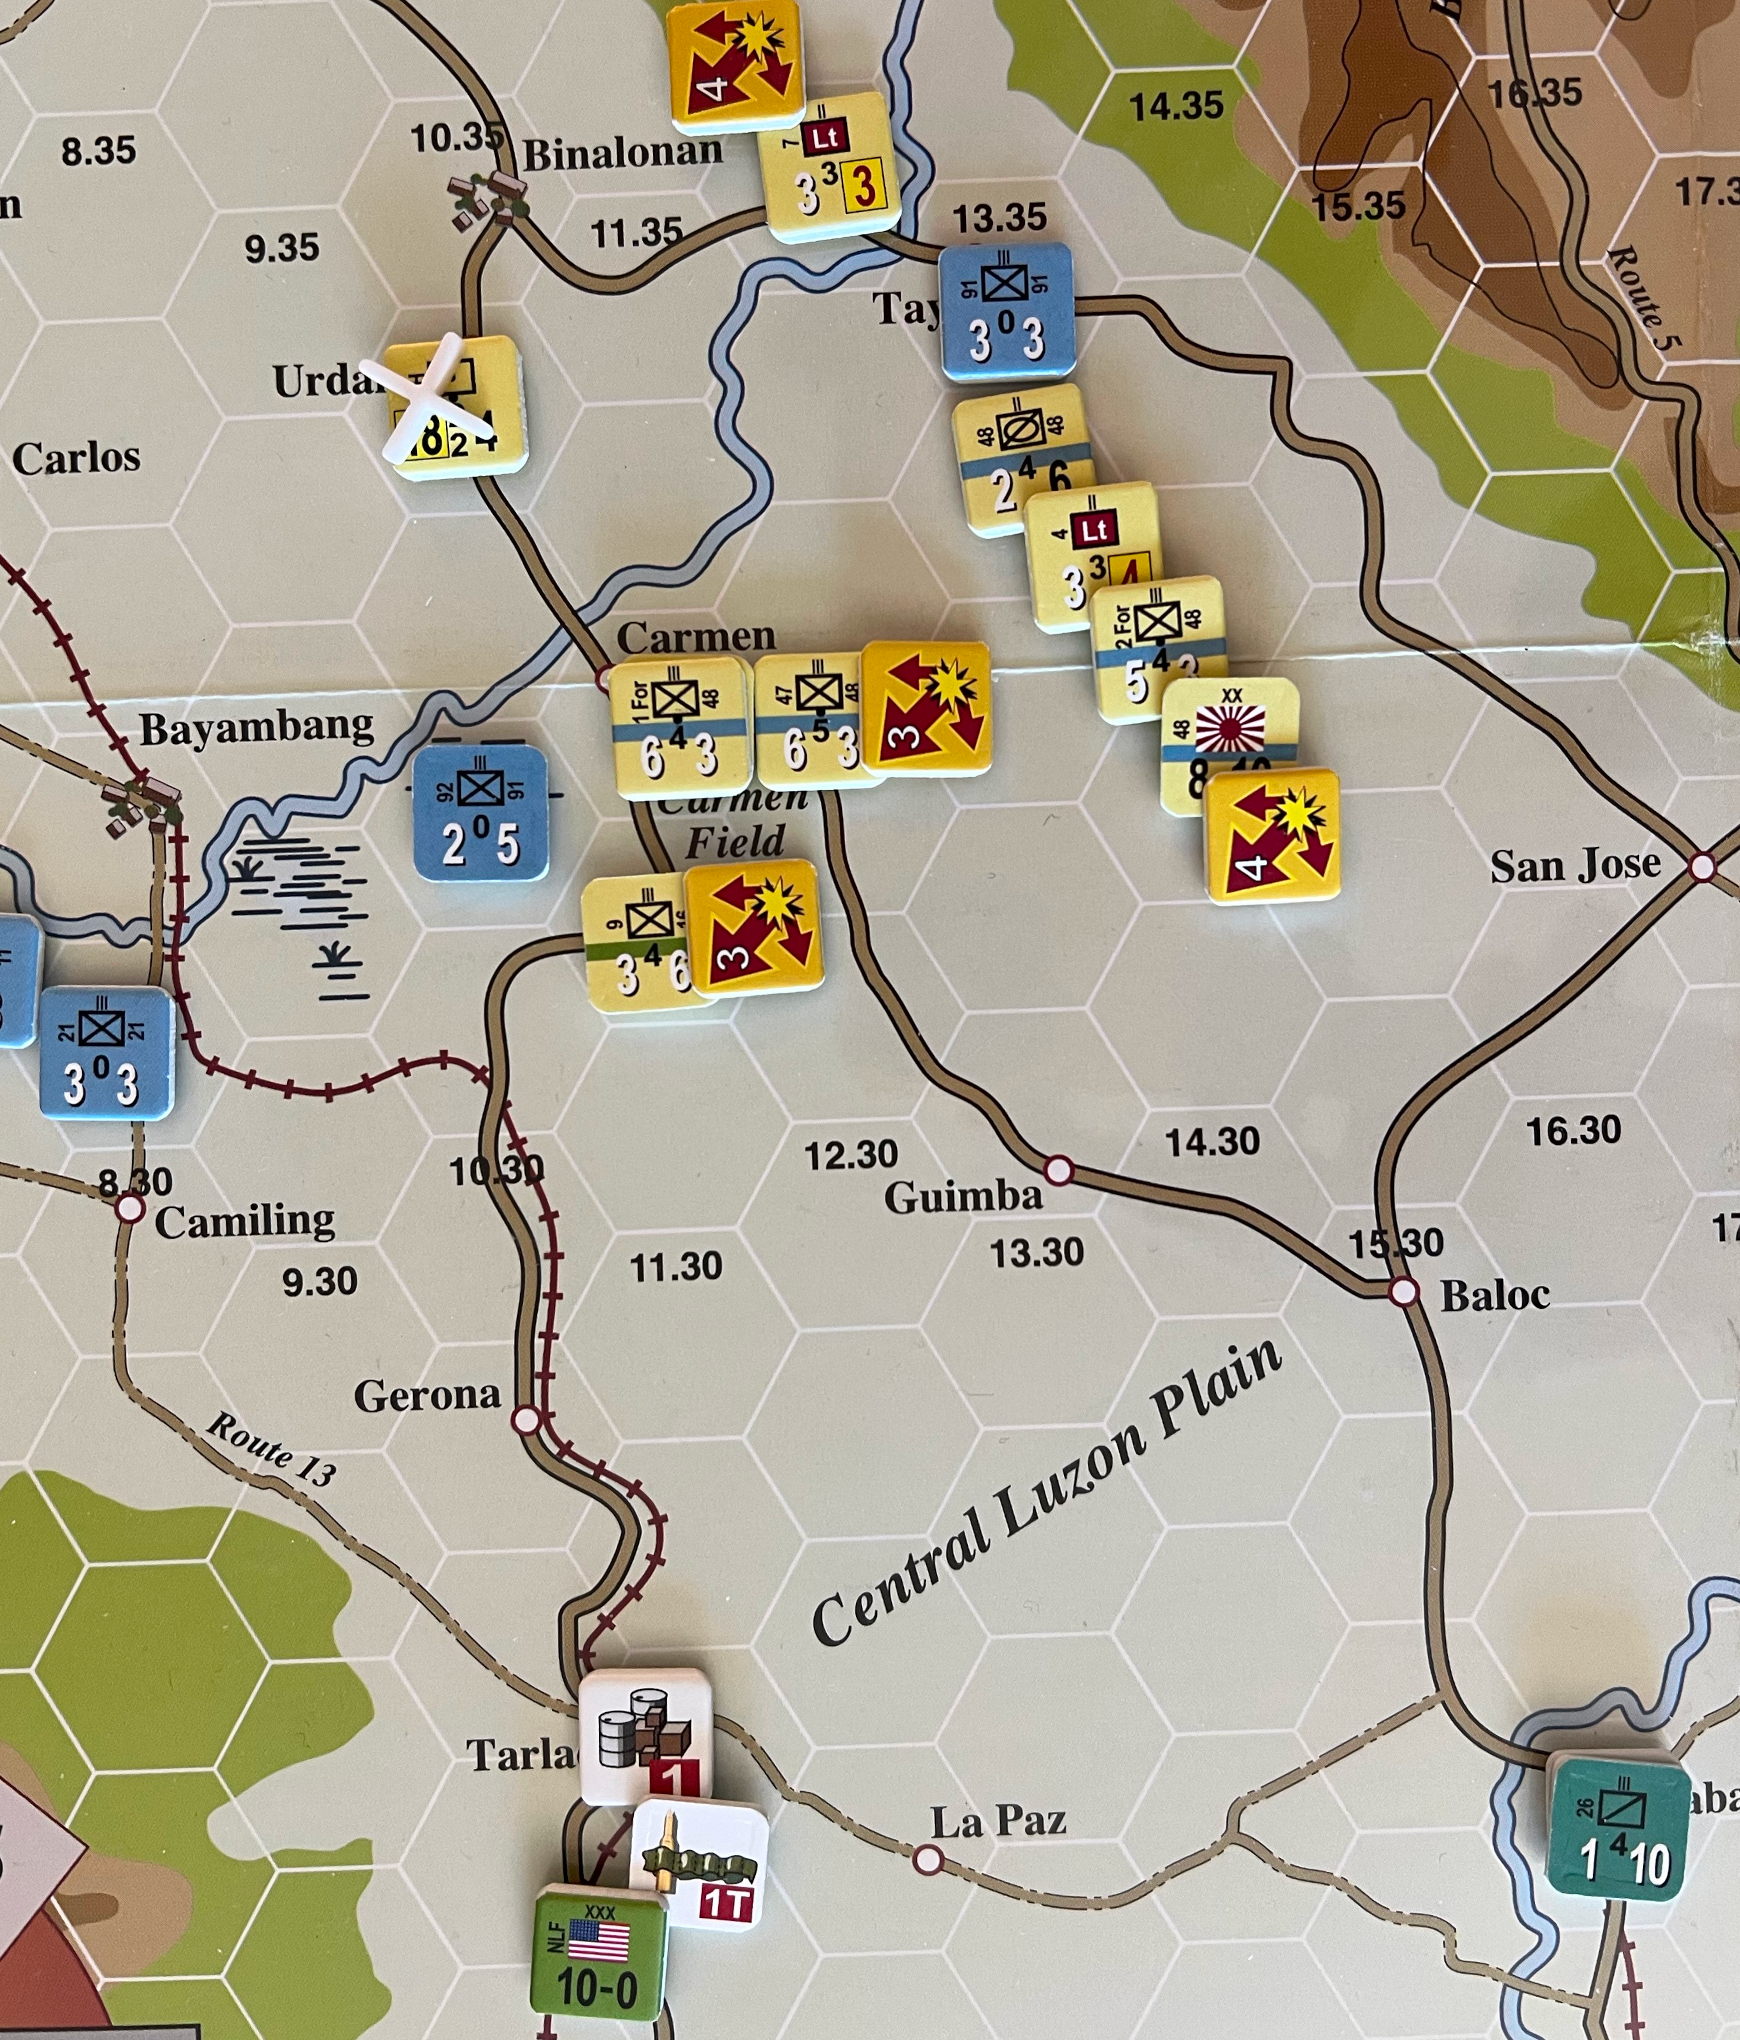
All done, concentrating around Carmen Field in the north.
- Air/Naval Barrage segment (10.2, 10.3)
Fly Lily, Ann, and MixB with strength 5 barrage defender at Carmen, roll 7 - 1 for no effect.
Trace Supply
All Japanese are in Trace.
Reaction phase
None.
Combat phase
- Artillery barrage (10.1, no Air or Naval barrage)
- Combat segment (9.0, artillery units strength [1] per 13.4b)
-
Barrage Carmen with 18 spending 3T, roll 8 - 1 for
DG, which is good as it will halve the defender strength. -
Carmen: Roll 8 + 5 for Surprise, right shift 6 (!), roll 4 + 5 for result
Ae3andDL2o2DG. -
East of Carmen, odds 3:1, roll Surprise 8 + 4 with shift 3 right gives 7:1 column, roll 6 + 4 = 10 which is
Ae4andDL1o2. Excellent. Chewing through the supply!
Going to need to get as many Philipinne units off the map as possible, otherwise they’re going to be pests on the supply line.
Exploitation phase
Exploitation mode is defined in Section 5.9, with Exploition Phase details defined in Section 11.0.
- Movement segment (6.0), overruns cost 3 MP (8.1a, 8.1e prohibits Exploitation result).
- Barrage segment
- Combat segment
-
92/91 hex 10.32 defending in a swamp (which they probably should not be in because they didn’t have enough movement, but whatever), so they will defend Very Close. Supply is in Tarlac, hex 11.68. As I read the rules, hex 10.31 is prohibited as it’s EZOC’ed by 9/46 regiment, and 9.32 is prohibited for truck movement, hence 92/91 regiment is out of supply and defending at 1. Odds 15:1, roll 2 + 4 = 6 no surprise, roll combat 6 + 4 resulting in
Ae4andDL1o2. Since that’s a swamp hex, will decline to advance. -
91/91 at Tayug hex 13.35, which I’m also treating as out of combat supply as it’s not in the throw range of Tarlac. The two Hill hexes spoil the fun here for the defending unit. Odds 11.5:1.5 > 7.6 = 8:1 in Close terrain. Roll surprise 8 + 4 with 1 shift right to 10:1 column, combat roll 6 + 4 resulting in
Ae4andDL1o2. Defender eliminated, excellent.
Japanese clean Up phase
- Remove DG and Exploitation markers.
Done.
Allies Turn 2
Brief summary of Allies goal this turn.
Pull back! Pull back! Pull back! After losing 3 units to Japanese aggression, the Allies need to pull back hard to ensure the Japanese advance is slowed enough to protect Manila, and allow holing up on the Bataan Peninsula.
Aircraft refit
Cost 1T to refit any air base regardless of level or number of aircraft (15.1B)
Not worrying about aircraft this turn.
Reinforcement
Per scenario specification or reinforcement track.
- Random draw 13/11.
- Roll 11 to rebuild 12/11.
Lucky!
Both placed at Manila.
Movement
All units moved, and nothing to barrage.
Trace Supply
All units in Trace.
Reaction phase
Japanese do not have any units in Reserve at the moment.
Combat phase
Nope, no way, not hardly.
Exploitation phase
N/A.
Allies clean Up phase
Remove tile markers, etc.
End of Turn 2
Both sides did pretty well I think, at least for me playing solitaire, with first time with Luzon, and first OCS since 2020.
The Japanese probably aren’t progressing fast enough, and they aren’t yet able to cut off Allied supply, which is what they really need to do to better provision the dead pool. Likewise with their own supply, stopping to bang away at every pissant unit is slowing them down too much.
On the other hand, the Allies are starting to lose units which they will have a hard time replacing, and they are also burning through supply. They may need to time it just right such that the last defensive combat pretty much proceeds from exhausted stocks. The odds won’t be good, but the terrain could be.
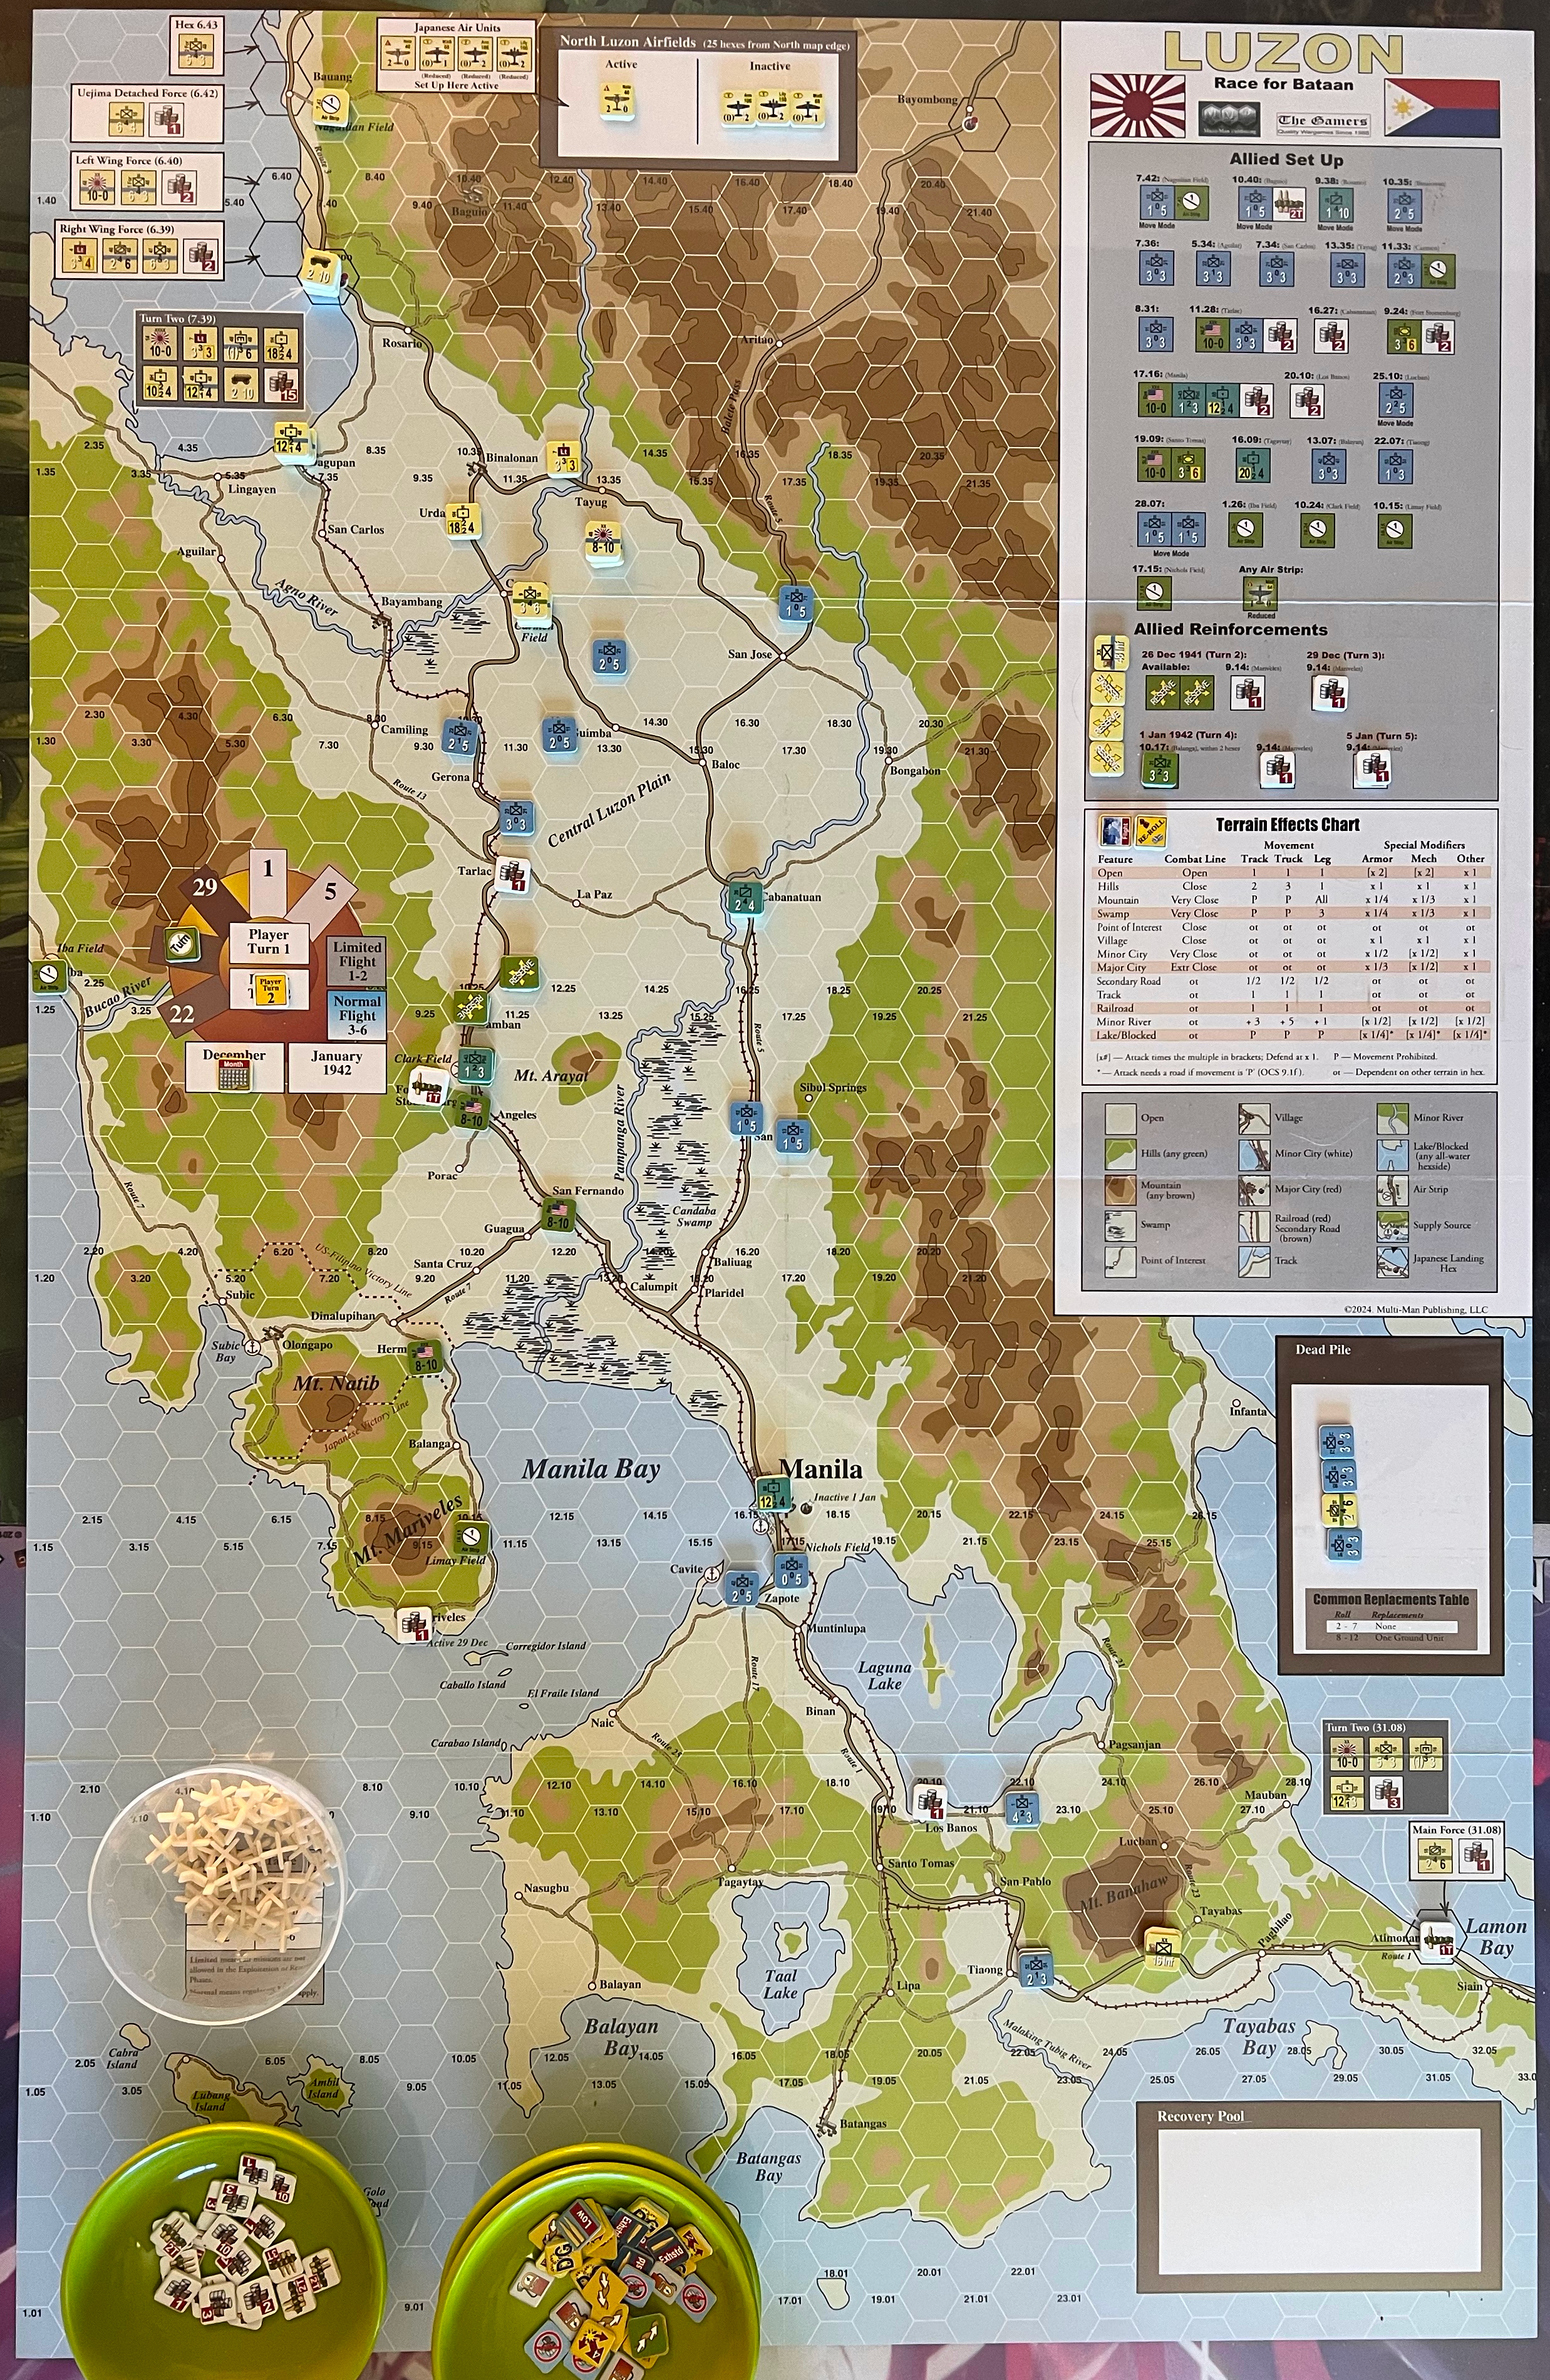
Here’s what it looks like at the end of Turn 2:
Game Turn 3, December 29, 1941
This is probably going to be a make or break turn for the Japanese. They need to get to the middle of the map this turn, and it’s going to be hard.
The Allies seem to be in a pretty good place, they just need to keep holding on.
Pre-Turn Phase
Weather, roll 2 bad weather.
Initiative:
- Allied: roll 8
- Japanese: roll 5
Initiative to US!
Allied Turn 3
Brief summary of Allied goal this turn.
This is going to hurt the Japanese really badly as all the Allied forces in Move mode can flip to Combat mode, move just a little bit forward to ensure the Japanese cannot Overrun, and sit tight.
Aircraft refit
Cost 1T to refit any air base regardless of level or number of aircraft (15.1B)
Not dealing with air this turn.
Reinforcement
Per scenario specification or reinforcement track.
There are no units in the Recovery Pool, which makes sense as the Initiative creates a double turn, and units not recovered go to the Dead Pile.
Roll 4, no replacements available.
Movement
- Movement segment (6.0): 1/2 for DG (5.10), 1/4 for Reserve (5.7)
Flip everything into Combat mode. Move everything up to a nice line of counters on the Central Luzon Plain.
- Air/Naval Barrage segment (10.2, 10.3)
No barrages this turn.
Trace Supply
All units in Trace.
Reaction phase
- Non-phasing player releases Reserves (5.7), destroy dumps (12.11).
- Non-phasing player barrage (all types, 10.0) and transport.
No Japanese units in Reserve.
Combat phase
- Artillery barrage (10.1, no Air or Naval barrage)
- Combat segment (9.0, artillery units strength [1] per 13.4b)
Hold the line, let the enemy come.
Exploitation phase
N/A.
Allied clean Up phase
Done.
Japanese Turn 3
Brief summary of Japanese goal this turn.
Breaking through is the main goal, the Japanese have got to get across the Central Luzon Plain.
Aircraft refit
Cost 1T to refit any air base regardless of level or number of aircraft (15.1B)
Not going to worry about air this turn.
Reinforcement
Per scenario specification or reinforcement track.
Roll 9 for rebuilding 16/16, which will come in at Lamon Bay.
Movement
- Movement segment (6.0): 1/2 for DG (5.10), 1/4 for Reserve (5.7)
I don’r think it’s going to happen, but I have managed to “carpet” my way through a ocuple of EZOCs to get some tank action in play.
- Air/Naval Barrage segment (10.2, 10.3)
-
Taiong: Spend 2T for barrage 12 with 1L for Close terrain, roll 11 for
1/2, roll 4 to cost the Philipinne’s a step and a DG. Making up for the previous fiasco on Turn 1. -
12.19 on Scouts, 3T for barrage 18 in Open terrain, roll 7 which is
DG, which is good because the Scout regiment is dangerous.
Trace Supply
All Japanese units are in Trace.
Reaction phase
Allies have 2 armor units in reserve, these are released and move up to the line.
Combat phase
- Artillery (no Air or Naval barrage)
- Combat segment (9.0, artillery units strength [1] per 13.4b)
-
Taiong: Odds 6:1, Surprise roll 9 shift 1R on Close terrain column 8:1 roll 4 + 4 result
Ao1andD1Lo1. Take the reroll 7 + 11 resultAe4andD1Lo2which is much better, Manila is within striking distance! -
San Jose: Odds 5:2, 3:1 close terrain, surprise 2 + 4 is 6 for no surprise, combat roll 5 + 4 result
Ao1andDo1. Attacker retreats, defenders stands. -
Baloc: Odds 10:3 which is 3:1 in the clear, but the Japanese have an LT unit as well, and a Mech unit, so the odds are 14:3 which is 5:1. Surprise roll 11 + 4 with 3R for 7:1, combat roll 7 + 4 result
Ae3andD2Lo2DG. -
Guimba: Odds 2:1 close, not great but whatever. The defending unit will draw supply, this could really hurt the attacker. Surprise roll 2 + 5 (high AR) for no surprise, combat roll 11 + 5 for result
Ae3andDL2o2DG. -
Scouts in 12.29, odds 12:1 with -1 AR for DG. Surprise roll 11 + 1 with shift 1R. Combat roll 6 + 1 result
Ae3andDL2o2DG.
And that’s that. These are resuls I needed Turn 1, or at least last Turn. Let’s see if the Exploitation can run some of these Philippine units out of supply and have them attrit away.
Exploitation phase
- Philippine armor at 13.30, odds 18:3 which is 6:1,
AR differential +1, surprise roll 4 + 2 no surprise,
combat roll 7 + 2 result
Ao1e4andDL1o2. Attacker loses the 47/48 to be able to use the other units to choke off supply.
Japanese clean Up phase
All done.
End of Turn 3
Briefly recap the turn for both sides.
The Japanese are starting to get into their stride. There are 3 Philippine units in the Dead Pile, and 5 in the Recovery Pool. The Allies are in a lot of trouble at this point.
Game Turn 4
Briefly summarize the upcoming turn for both sides.
Pre-Turn Phase
- Weather determination (2.3, probably on map)
- First player determination, roll d6 highest has initiative, reroll for tie (2.3).
Weather roll 5, clear.
Initiative:
- Japanese roll 2
- Allies roll 5
Allied initiative.
Allies Turn 4
Brief summary of Allied goal this turn.
Very fortunate to get the initiative this turn, as it will definitely continue to slow the Japanese advance. Had the Japanese gotten initiative, it could have been pretty ugly for the Allies.
Aircraft refit
Cost 1T to refit any air base regardless of level or number of aircraft (15.1B)
No air.
Reinforcement
Per scenario specification or reinforcement track.
- Recovery, draw 52/51, place at Balanga.
- Replacement roll 9, choose Scout at Manila.
Movement
- Movement segment (6.0): 1/2 for DG (5.10), 1/4 for Reserve (5.7)
All done, still holding a line.
Trace Supply
This phase does:
-
Determine which units are in or out of Trace Supply (12.6)
-
The 1/1 at 22.09 is OOS, roll Attrition 8, eliminated. They went home.
Reaction phase
No Japanese in reserve.
Combat phase
Let the Japanese initiate, the Allies are making them pay dearly.
Exploitation phase
N/A.
Allied clean Up phase
Done.
Japanese Turn 4
As usual, try to break through. Losing initiative really hurt.
Aircraft refit
No air.
Reinforcement
Per scenario specification or reinforcement track.
Roll 7, no reinforcement.
Movement
- Movement segment (6.0): 1/2 for DG (5.10), 1/4 for Reserve (5.7)
All moved, managed
- Air/Naval Barrage segment (10.2, 10.3)
- Tanks at 12.27, barrage 18 for 3T roll 7, DG.
- Los Banos, barrage 12 for 2T, roll 7 with 2L, no effect.
Trace Supply
All units in Trace.
Reaction phase
N/A.
Combat phase
-
Los Banos, odds 7:2 is 4:1, Close terrain, roll 7 for no surprise, combat roll 4 ugh
AL1andDo1. Which is fine, I can advance onto the supply dump. Hope I can use it, roll 5 for 50%, so 2T which will mandatory replace internal stocks. The defending unit will attrit away most likely. -
14.28 odds 15:2 is 8:1 in the Open, surprise roll 8 + 4 with shift 3R. Combat roll 5 + 4 result
Ae4andDL1o2. -
12.28, odds 12:1 with AR differential 2, surprise roll 9 with shift 2R. Combat roll 8 + 2 result
Ae2andD2Lo23DG. -
La Paz, 2:1 with +2 AR (because DG), dang. Surprise roll 4 + 6 no surprise. Combat roll 2! !!! !! result
AL1o1andDo1. Attacker eliminated, defender stands.
Exploitation phase
- Tanks, again, 12:3 is 4:1 with +2 AR, surprise roll 9 shift 1R,
combat roll 8 + 2 result
Ao1e4andD1Lo2. Acceptable.
Japanese clean up phase
Done.
End of Turn 4
This turned out sort of ok for the Japanese, other than losing another unit from a low adds attack. That really hurt because the remaining Philippine units can still move back into Trace. Having the one unit would have kept at least one the remaining units from being in Trace.
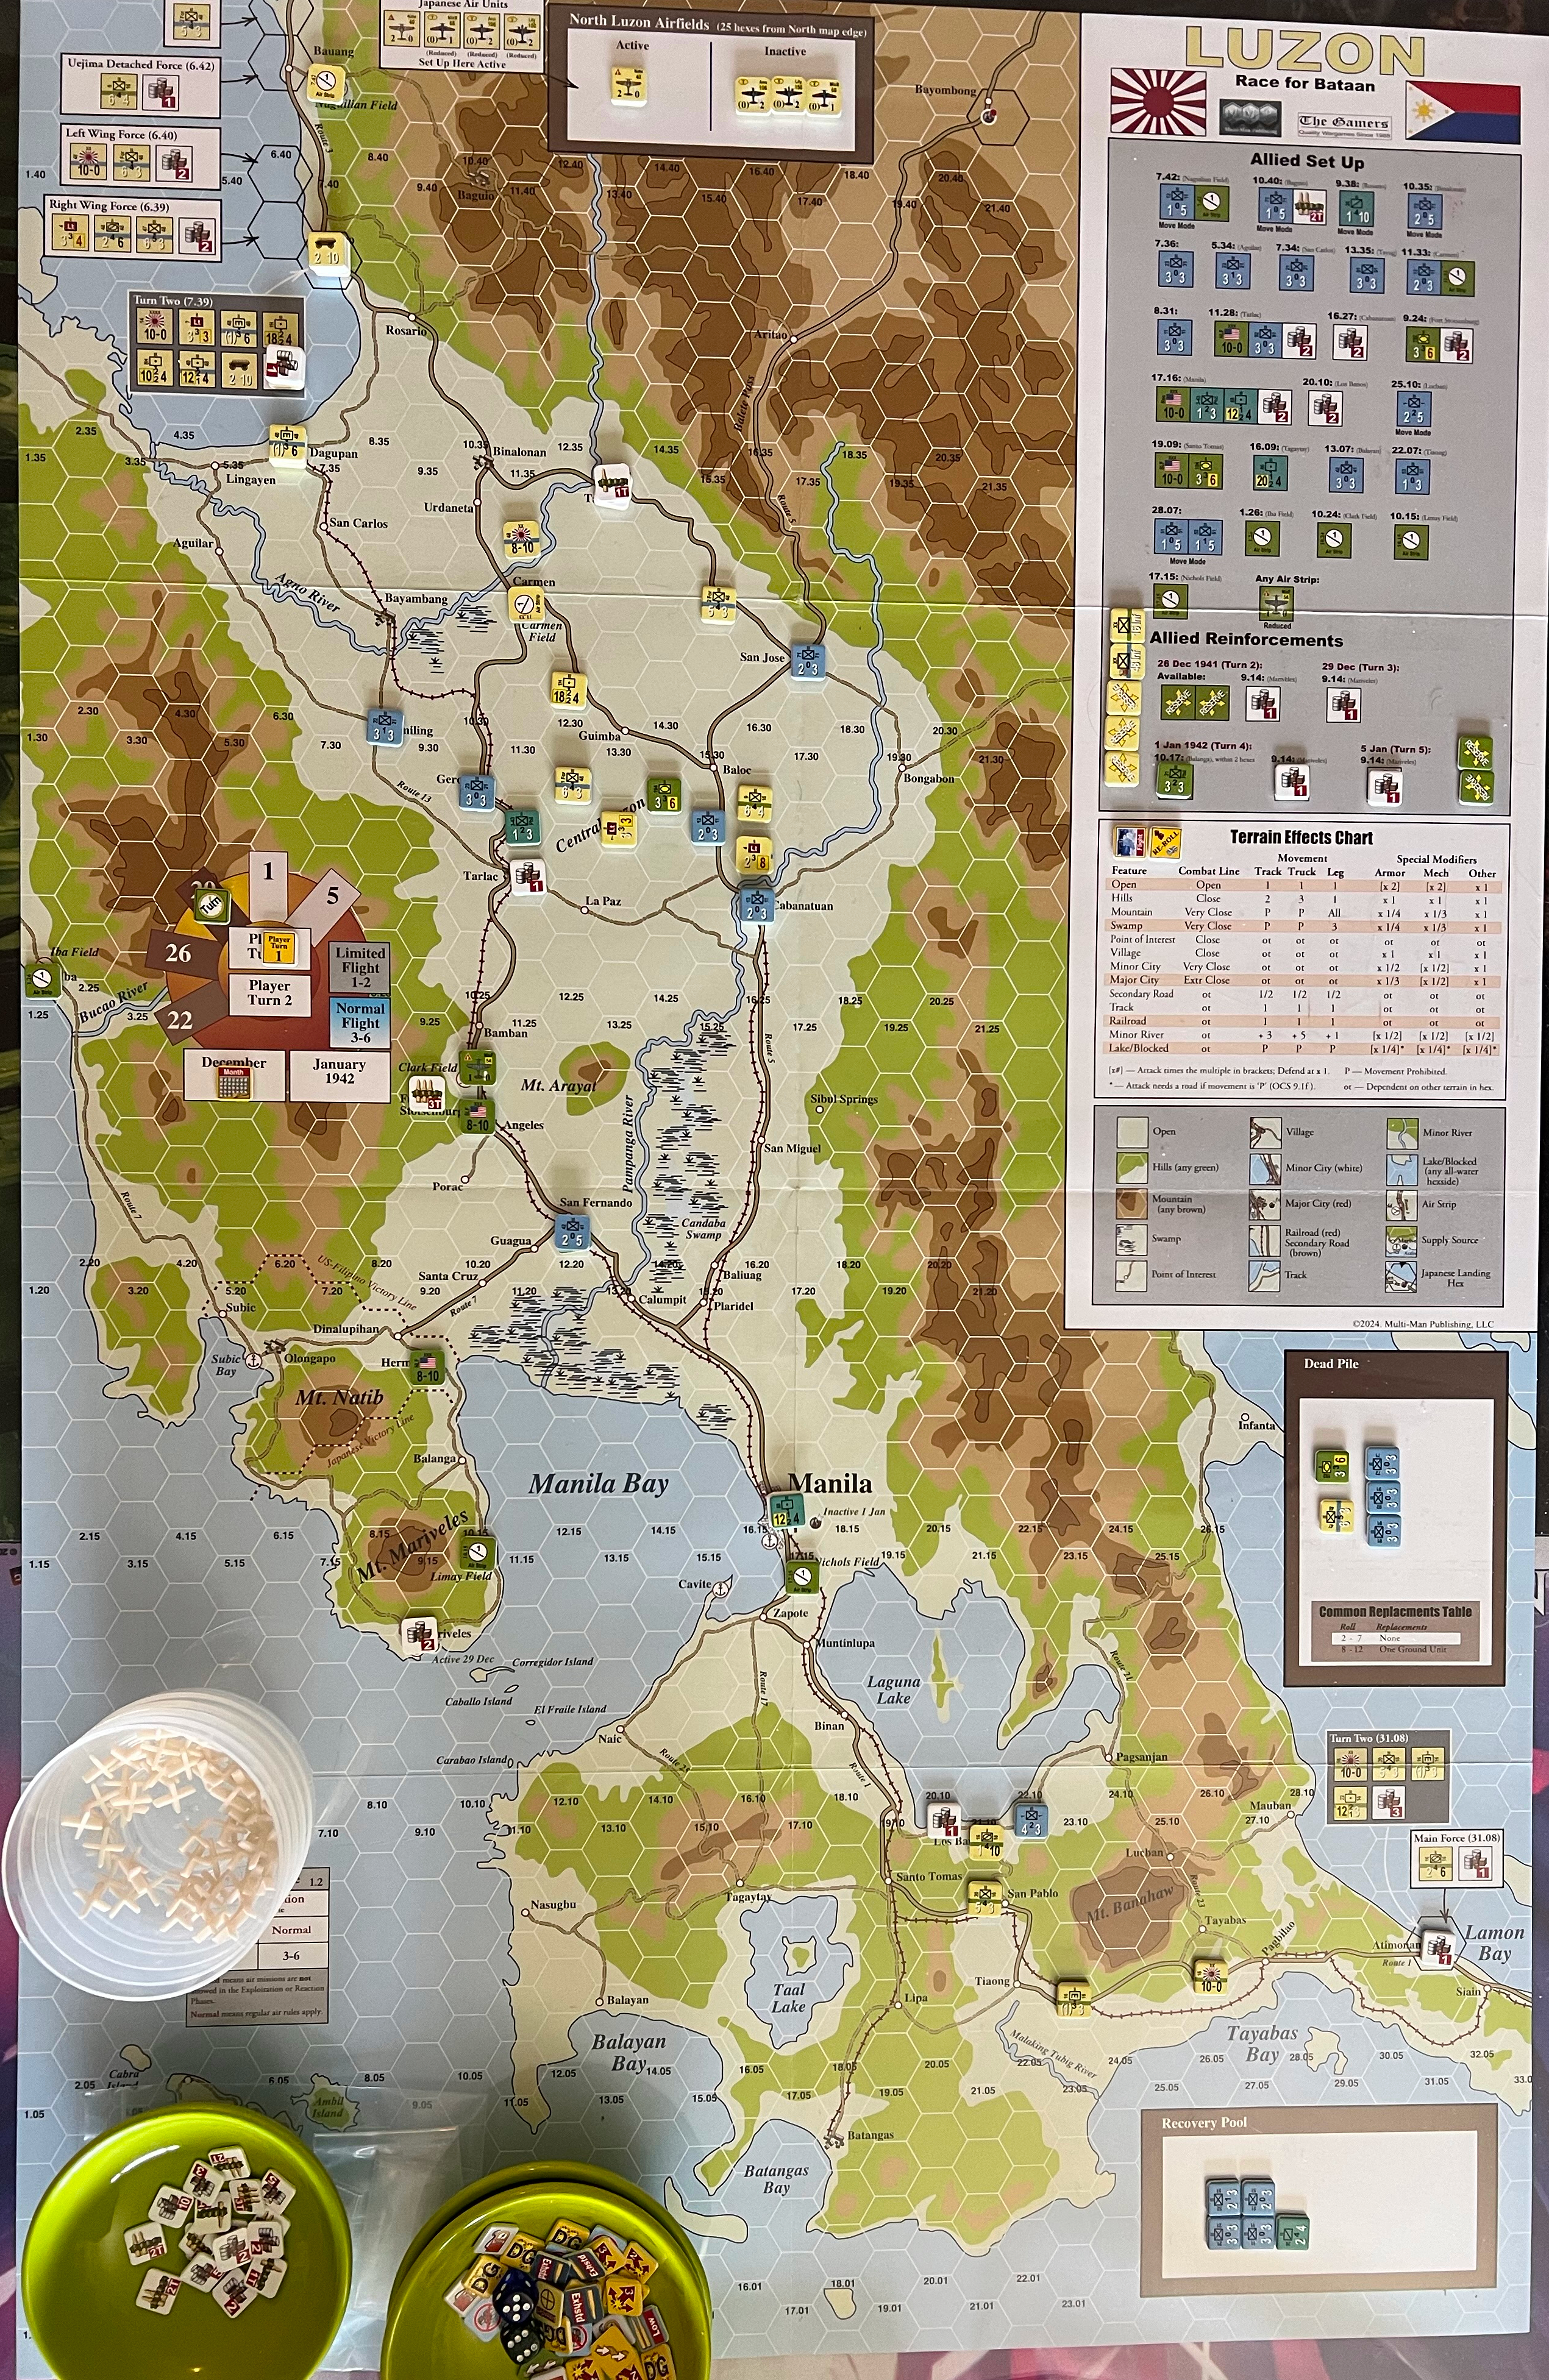
End of Turn 4 situation (maybe Turn 3?)
Game Turn 5
The Japanese really have no hope of winning, and I don’t think they can even get to a draw at this point. It’s worth playing it out, it will go fast, and it cool to actually finish an OCS scenario regardless of outcome.
Pre-Turn Phase
- Weather determination (2.3, probably on map)
- First player determination, roll d6 highest has initiative, reroll for tie (2.3).
Weather roll 1 bad weather.
Initiative:
- Allies: 7
- Japanese: 8
Japanese have the initiative.
Japanese Turn 5
Hard to say what can be done with the Japanese. They aren’t quite close enough to get to Manila, and don’t have quite enough supply to do anything there if they did. Let’s see if they can move to force the northern Philipinne forces to attrit.
Aircraft refit
No air.
Reinforcement
Per scenario specification or reinforcement track.
Roll 10, replacement 47/48 regiment at Agoo. Move mode is 8, which is a lot on the secondary roads.
Movement
- Movement segment (6.0): 1/2 for DG (5.10), 1/4 for Reserve (5.7)
Turns out the Japanese can get to Manila, and within thow range too.
- Air/Naval Barrage segment (10.2, 10.3)
- Don’t have enough supply to barrage Manila.
- 11.29, barrage 18 for 3T, roll 5 for no effect.
Trace Supply
This phase does:
- Determine which units are in or out of Trace Supply (12.6)
- Replenish low or exhausted internal stocks (12.10)
Stocks replenished, but I don’t think the forces south of Manila are in Trace due to the Scout regiment which is EZOCing the road. One more turn and this Scout should attrit, maybe, it’s AR 4. Roll 11 and both Japanese 20/16 and 22/16 attrit. The Engineer in Los Banos roll 11 again, dang, attrits. This puts the fucking Scout back into Trace from Manila, at least at the moment.
Reaction phase
N/A.
Combat phase
- Artillery barrage (10.1, no Air or Naval barrage)
- Combat segment (9.0, artillery units strength [1] per 13.4b)
- Manila: odds 4:1 in Extremely Close. Surprise roll 2 + 3 is
defender surprise shift 2L, combat 11 + 3 for
Ao1andD1Lo1so Manila falls. At least temporarily.
Exploitation phase
N/A.
Japanese clean up phase
Done.
Allies Turn 5
Brief summary of Allies goal this turn.
Two things:
- Get as many units as possible back into Trace.
- See if Manila can be retaken.
Aircraft refit
No air.
Reinforcement
Per scenario specification or reinforcement track.
- Recovery: 89 Arty.
- Replacement roll 8, rebuild the 1/1.
Bring both in at Balanga.
Movement
- Movement segment (6.0): 1/2 for DG (5.10), 1/4 for Reserve (5.7)
- Can’t get enough to Manila to make much difference, will still roll to see what happens.
- Got a couple of units back into supply.
- Air/Naval Barrage segment (10.2, 10.3)
- 86 Arty barrage the shit out of 7 LT, roll 7 for DG.
Trace Supply
- Units at Cabanatuan consume remaining supply, eat off the map, 1T get 2 RE, since there are 3 RE, requires 2T.
Reaction phase
N/A.
Combat phase
I’m calling the game here, I don’t see any point in going further. It was good enough to have the Japanese actually capture Manila albeit pretty late in the game. Retaking Manila would be at best 1:2 odds in Extremely Close terrain with a -4 DRM for action differential. Every result is an attacker loss with no effect on defender. Pointless.
Here’s the situation at the end:
AAR
The Allies still have some small amount of supply remaining, and this could have been effectively used had artillery been put into Reserve.