OCS Burma (1)
[Note: game initially set up June 29, 2019.]
I have the super small learning scenario set up, and hope to play through it over the next few days. OCS is so committing, but I really want to play at least 1-2 games of it per year, just to keep the rules semi-fresh. Burma is highly regarded, although probably right at the edge of what makes sense in the operational combat system. A lot of special, theater-specific rules to account for the weirdness of the situation.
As it turns out there is a pretty good youtube video on Black Cats vs White Tigers.
Game Turn 1
Briefly summarize the upcoming turn for both sides.
This is the start of the game. I haven’t played OCS in probably 2 years, so I’m really rusty with it. (I’ve also a got a few other games going on the side, and I’m super rusty on all the rules for everything.) It’s a good thing I have the turn sequence already written out, no way I’d attempt this otherwise.
Also, I have a hard stop Friday afternoon because of having company over for Ogre on Saturday. It really should not be a problem to to get very close to a complete game in.
It occurs to me I don’t actually understand what the Japanese are intending to accomplish here, possibly it’s an attempt to take Imphal.
Pre-Turn Phase
- Weather determination (2.3, probably on map)
- First player determination, roll d6 highest has initiative, reroll for tie (2.3).
Weather roll is 23, clear and normal.
Rules call for Japanese to have first move.
Japanese Turn 1
Brief summary of Japanese goal this turn.
The Japanese goal this turn is to figure out what the Japanese are actually intending to accomplish.
Aircraft refit
Cost 1T to refit any air base regardless of level or number of aircraft (15.1B)
No air for Japanese this scenario.
Reinforcement
Per scenario specification or reinforcement track.
None for Japanese.
Movement
- Breakout segment (12.8e) Check trace to friendly units in supply.
Nothing to break out.
- Movement segment (6.0): 1/2 for DG (5.10), 1/4 for Reserve (5.7)
All units close into the Allied column as much as possible. The Youtube video I’m watching shows the Japanese moving the cut supply from the Allied column, but this incorrect according to how my rules dictate the setup.
- Air/Naval Barrage segment (10.2, 10.3)
No air or naval barrage capability for the Japanese. Will remove this section on the next game turn.
Trace Supply
Trace Supply phase does:
- Determine which units are in or out of Trace Supply (12.6)
- Replenish low or exhausted internal stocks (12.10)
All units can be in some sort of supply. Here’s a spiffy table showing how a 1T truck can move Tokens from Kalewa to the other side of Yazago:
| Hex | Cost | Cumulative | Name |
|---|---|---|---|
| 12.12 | 0 | 0 | Kalewa |
| 9.25 | 3.5 | 3.5 | Yazago |
| 8.25 | 8 | 11.5 | Dump site |
| 8.25 | 4.5 | 16 | Unload 1T |
| 12.21 | 4 | 20 | Kalewa |
| 12.21 | 4.5 | 24.5 | load 1T |
| 9.25 | 3.5 | 28 | Yazago |
| 8.25 | 8 | 36 | dump site |
| 8.25 | 4.5 | 40.5 | unload 1T |
| 12.21 | 4 | 44.5 | Kalewa |
Not bad.
It does not deal with the “On Map” supply provided by “S” and “T” counters.
Reaction phase
- Non-phasing player releases Reserves (5.7), destroy dumps (12.11).
- Non-phasing player barrage (all types, 10.0) and transport.
Allies choose to Air Barrage in two places:
- B.4.27 with 28 barrage points, and
- B.4.22 with 24 barrage points.
B.4.27
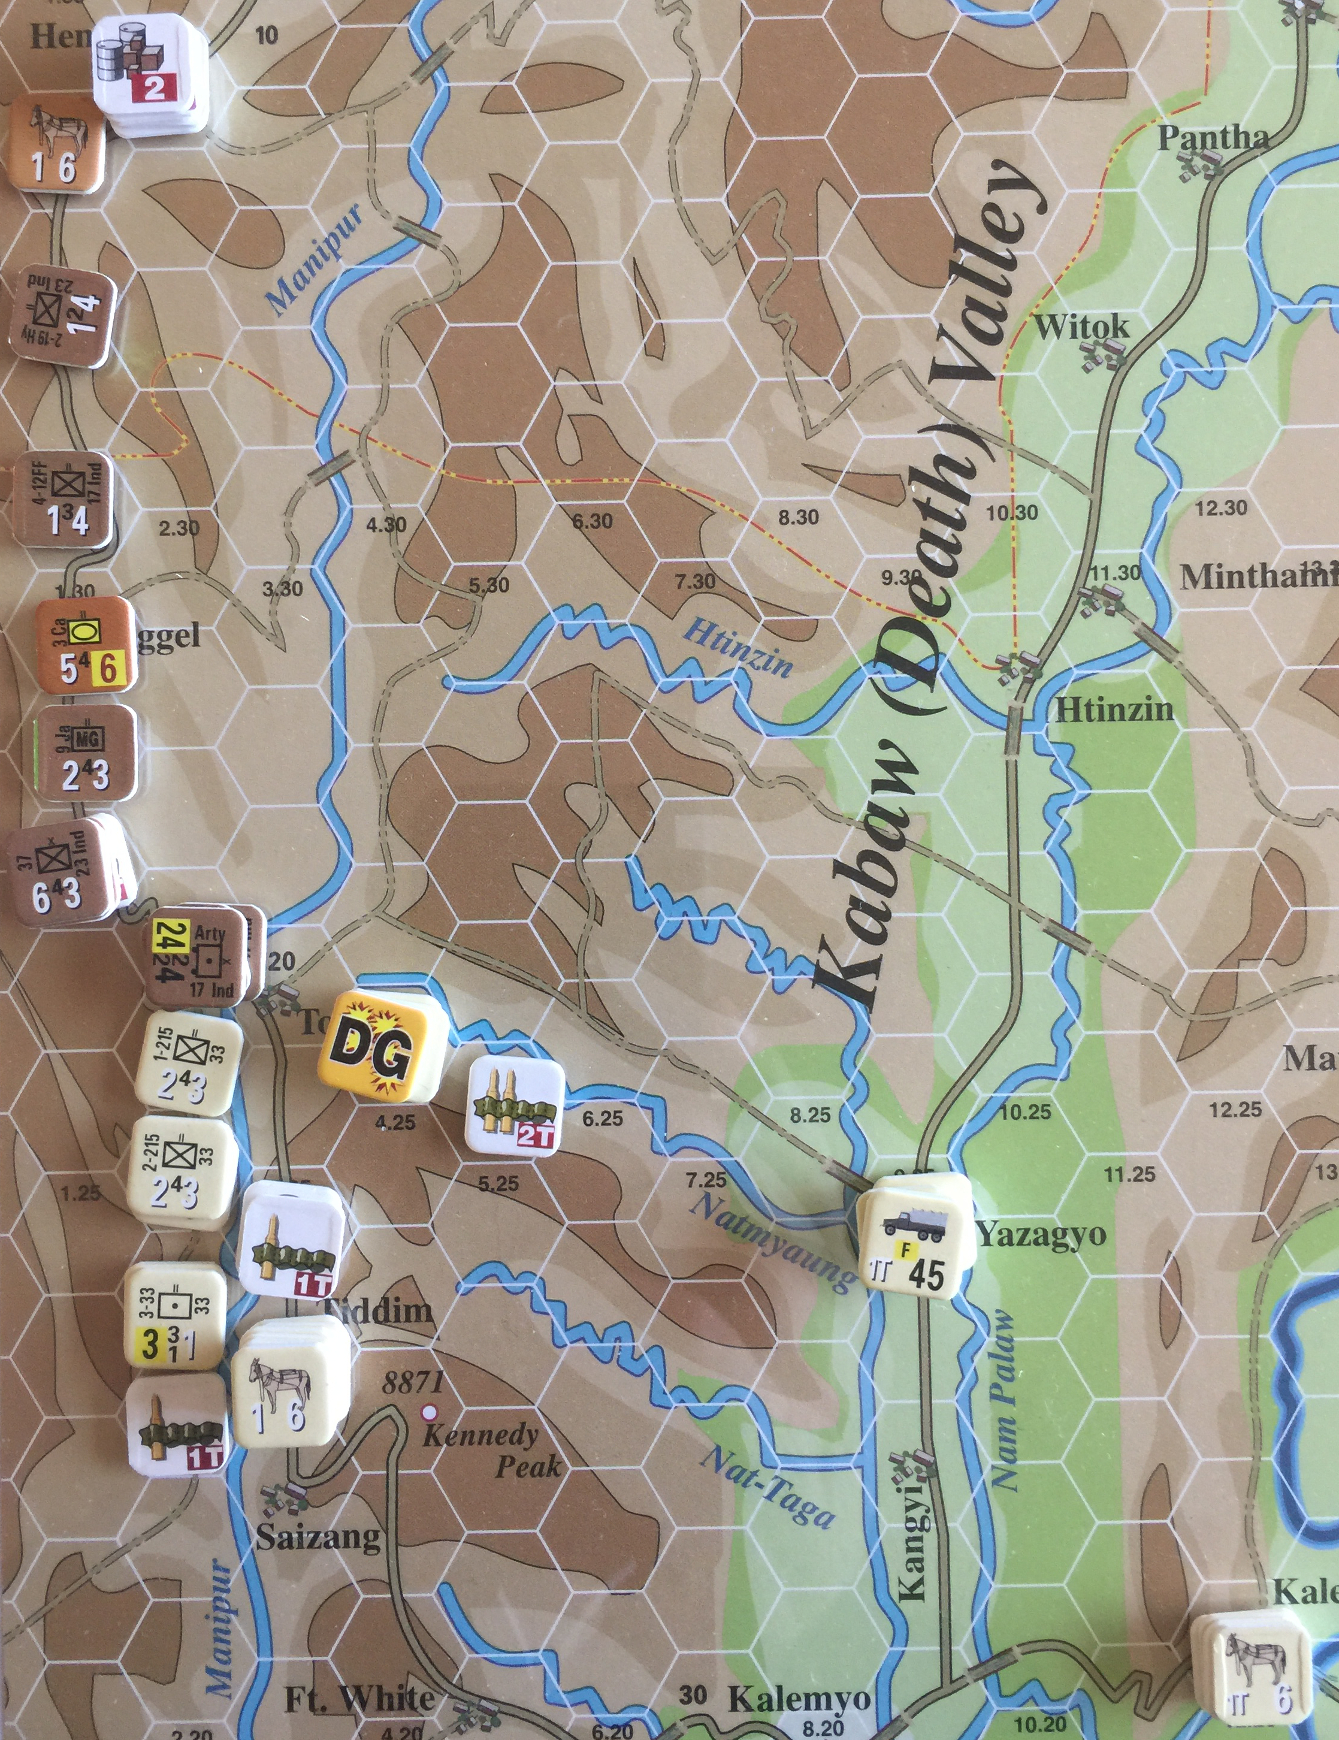
28 points against a stack of 3 Japanese units in Extremely Close terrain (Mountain with Track), which is 2 shifts left on the barrage table. Flak roll is 5, no effect. Barrage roll is on 12-16 column, roll 6 for DG.
B.4.22
21 points against stack of 3, shift 1 left for Very Close (Mountain hex with a road). Flak roll is 5 for no effect. Barrage proceeds on column 12-16, roll 6 for DG.
Bummer about the north stack. The south stack is 2 arty units, which isn’t so bad. I can still attack with remaining units.
Combat phase
- Artillery barrage (10.1, no Air/Naval)
- Combat segment (9.0, artillery units strength [1] per 13.4b)
Not going to do any artillery this turn.
Combat against 1 WY 17 Ind in B.3.24, 7 Japanese AF against 2 Indian DF for 4:1 in Very Close terrain. Since two of the Japanese are attacking across a minor river, their AF is halved, so it’s 5:2 which is 3:1. Japanese AR 5 against Indian AR 3, roll surprise 5 + 2 for 7 no surprise either way.
Pay 4T for 4 units to fight, roll 9 + 2 for 11 on 3:1 in Very Close
yields Ao1/DL1o1. Japanese 33 Eng and 2-213-33 retreat to b.4.22,
1 WY is eliminated. Good roll for the Japanese. An Advance After
Combat (9.12g) cuts off the 4-12FF, will let that die off from
being out of supply.
Exploitation phase
Exploitation mode is defined in Section 5.9, with Exploition Phase details defined in Section 11.0.
- Movement segment (6.0), overruns cost 3 MP (8.1a, 8.1e prohibits Exploitation result).
- Barrage segment
- Combat segment
No exploitation this turn. The 1-214-33 which was in reserve in B.4.27 was DG and cannot go into Exploitation movement (5.10b (C): DG mode units are unable to overrun or earn Exploitation Mode).
Japanese clean Up phase
- Remove DG and Exploitation markers.
- Flip or remove Fueled markers.
- Remove train-busting placed by Allied player.
Allies Turn 1
Brief summary of Allies goal this turn.
Now that I’ve had time to take a better look at the situation on the map, the Allies are in a hard spot. They have 1 Mule, and 5 SPs, and pretty much no place to run, being nearly trapped with a 6 SP at Tiddim. They’re best bet is probably to try to bolt as fast as possible towards Imphal and hope to stay in Trace Supply.
However, I don’t think this can be done on the first turn, will need to wait a turn to pull in more supplies, and use up the big dump trapped at Tiddim. The mules can get an SP out per turn, EZOC permitting, allowing the big dump to get drawn down a little while reinforcements come down from Imphal.
Aircraft refit
Cost 1T to refit any air base regardless of level or number of aircraft (15.1B)
Refitting doesn’t cost anything for Allies in this scenario.
Reinforcement
Per scenario specification or reinforcement track.
Reinforcements are already on the map, with a specified number of MPs already spent. There won’t be any further reinforcements this game.
Movement
- Breakout segment (12.8e) Check trace to friendly units in supply.
4-12FF needs to try a Breakout: roll 5, return in 2 turns March 22, 1944.
- Movement segment (6.0): 1/2 for DG (5.10), 1/4 for Reserve (5.7)
First up is to move the artillery unit out of danger while there is ZOC negation. This requires fueling.
Next, all the reinforcements move down from Imphal.
Then some rearrangement to put pieces in the right place to prevent easy Japanese takeovers.
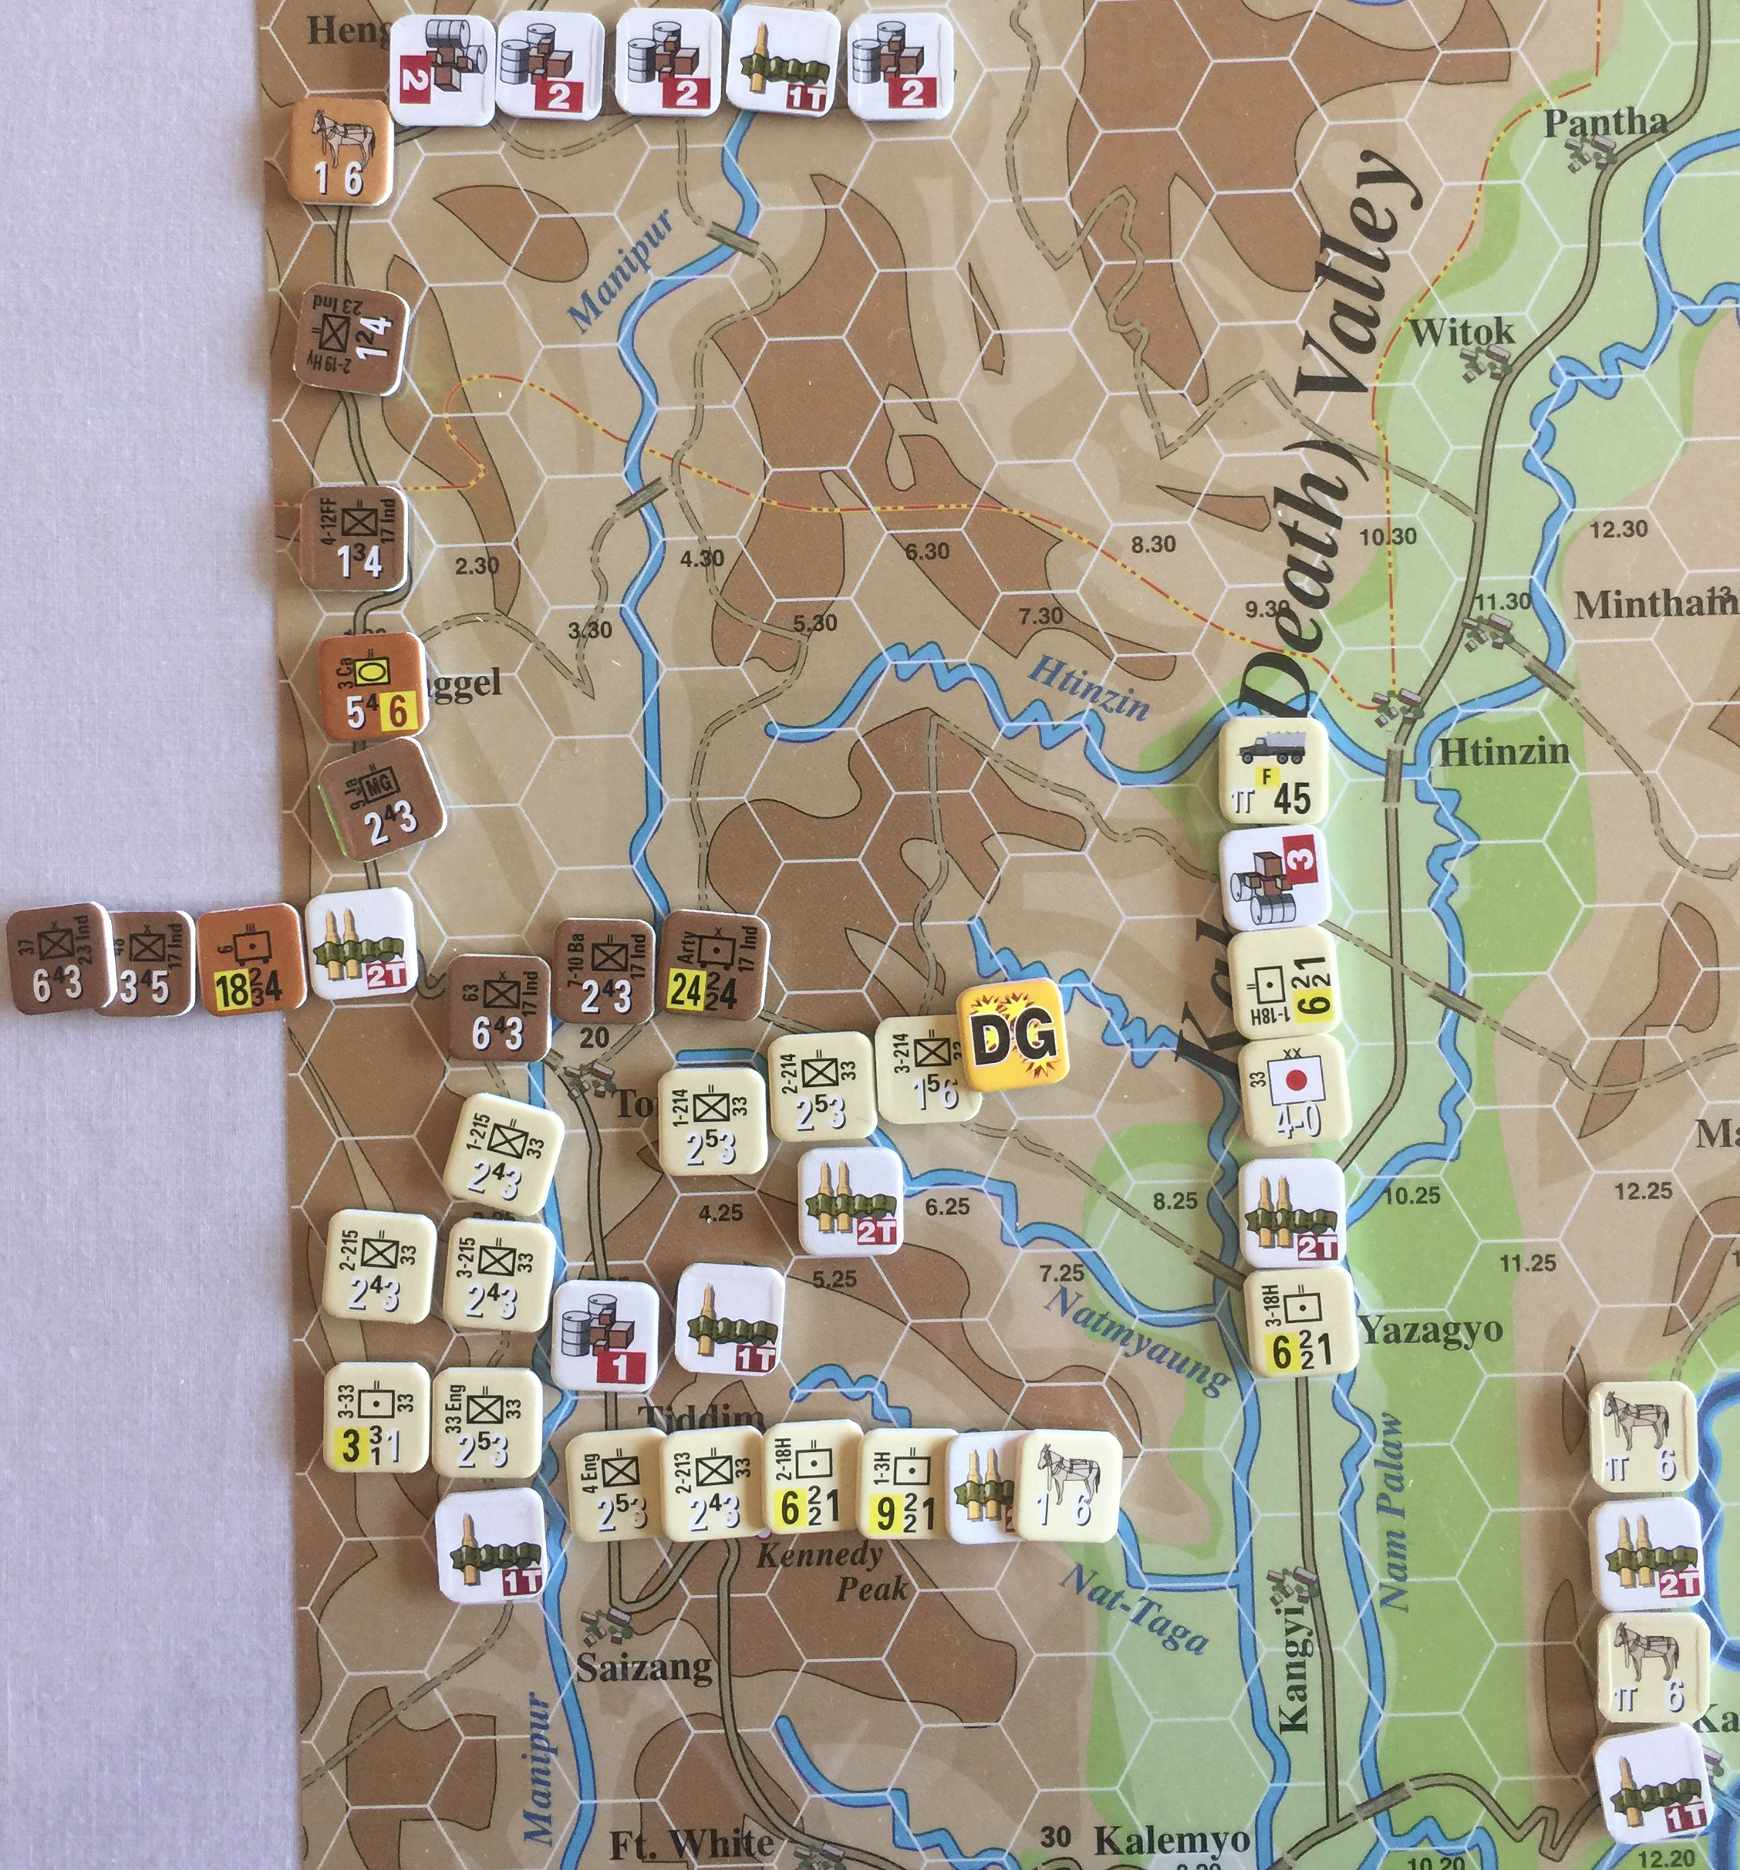
Here’s the situation after the Allies move:
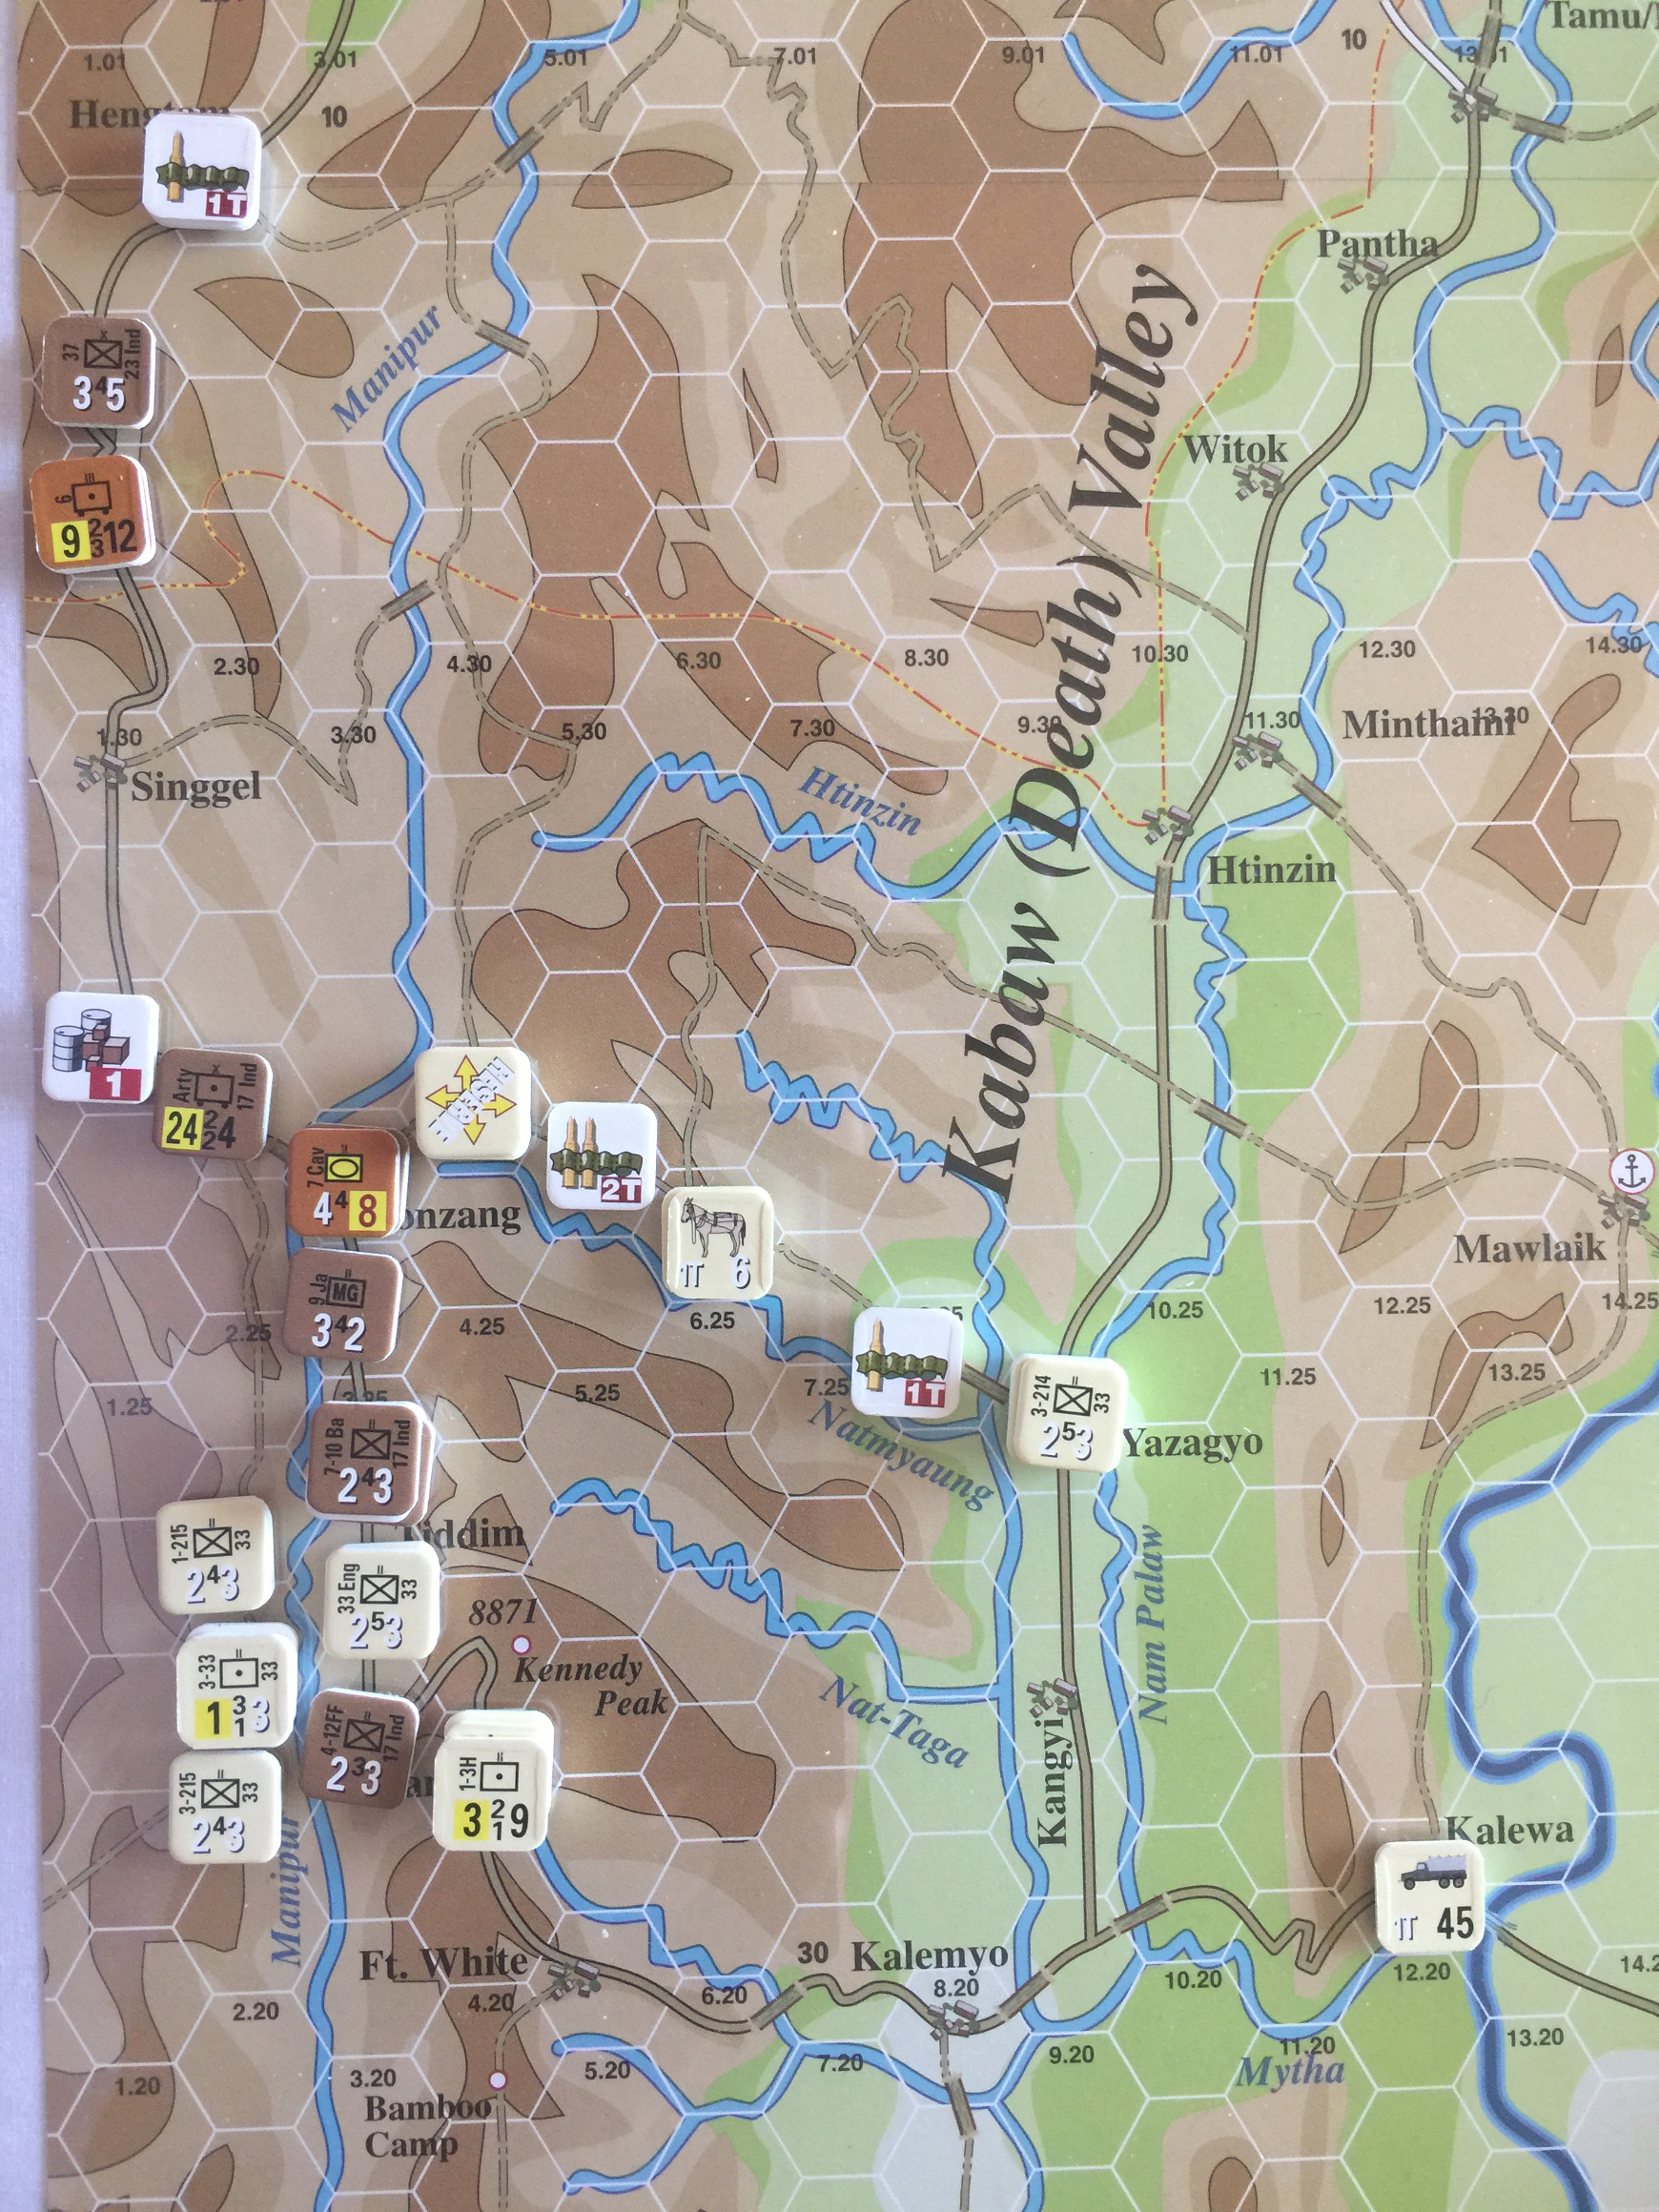
Note that 4-12FF is shown in its pre-Breakout location. It will return as a Reinforcement March 22, 1944. This is super lucky for the Allies, otherwise this would have gone into the Dead Pile, and there is no rebuilding replacements in this scenario.
- Air/Naval Barrage segment (10.2, 10.3)
Let’s fire up the planes again, do more aerial barraging. Would be great to get some DG, then attack to cripple the Japanese effort.
B.3.24
First up is handling these units threatening the supply dump. Let’s send 28 Barrage points at these two units. Flak roll 11 & 4, that’s bad news for the Allies: Super lucky! Hurricane II was in the affected position and only lost 1 point. For barrage, roll 4 on 12-16 column, no effect, bummer. Note that this is a single RE as it’s 2 companies. The other modifier is a 1 shift left for Very Close being on a road.
B.4.27
Next apply 21 barrage points stack of three units, which are going to get a shift left 2 due to being on a track instead of a road. First, flak roll 5, no effect. Barrage roll 7 on 8-11 table, DG.
Trace Supply
This phase does:
- Determine which units are in or out of Trace Supply (12.6)
- Replenish low or exhausted internal stocks (12.10)
It does not deal with the “On Map” supply provided by “S” and “T” counters.
All Allied units are in Trace Supply.
Reaction phase
- Non-phasing player releases Reserves, etc.
- Non-phasing player barrage
Japanese decide against reaction this phase, depite having a Reserve marker.
Combat phase
- Artillery (no Air/Naval)
- Combat segment (9.0, artillery units strength [1] per 13.4b)
Allies are going to risk it, attacking the stack at B.4.27.
7 Cav & 63-17 Ind vs. 1,2-214-33 & 1-33-33
Attacker with 8, defender with 2.5, which is 3.2:1 rounding to 3:1 in Extremely Close terrain. This is probably a really bad idea for the Allies, but in any case there is a good chance it will decide the game.
Surprise roll 4 & 5, which is defender surprise with 5 shifts left!
Noooooooo! Combat roll 9 for AL1o1/Do1. Bummer! 7 Cav is out! 63-17
retreats up the road 1 hex.
Not looking good for the Commonwealth. Lose 1 more and it’s a draw.
Exploitation phase
- Movement segment
- Barrage segment
- Combat segment
Nothing to do here.
Allies clean Up phase
- Remove DG and Exploitation markers.
- Flip or remove Fueled markers.
- Remove train-busting placed by Japanese player.
N/A.
End of Turn 1
Briefly recap the turn for both sides.
OCS, always good for some surprises!
The game isn’t decided yet, at least as far as I can tell. A better player may have a different opinion, but I’m thinking I can get either side to win even as it stands right now. We’ll see what happens.
Game Turn 2
Briefly summarize the upcoming turn for both sides.
Pre-Turn Phase
- Weather is Clear with ground condition Normal.
- Commonwealth moves first.
Allies Turn 2
Brief summary of Allies goal this turn.
After the previous engagement, the Allies are more than happy to bug out. It may be just fine, since the Japanese were pushed back in the north, there is no EZOC to deal with, and the Allies might be able to just haul ass (as it were), beat feet, take a powder, vamoose, and otherwise make themselves scarce on in the general area of Tiddim.
The big challenge is to resist take a potshot at the Japanese on the way out. Much easier to just defend, let them take losses at low odds in rough terrain.
Aircraft refit
All aircraft refitted and ready for missions.
Reinforcement
No reinforcements this turn.
Movement
- Breakout segment (12.8e) Check trace to friendly units in supply.
Nothing to break out.
- Movement segment (6.0): 1/2 for DG (5.10), 1/4 for Reserve (5.7)
- Mule gets another SP moved.
- 2-19Hy moves down from Imphal.
- Moved up some armor, artillery and infantry to control an orderly withdrawal.
- Air/Naval Barrage segment (10.2, 10.3)
Allies have no spotters where any barrages would be effective, would be too many shifts left without spotters.
Air is going to hold until Reaction phase of upcoming Japanese turn.
Trace Supply
This phase does:
- Determine which units are in or out of Trace Supply (12.6)
- Replenish low or exhausted internal stocks (12.10)
Allies are all in Trace.
Reaction phase
- Non-phasing player releases Reserves, etc.
- Non-phasing player barrage
Japanese having nothing for Reaction.
Combat phase
- Artillery (no Air/Naval)
- Combat segment (9.0, artillery units strength [1] per 13.4b)
Allies aren’t going to risk it this turn, holding tight.
Exploitation phase
- Movement segment
- Barrage segment
- Combat segment
Nothing.
Allies clean Up phase
- Remove DG and Exploitation markers.
- Flip or remove Fueled markers.
- Remove train-busting placed by Japanese player.
N/A.
Japanese Turn 2
Brief summary of Japanese goal this turn.
In short, the Japanese need to eliminate 2 more to get a win. This might be easy, it might be hard. In either case, it’s going to take very close tracking of supplies to get them where they need to be.
Movement
- Movement segment (6.0): 1/2 for DG (5.10), 1/4 for Reserve (5.7)
Moving supplies and positioning for combat next turn. Not enough SP within throw to make combat worthwhile.
The general notion is to take a good solid swipe at the Allies as they consolidate before bugging out. With a little luck, the Japanese will get the double turn. They will be well-positioned for it.
Trace Supply
This phase does:
- Determine which units are in or out of Trace Supply (12.6)
- Replenish low or exhausted internal stocks (12.10)
All in Trace Supply.
Reaction phase
- Non-phasing player releases Reserves (5.7), destroy dumps (12.11).
- Non-phasing player barrage (all types, 10.0) and transport.
Air barrage on the buildup at Tiddim, will use high bombardment from two airbases for the flight, will be nasty for the Japanese if the air barrage works.
Barraging with 40 points on B.3.24. Flak roll 7 for no effect.
Roll 8 - 1 left for Very Close terrain for 7, which is column 17-24
and a DG result. Bummer for Japanese. They’re going to attack anyway
on next turn, because this is their turn, so the DG marker is coming
off. It was a wasted air barrage given the Japanese aren’t going to
attack, but the Allies don’t really know that, so, not a waste given
free air for Allies.
Combat phase
- Artillery barrage (10.1, no Air/Naval)
- Combat segment (9.0, artillery units strength [1] per 13.4b)
Japanese passing on Combat this turn.
Japanese clean Up phase
DG markers come off. Now to get that double roll for the Japanese on next turn.
End of Turn 2
The Allies decided not to cut and run, it would have been high risk at least one more unit eliminated. Holding for one more turn should allow for a better retreat, lower risk as more units come forward to help support the retreat.
The Japanese just didn’t have enough supply to do any decent combat for two successive turns, so they decided to wait one more turn to bring up enough supply to put full weight on the Allied tail draggers. If they get the initiative next turn, there is a good chance they can take out another Allied unit.
Here’s the game state for the end of Turn 2.
Turn sequence:
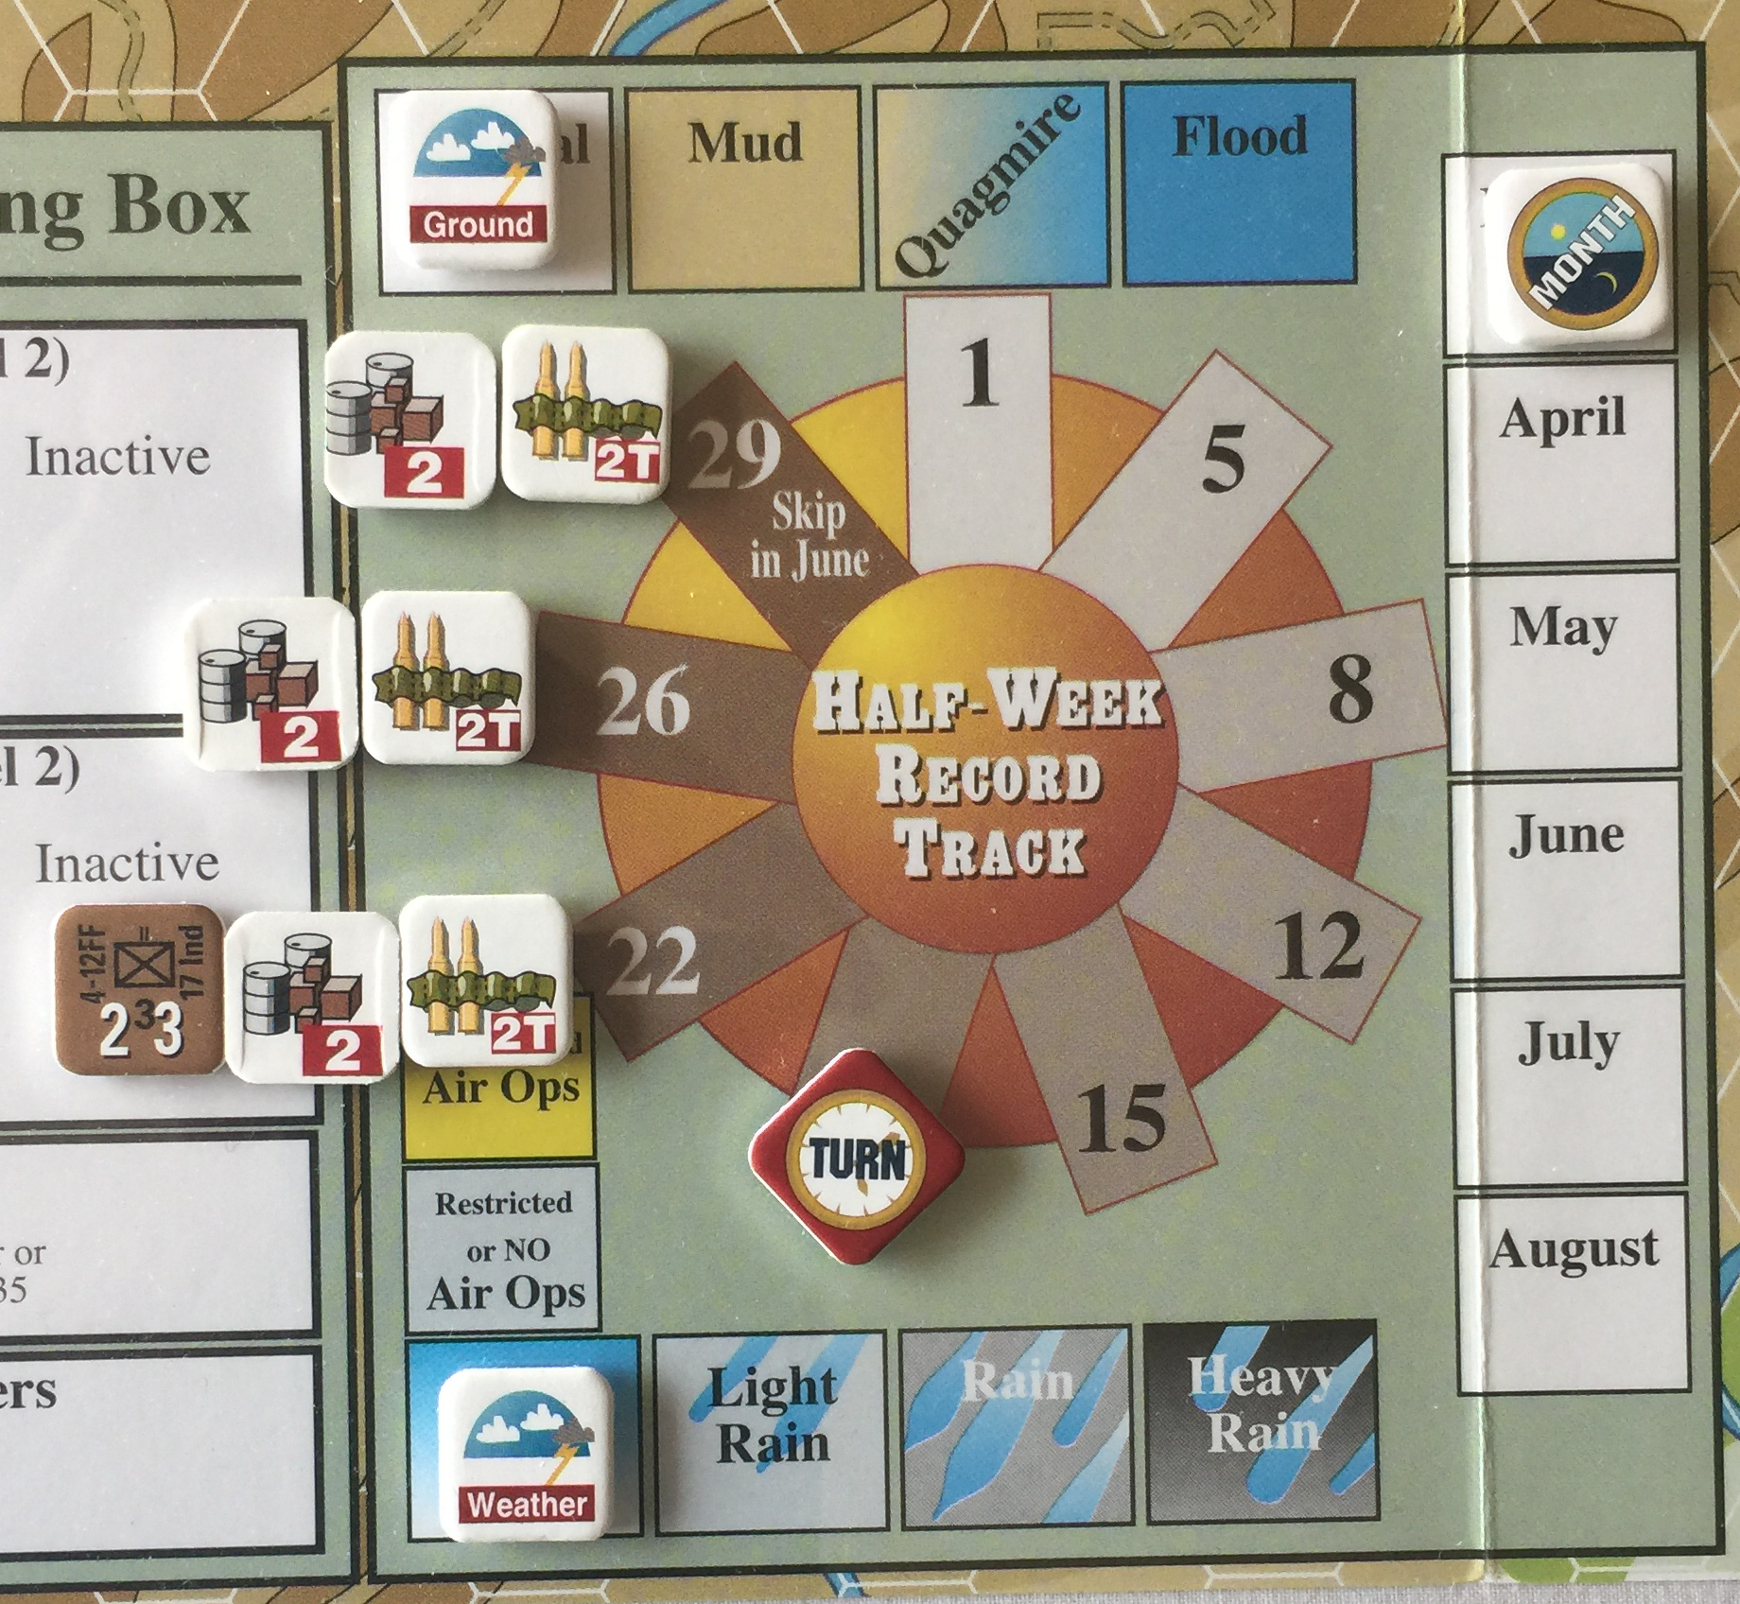
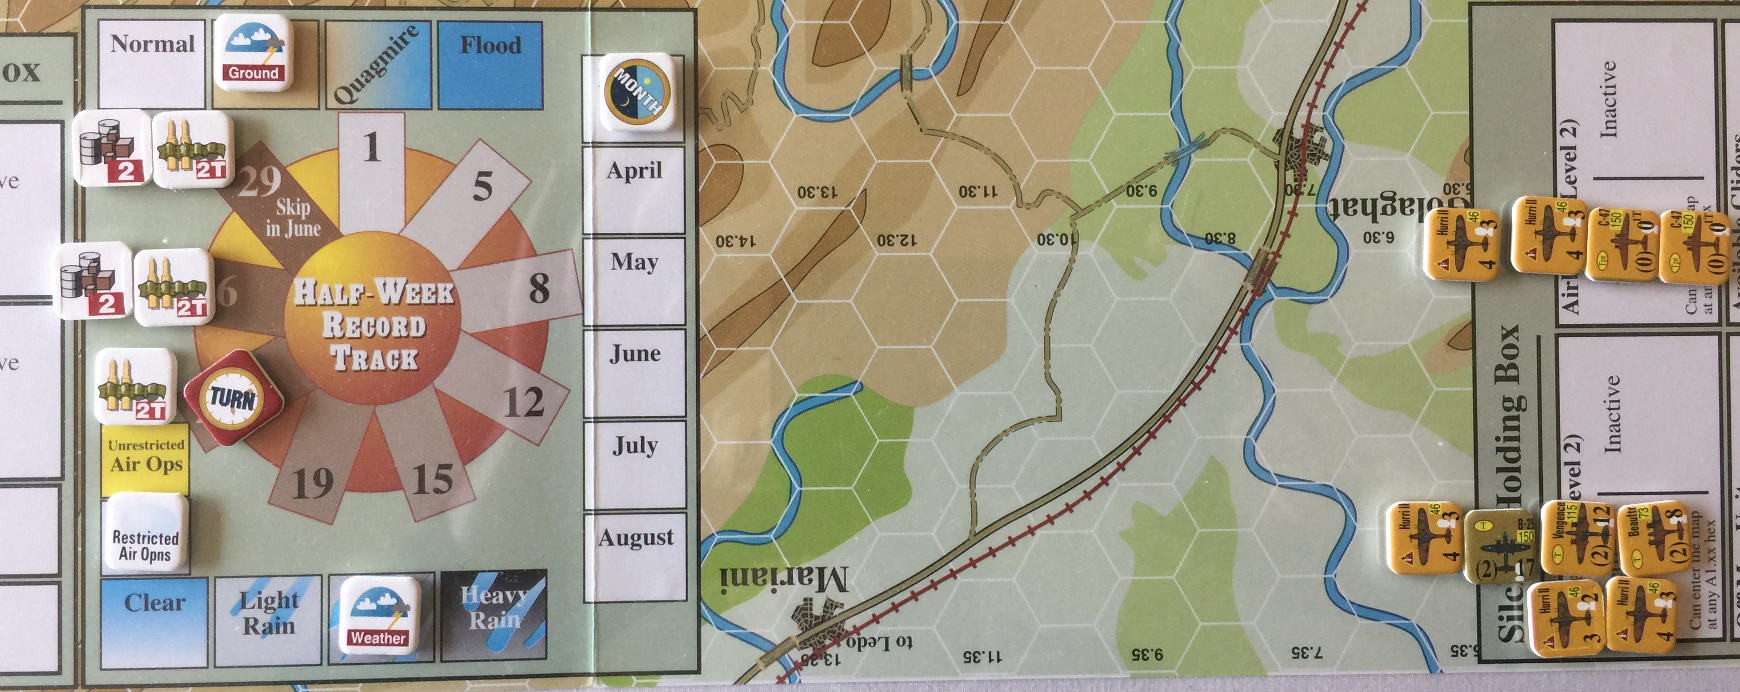
Silchar holding box:
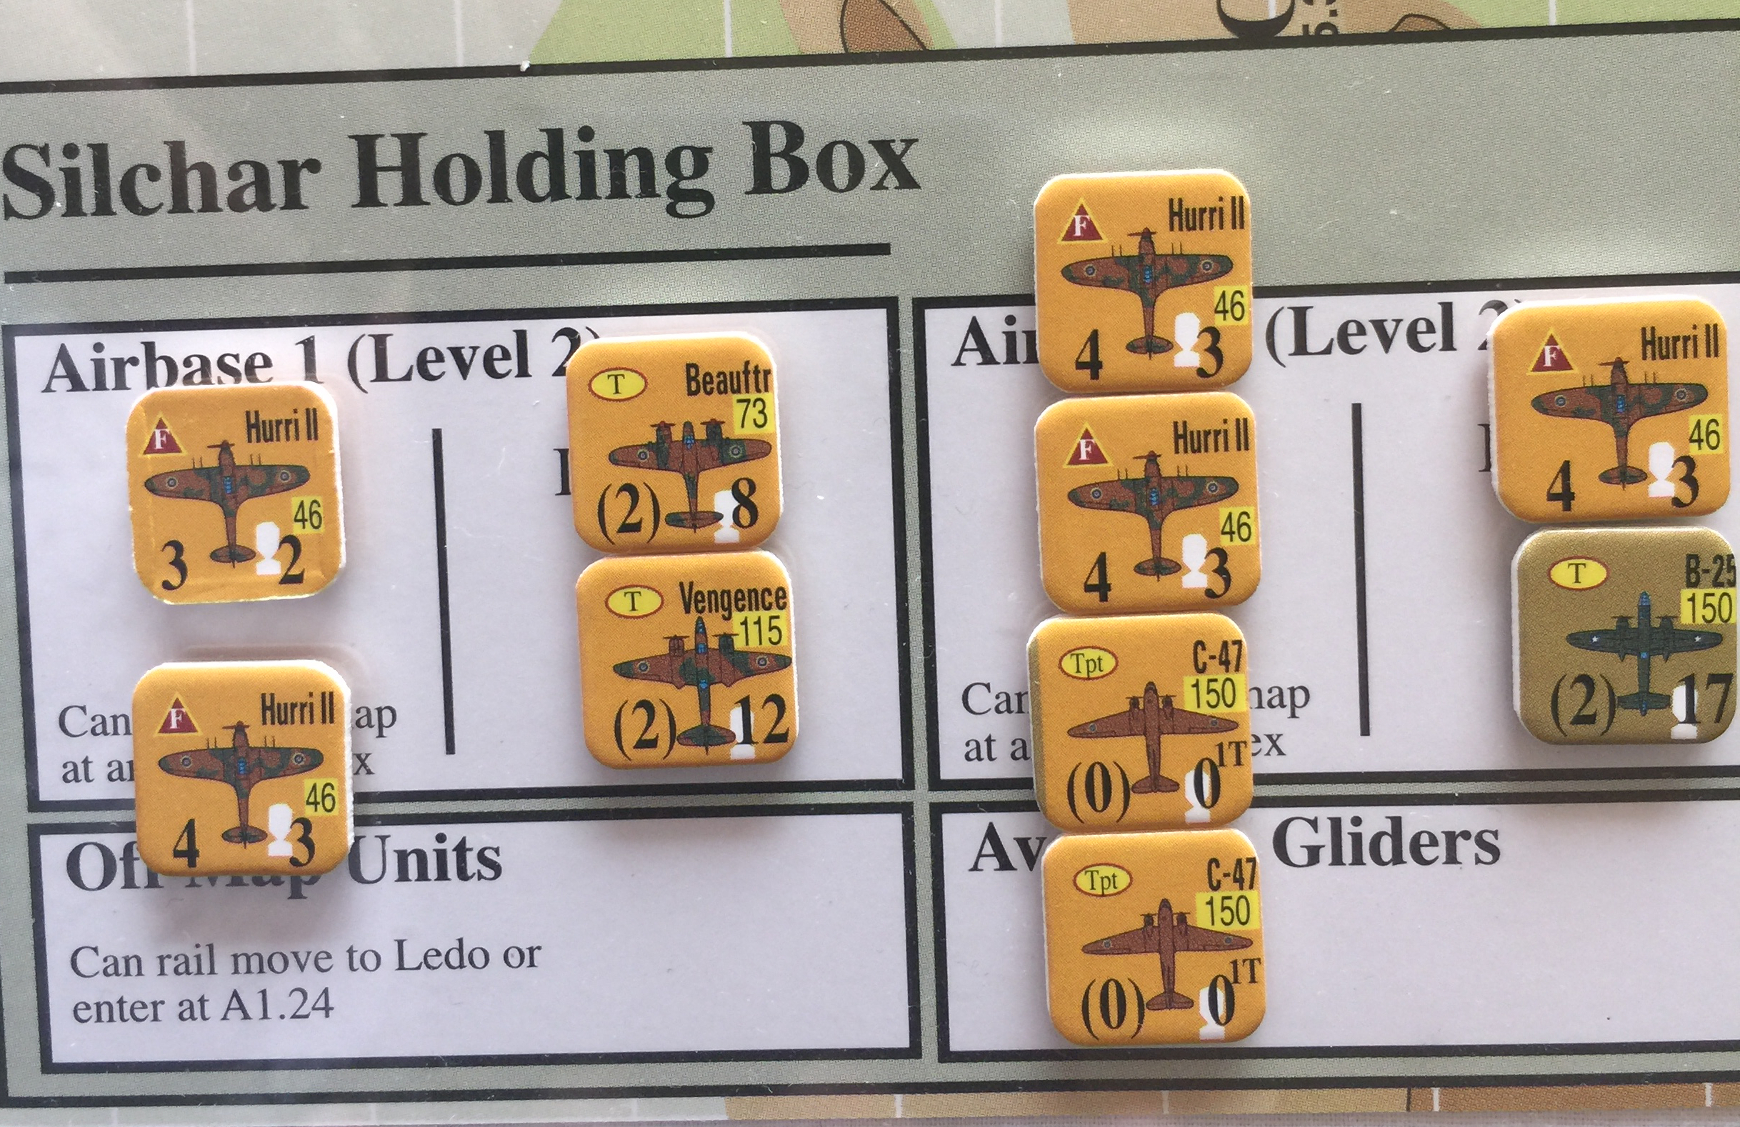
Positions of units:

Note: these are spread out to allow setting up later. The game had to be boxed up for a few days to allow other activities to proceed.
Game Turn 3
The Allies are almost in a bind, but the Japanese are pretty far out on their supply chain as well. The Japanese would like to kill two more units for the win. The Allies need to reinforce just enough to cleanly bail. A lot will depend on who has first player this turn.
Pre-Turn Phase
- Weather roll:
6-3which is rain! This makes ground conditions Mud. This has effects on Air and Movement. - First player determination: Allies 2, Japanese 1, Allies move.
Allies Turn 3
Brief summary of Allies goal this turn.
The Allies are going to move all units as far as they can using up as much supply as possible, blow the supply which cannot be moved, barrage with as much supply as will allow defending and next turn movement.
At the start of the turn, the Allies can draw on 5 SPs, with another 6:1T available within throw.
Aircraft refit
All planes ready to fly. Except rain! Roll 4, Restricted Air Operations.
Reinforcement
- 2 SP at B.2.34
- 4-12FF back in play at B.2.34
Movement
- Movement segment (6.0): 1/2 for DG (5.10), 1/4 for Reserve (5.7)
- Because of rain(!), the mules cannot get any more SP out of the combat zone.
- Fuel up the armor and trucks (artillery).
- Blow the dump, roll 3, destroy 1 SP, leave 1:1T behind. Bummer.
- Start moving out! Deploy reserve markers liberally to allow some spotting, then being able to move to a more defensible position after spotting.
- Air/Naval Barrage segment (10.2, 10.3)
Rain! No air for the Allies. Bummer for them.
Trace Supply
All Allied units in trace.
Reaction phase
Japanese have no units reaction capable.
Combat phase
- Artillery barrage (10.1, no Air/Naval)
Barrage with 42, draw 6T, roll 10-6 which means
the Japanese lose a step and get DG. Let’s let the 1-33-33
arty unit take the hit. Those dudes are weak sauce anyway.
- Combat segment (9.0, artillery units strength [1] per 13.4b)
Passing on combat, going straight to reserve movement.
Exploitation phase
Move the reserve unit which was spotting out of the way. This will let the Japanese attack, but that’s ok. Should still have enough T to defend.
Allies clean Up phase
Nothing to do here other than remove reserve markers.
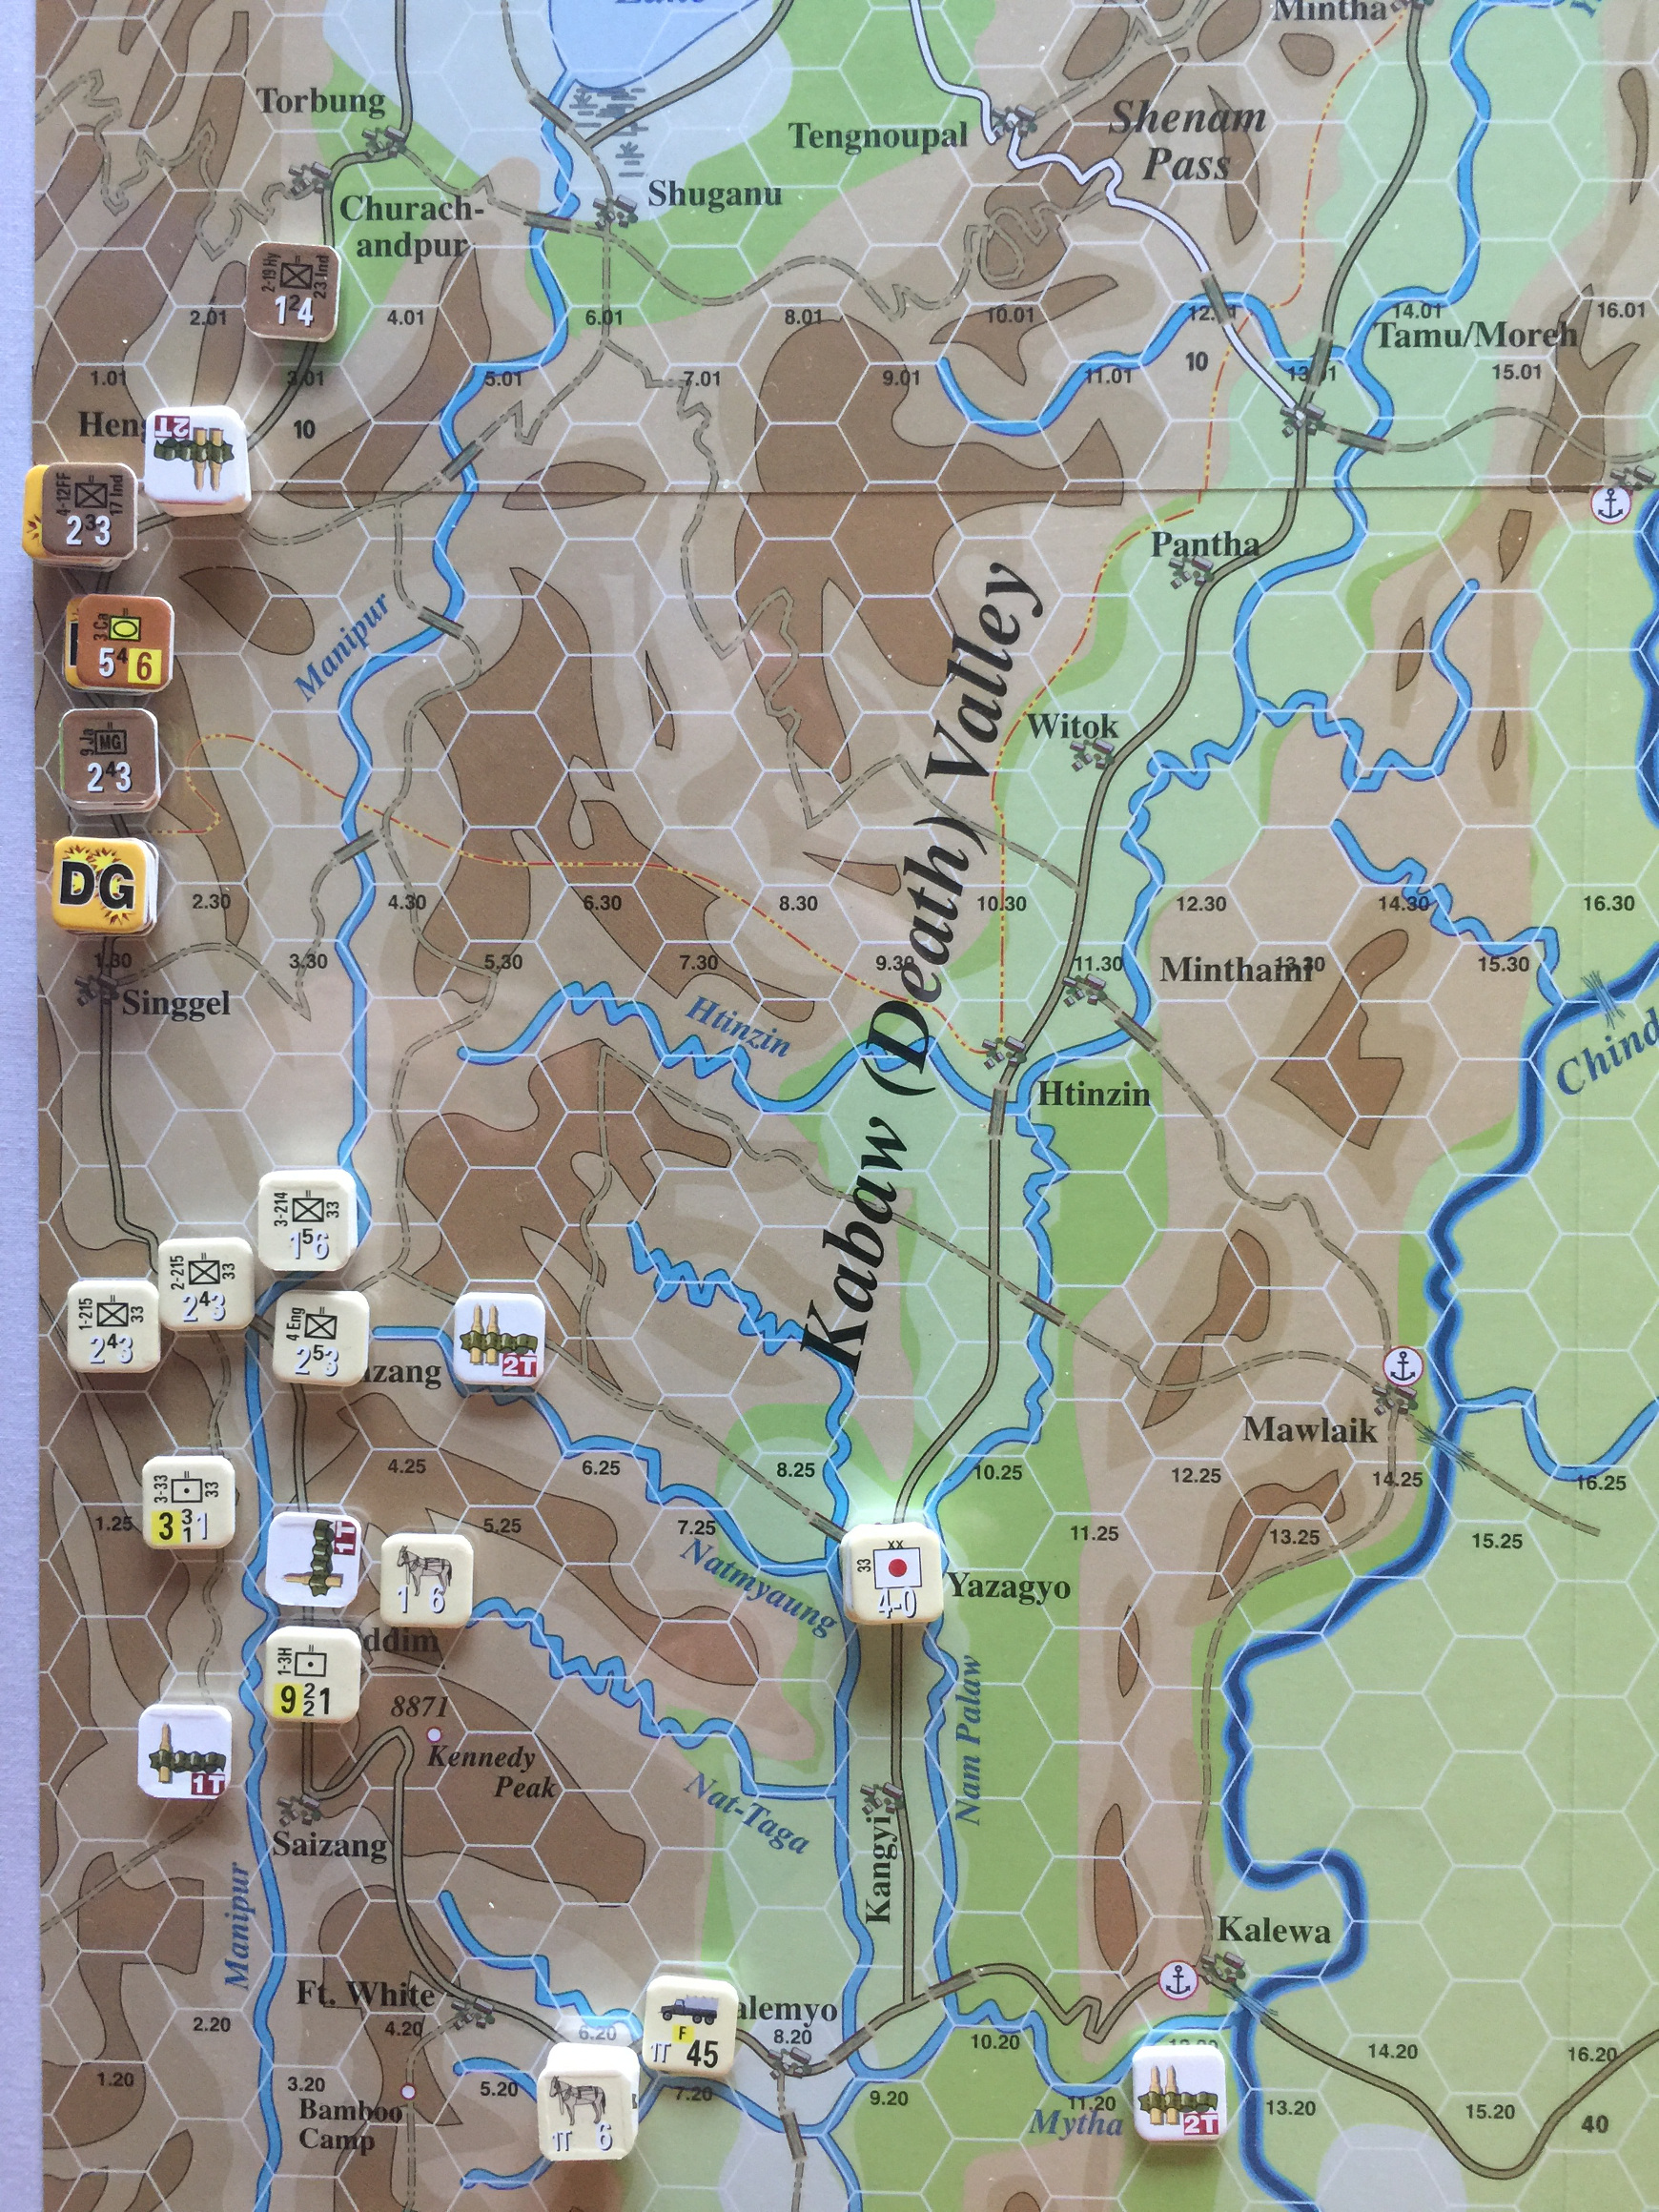
I had to put the game up for a bit, here’s the situation after the CW Turn 3:
Japanese Turn 3
Brief summary of Japanese goal this turn.
Setting this up on Christmas Day 2019, 6 some odd months after starting the game, I’m not really clear on what to do next. At the moment of this writing, I have the counters on the map, but that’s it. Next steps, in order:
- (DONE) Dig out the OCS rules, the Burma rules, and the player aids.
- Reread the session report to determine what has actually transpired up to now.
- Determine how long I want to play this thing today, and develop some ending criteria.
- Make a plan for the upcoming Japanese turn.
- Get more of the rules in to Anki (ongoing during game play).
All of this is extra difficult as my eyes are really sore and I’m having a hard time focusing on the screen.
[2019-12-18] And nothing happened on Christmas Day, I got distracted by other things. What I’ve decided the Japanese will do is go all out attack and see if they can destroy another step of CW units, which I believe will result in a draw. Then I might just put it away. We’ll see at that time.
Aircraft refit
Cost 1T to refit any air base regardless of level or number of aircraft (15.1B)
No aircraft for Japanese.
Reinforcement
Per scenario specification or reinforcement track.
2T at Kalewa.
Movement
- Breakout segment (12.8e) Check trace to friendly units in supply.
No breakout.
- Movement segment (6.0): 1/2 for DG (5.10), 1/4 for Reserve (5.7)
This is a Mud condition turn, which is going to have effects on movement, worst effect on the trucks. Nevertheless, the Japanese are taking advantage of the OCS rounding rule, and moving 2 hexes for a 1.5 MF. Focus is on CW unit in hex B2.27. (This is wrong for movement, recall trucks count half points, which is what should have been done here as well. It didn’t matter for this turn, but having a single unit 1 hex further than it would normally be could matter a lot in future turns.)
- Air/Naval Barrage segment (10.2, 10.3)
None.
Trace Supply
This phase does:
- Determine which units are in or out of Trace Supply (12.6)
- Replenish low or exhausted internal stocks (12.10)
It does not deal with the “On Map” supply provided by “S” and “T” counters.
Reaction phase
- Non-phasing player releases Reserves, etc.
- Non-phasing player barrage
Huge mistake here from the CW side: they should have put all the artillery in Reserve so it could be used here in reaction phase to disrupt the oncoming Japanese. No reaction!
Combat phase
- Artillery (no Air/Naval)
The Japanese have one puny battery of strength 3, but it’s going to try and get lucky, there is enough supply. Just enough, and that’s blowing the wad on this turn.
Spend 2T for 3-33, roll 7/1, which is no effect for barrage.
- Combat segment (9.0, artillery units strength [1] per 13.4b)
Japanese 33 Eng leads with Morale 5, CW 7-10 leads with Morale 4, roll for surprise: 8 + 1 for no surprise.
Odds are 10:9, rolling on 1-1 for very close…roll 6 + 1 (Action rating
difference) for 7, which is AL1o1Do1. 33 Eng is kaput, will take
another step loss as will be getting a stack of units back from DG at
the end of the turn, 3-215 chooses to stand and die. This forces the CW
to choose a retreat or a step loss. Obviously, a retreat is in order,
but every retreatable hex is in a Japanese ZOC, so they retreat up the
road and stack with another unit, and the whole stack goes DG. Which is
not a bad thing for the Japanese, although it probably won’t matter.
Exploitation phase
- Movement segment
- Barrage segment
- Combat segment
Nothing.
Japanese clean Up phase
- Remove DG and Exploitation markers.
- Flip or remove Fueled markers.
- Remove train-busting placed by Japanese player.
Remove DG markers.
End of Turn 3
Briefly recap the turn for both sides.
The Japanese made a worthy attempt, but if the CW gets away on the next turn, it’s game over with a CW win. The Japanese needed to get a CW step loss here to get the draw. Let’s see what happens next. Maybe the Japanese will get the initiative. But can they get enough supplies to make that matter?
Game Turn 4
Briefly summarize the upcoming turn for both sides.
In a nutshell:
- The CW needs to bolt down the road as fast as possible to out run the Japanese ability to supply.
- The Japanese need to get the initiative and hammer the CW while it’s DG, supply permitting.
Pre-Turn Phase
-
Weather determination (2.3, probably on map)
- Weather roll 5/4, Light Rain this turn.
- Mud last turn with Light Rain this turn is Mud again.
- Air Operations roll 1, Unrestricted with Light Rain. This is super good for CW.
- First player determination, roll d6 highest has initiative, reroll for tie (2.3).
Roll:
- CW: 3.
- Japanese: 1.
CW has the initiative. Bummer for Japanese.
Commonweath Turn 4
Brief summary of Commonweath goal this turn.
Succinctly, getting as far away from the Japanese as possible, hopefully out past their ability to supply themselves. Should be doable.
Aircraft refit
Cost 1T to refit any air base regardless of level or number of aircraft (15.1B)
All aircraft are active.
Reinforcement
Per scenario specification or reinforcement track.
2S at B3.35.
Movement
- Breakout segment (12.8e) Check trace to friendly units in supply.
None.
- Movement segment (6.0): 1/2 for DG (5.10), 1/4 for Reserve (5.7)
Time to read up on DG movement in rules. MP is 1/2 when in DG mode. Since we’re in Mud, that’s going to slow down the retrograde motion considerably for the DG units. I can move stacked DG units independently, the rules imply each “dropped off” unit remains in DG mode. I’ll need to fish out some markers.
First thing is to bring up some supply points to fuel the motorized units. Then move everything.
It’s clear after moving that even with half movement points, and trailing unit being DG, that the Japanese cannot move nearly enough combat strength to make a difference. It would be combat on the 1:3 column, and would need to roll boxcars with a +3 DRM, which just isn’t there, best is +1 DRM.
So that’s the game after all. Here’s what it looks like:
AAR
Overall I’m happy with the game. It’s nice to sit back down with OCS again. I’m not happy it took me 6 months to finish the game, with what ended up being a single turn of play to finish. But that’s how it goes, career is first these days.
Some questions
-
Suppose a stack with a reserve marker is rendered DG during Reaction Barrage Segment. The way the rules read this renders the Reserve unit(s) unable to move in Exploitation Phase. The ambiguity concerns the word “earn Exploitation Mode” in 5.10b (C), to wit, the Reserve markers are placed rather than “earned.” I’m playing that the DG renders the Reserve movement in Exploitation Phase null, but I can see it either way: a unit in Reserve might be better prepared to weather what would otherwise be the effects of DG.
Restating: does a DG result from reaction remove the ability of a unit in Reserve to proceed during Exploitation Phase?
-
When a 3 MP is halved to 1.5, is that rounded up to 2? I think it is not, as trucks moving supply track half points as well. So I played it wrong on Japanese turn 3.