Kim Kanger's Tonkin
I have a potential opponent lined up for playing “Tonkin The First Indochina War.” This provides an excellent reason to lay it out for some solo play to learn the rules.
The game is published by Legion as an updated version of a similar game which appeared several years previously in a Via Victus issue. The counters are Legion’s easy punch. The map is a bit busy, such the counters tend to blend in with the map, making it difficult to photograph games in progress. I won’t complain about overly busy maps, or the “little dudes” on the counters, but I do find such things detracts from my experience with a game.
Turn 1, Oct. 1952
Recap previous turn, and present challenges for both players for this upcoming turn.
Since this is the first game I’ve played of Tonkin, I have no idea what I’m doing, so I’m just going to do it.
Replacement & Reinforcement Phase (rule 2.0):
1. VM receives reinforcement, if the VP level is equal to
or less than the current VM number (rule 2.1).
No reinforcements this scenario. The Reinforcement Chart (player aid) only shows reinforcements for December 1950 in any case.
2. VM decides on mix of SD and Replacement Points
(rule 2.2). Regiments may receive replacements.
For the Na San intro scenario, the VM receive 2 replacement points and any points received from 2.2e and 2.2f from occupying FEF or attacking FEF positions.
3. VM non-motorized regiments may replace steps by
absorbing Tieu Doans within 2 hexes (rule 2.3).
Nothing for this scenario.
4. VM may mobilize an equal number of Tieu Doans
from Tieu Doan/Pathet Lao Box 2 as half the number
of VM-friendly VP hexes. Place them within 2 hexes
of a Vietnamese mobilization center (rule 9.0-2).
VM may place a Pathet Lao, from the same box, in a
VM-friendly mobilization center in Laos if there are
more VM-friendly centers in Laos than there are
Pathet Laos. Finally, move all units from box 1 to
box 2 (rule 2.4).
No Tieu Doan this turn (up to 2 in this scenario, must be taken from losses).
5. FEF receives reinforcement and pays VP, or places
them on the Turn track (rule 2.5).
No reinforcements this scenario for FEF.
6. FEF decides on mix of SD and replacement points
(rule 2.6). Units may receive replacements.
FEF receives 1 SD to be placed in Hanoi.
7. FEF withdraws units (rule 2.7).
No withdrawal for FEF this turn.
VM Player Movement Phase (rule 3.0):
8. VM may move all VM units (rules 3.1, 3.8, 4.5, 6.14,
7.5). Units may double move (rule 3.2) and use
transports (rules 3.3, 3.4). Units may overrun
(rule 6.4).
Not doing a lot of movement this turn, as I’m not really getting the movement and ZOC rules down very well. However, I have set up the VM to attack. Basically, just pushed around a few counters towards one of the VP hexes.
For Na San only: VM receive 1 SD according to scenario instructions.
FEF Player Movement Phase (rule 3.0):
9. All FEF units may move (rules 3.1, 3.8, 4.1, 4.3, 6.14,
7.5). Units may double move (rule 3.2)
use transports (rules 3.3 - 3.7). Units may overrun
(rule 6.4).
I’m going to have to write out these moves in detail to understand how movement works in this game. As of this writing, November 23, 2015, I haven’t been able to make any progress on the game in a month. That’s idiotic.
I have the 2/2 REI, the 2/13 and 3/13 DBLE, 1 and 4 GM in Vin Yen (V-14). I want to move them to Phu Tho (T-14) to attack a stack of Tieu Doan in hex T-13. Let’s total up the costs.
- REI is Regiment Legion Etranger Infantry, i.e., French Foreign Legion. MF 7.
- French Foreign Legion half-brigade MF 7
- GM is Group Mobile, i.e., mechanized. MF 14.
The distance is 2 hexes.
I strongly suspect the mechanized units will pay a premium for movement across river and woods hexes.
The terrain:
- First hex clear (1, 2) with river (+2, +3).
- Second hex forest (4, 7) with river (+2, +3).
There will be no double movement allowance as these units will end in an EZOC.
Totaling everything up it requires 9 MF for the leg and 15 MF for the mechanized to move 2 hexes. That’s a no go, so they’ll move to U-13 to put some pressure on the Tieu Doan.
Next up, the Thai will defend Nghia Lo as it’s a victory hex, containing an airfield. One Thai is in place, the other needs only move one hex, from Q-11 to R-11. The terrain is rough, which requires 3 MF, and the Thai have 9 MF to spend. Since there is no movement cost for moving into (or out of) an EZOC, the Thai unit moves to reinforce Nghia Lo. Hopefully they will be able to do some damage in return to the upcoming attack from the Communists.
Now to move the stack of units from Ha Dong to somewhere useful. One possibility is assaulting the NVA regiments lurking south of Hoa Binh, but the best odds I could get there are 19:10, which is probably 1:1 because I don’t see any other rounding rule specified. The FEF does get a morale +1 if leading with DNA. However, it looks like they could simply bypass the NVA as ZOCs apparently do not inhibit regular movement, only double movement. This force is going to head to Na San to shore up the defense there (Na San is a VP hex).
Huge stack of FEF leaves Hanoi towards Tuyen Quang. Can’t get all the way there, not enough MF and would end in EZOC preventing double MF move.
Moved a GCMA onto the NA San hex, just in case.
That’s it for movement phase. Only took a month to get this much of the game figured out.
Attrition Phase (rule 5.0):
10. All units with an OoS marker will lose 1 step each as
attrition unless able to draw supply (rule 5.0).
Nothing to do in attrition phase this turn, everything is assumed to be in supply.
Operation Phase (rule 6.0):
11. Both players receive 10 operation points and both decide whether to spend an SD or not (rule 6.2).
Both will spend an SD.
12. VM rolls to get 1, 2 or 3 operation points (rule 6.1).
VM rolls 2 for 1 operation point to kick off Turn 1 Operations Phase.
Each point (rule 6.3) allows you to either:
- Remove 3 DG / destroyed road markers (rule 4.5).
- Exchange an SD for 3 trench markers.
- Move a stack of units (see number 8 above).
- Destroy roads (rule 6.7). If an SD was spent then you may also choose to
- Barrage with artillery (rule 6.6) (only if SD spent).
- Attack with troops (rules 6.4, 6.7 - 6.15) (only if SD spent).
After the point/points are spent then it is FEF’s turn.
13. FEF rolls to get 1, 2 or 3 operation points (rule 6.1).
Each point (rule 6.3) allows you to either:
- Remove 3 DG / destroyed road markers (rule 4.5).
- Exchange an SD for 3 trench markers.
- Move a stack of units (see number 8 above).
- Barrage with airstrike/Navy (rule 6.6)
- Destroy roads (rule 6.7).
- (If an SD was spent) Barrage with artillery (rule 6.6)
- (If an SD was spent) Attack with troops (rules 6.4, 6.7 - 6.15).
After the point/points are spent then it is VM’s turn. VM and FEF take turns to spend operation points until both sides have spent ten points each.
VM 1
138 and 42 attack FEF stack passing by on road. The odds are 10:19, so
1:1, with -1 terrain and -1 morale difference. The VM need to roll lucky
here, 2d6 roll 7 - 2 for 5 is Ex-Al. That’s not too bad as the VM
units are each 3 step. The French have to take it out of the morale 4
unit which was defending, losing a single point of combat strength. Now
to roll for DG: VM 2 + 2 (forest)no DG, FEF 6 DG. Rolling a 6 is pretty much
guaranteed DG unless the unit is entrenched or has very high morale.
FEF 1
FEF rolls 1, chooses to remove DG marker from previous battle.
That was fast.
VM 2
Roll 2 for 1 operation, attack Thai in Nghia Lo at 23:4 odds which is
5:1. Roll 7 + 1 (morale) for 8 is ExDL, which eliminates the Thai.
VM DG roll 2, no effect. All VM advance after combat into Nghia Lo.
FEF 2, 3, 4
Roll 6 for 3 operations.
First, move to Destroyed Road marker.
Second, remove Destroyed Road marker.
Third, continue moving that stack, which can only move another hex along the road as it doesn’t have enough MF to clear the adjacent river in the forest. It is two moves from being able to attack Nghia Lo though.
VM 3, 4, 5
VM roll 6 for 3 operations.
First, move to block the large stack of FEF.
Second, move artillery to blocking units.
Third, barrage the FEF in V-13 from V-12. From the Barrage table we need
to roll high to get good results. Defender morale 5 is -1, defender in
forest is -1, defender stacked 6+ is +1 for net -1, roll 11 (!) - 1 for
10 is DG the whole stack. Unmodified that would have been DG & DL.
FEF 6, 7, 8
FEF rolls 6 for 3 operations, lucky.
First, remove DG on mega-stack.
Second, move megastack to W-12, which is a single hex.
Third, attack the lone VM in W-11 at 22:6, which is 3:1 with defender in
forested hex. Roll 4 - 1 (defender in forested hex) + 2 (morale to FEF) = 5,
which is Ex, which isn’t great, but the FEF can absorb it but than the VM.
VM roll 1 for no effect, FEF roll 5 for DG, bummer.
VM 6
VM rolls 2 for 1 operation.
(I’m picking this up again after several months of not playing.)
Two regiments of the NVA 312 move towards Na San.
FEF 9
FEF rolls 1 for 1 operation, remove DG from big stack south of Thai Nguyen.
VM 7
VM rolls for 1 operation. Will barrage from V12 to W12 with 4 points. Target has a 5 morale unit for -1, but heavily stacked for +1, and in mountain terrain, -1. VM need to roll 9 or above: 7, miss.
FEF 10
No need to roll, this is the last FEF operation, and they will attack
W12 to V12. Odds are 21 to 13, because the barrage value may be used
in defense (S. 6.8, para. 2), hence 1:1 with -1 combat modifier for
defender in forest, +2 for morale difference, net +1 roll 9 + 1 for 10
which is EX-DL, not a bad result for the FEF given the odds.
DG roll for FEF is 2, +1 for defending artillery is 3, with DG being 5+, FEF is not DG.
For VM, DG roll is 3 with 3+ resulting in DG.
VM 8, 9, 10
- HQ and SD from U12 move to U11.
- DG removed
- Another barrage as above, maybe the VM will get lucky: roll 7, missed.
And that concludes the Operations Phase of Turn 1. On to supply…
Supply Check Phase (rule 7.0):
14. All units check for supply (rules 7.1 - 7.4). If a unit
is not in supply then it is marked with an OoS
marker (rule 7.5).
3 VM units out of supply, all FEF units in supply.
15. Reset the Phase marker, the VM truck transport
marker, the FEF air transport marker and move
the Month marker and start at number 1 again
(rule 1.10) or
End of Turn 1
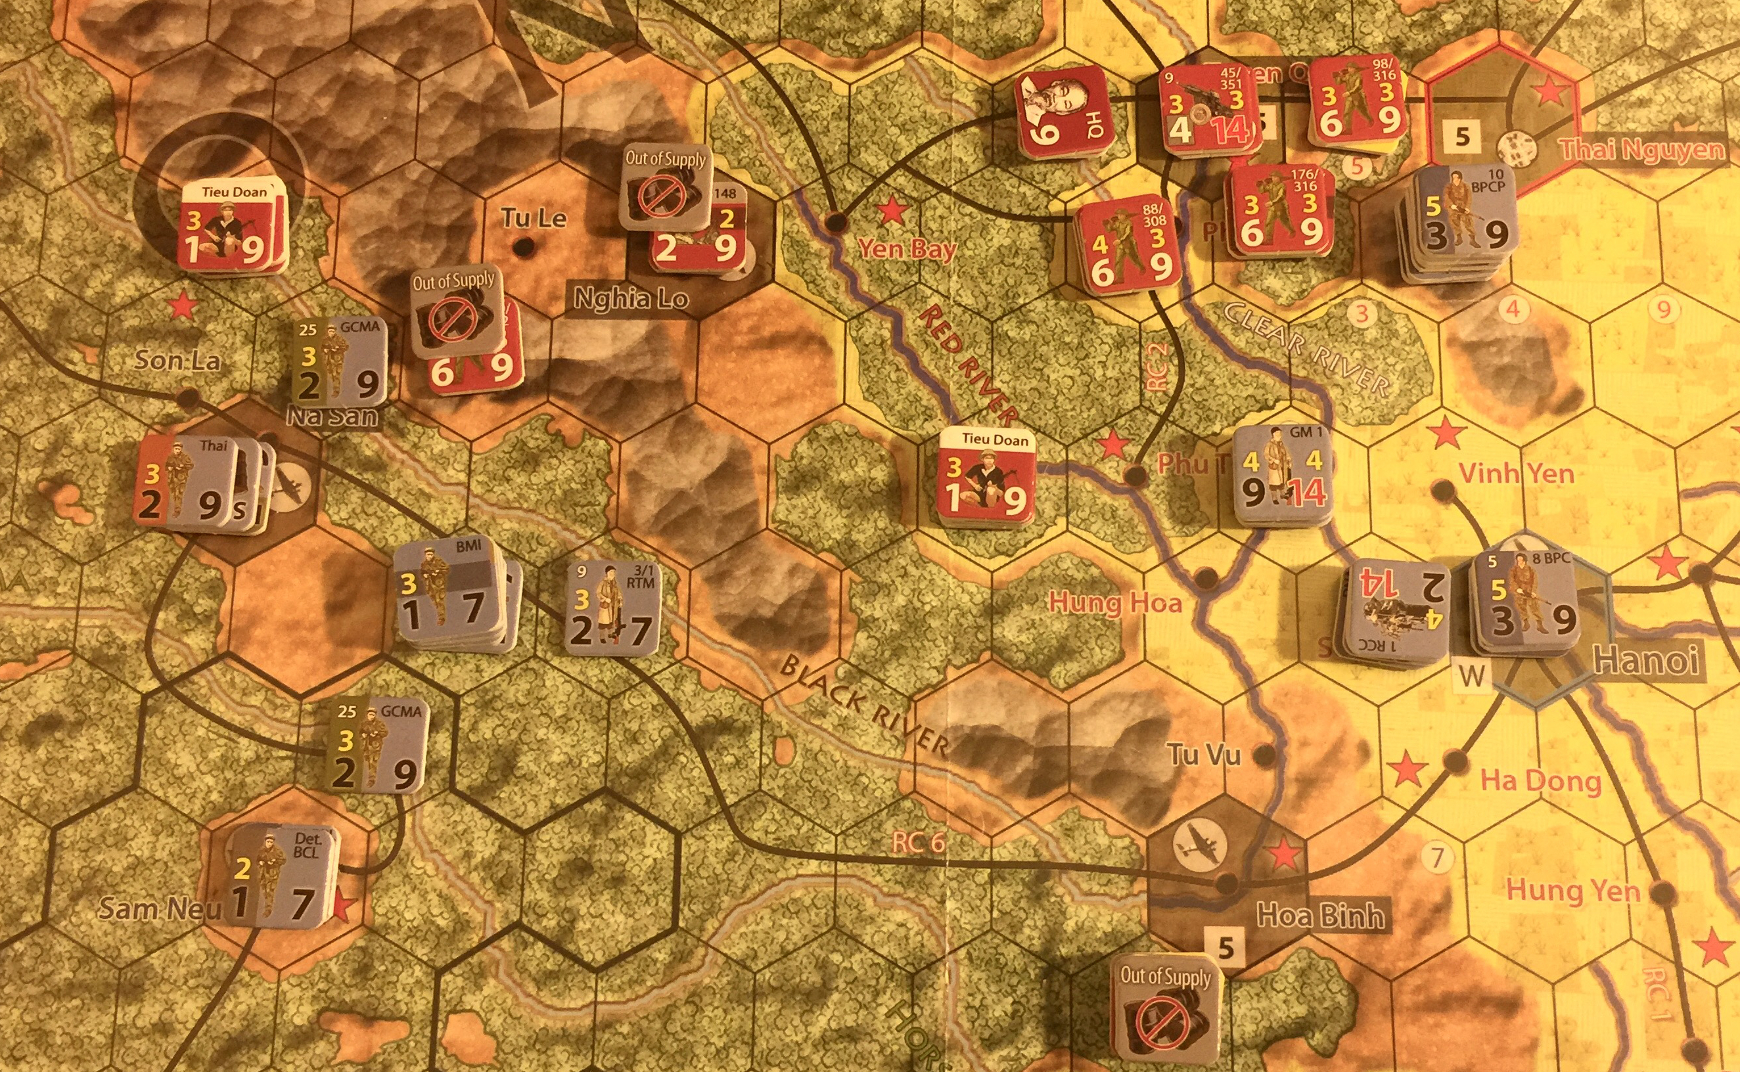
Here’s the situation:
Turn 2, Nov. 1952
Recap previous turn, and present challenges for both players for this upcoming turn.
During the previous turn, neither the VM or FEF had any idea whatsoever about what exactly to do, so they both blundered about. The VM did manage to acquire Nghia Lo, which is a VP hex.
During the upcoming month of November, the FEF will attempt to recapture Nghia Lo, while the VM will attempt to defend it while acquiring Na San proper.
We’ll see how it goes.
Replacement & Reinforcement Phase (rule 2.0):
1. VM receives reinforcement, if the VP level is equal to
or less than the current VM number (rule 2.1).
No reinforcements this scenario.
2. VM decides on mix of SD and Replacement Points
(rule 2.2). Regiments may receive replacements.
In this scenario, VM get an SD, which is placed on any road hex connected to Thai Nguyen. In this case, it’s going in hex S11. VM also get 2 replacement points, each of which is used to rebuild a step for 2 two regiments near Thai Nguyen.
3. VM non-motorized regiments may replace steps by
absorbing Tieu Doans within 2 hexes (rule 2.3).
There are no Tieu Doans within range at the start of Turn 2.
4. VM may mobilize an equal number of Tieu Doans
from Tieu Doan/Pathet Lao Box 2 as half the number
of VM-friendly VP hexes. Place them within 2 hexes
of a Vietnamese mobilization center (rule 9.0-2).
VM may place a Pathet Lao, from the same box, in a
VM-friendly mobilization center in Laos if there are
more VM-friendly centers in Laos than there are
Pathet Laos. Finally, move all units from box 1 to
box 2 (rule 2.4).
Nothing in Box 2.
5. FEF receives reinforcement and pays VP, or places
them on the Turn track (rule 2.5).
No reinforcements this scenario.
6. FEF decides on mix of SD and replacement points
(rule 2.6). Units may receive replacements.
1 SD in Hanoi, 4 replacement points received, spent 3.
7. FEF withdraws units (rule 2.7).
VM Player Movement Phase (rule 3.0):
8. VM may move all VM units (rules 3.1, 3.8, 4.5, 6.14,
7.5). Units may double move (rule 3.2) and use
transports (rules 3.3, 3.4). Units may overrun
(rule 6.4).
VM move on Na San, while bolstering Nghia Lo and attempting to remain well-fortified at Thai Nguyen. We’ll see how it works out.
FEF Player Movement Phase (rule 3.0):
9. All FEF units may move (rules 3.1, 3.8, 4.1, 4.3, 6.14,
7.5). Units may double move (rule 3.2)
use transports (rules 3.3 - 3.7). Units may overrun
(rule 6.4).
Move to assault at Thai Nguyen, reinforce at Na San.
Attrition Phase (rule 5.0):
10. All units with an OoS marker will lose 1 step each as
attrition unless able to draw supply (rule 5.0).
Operation Phase (rule 6.0):
11. Both players receive 10 operation points and both decide
whether to spend an SD or not (rule 6.2).
FEF spending at Hanoi, VM spending from HQ north of Nghia Lo.
12. VM rolls to get 1, 2 or 3 operation points (rule 6.1).
VM 1, 2
VM rolls 4 for 2 operations.
Each point (rule 6.3) allows you to either:
- Remove 3 DG / destroyed road markers (rule 4.5).
- Exchange an SD for 3 trench markers.
- Move a stack of units (see number 8 above).
- Destroy roads (rule 6.7). If an SD was spent then you may also choose to
- Barrage with artillery (rule 6.6)
-
Attack with troops (rules 6.4, 6.7 - 6.15). After the point/points are spent then it is FEF’s turn.
- Barrage W12 from V12 and W11, 8 barrage points, with +1 modifier
for excessive stacking, -1 for mountaint and -1 for 5 morale,
roll 10 - 1 is 9, which is
DG & DL. - Move out of supply regiments around the east of Hanoi to get into supply range of Thai Nguyen.
13. FEF rolls to get 1, 2 or 3 operation points (rule 6.1).
FEF 1, 2
FEF rolls 3 for 2 operations.
Each point (rule 6.3) allows you to either:
- Remove 3 DG / destroyed road markers (rule 4.5).
- Exchange an SD for 3 trench markers.
- Move a stack of units (see number 8 above).
- Barrage with airstrike/Navy (rule 6.6)
- Destroy roads (rule 6.7). If an SD was spent then you may also choose to
- Barrage with artillery (rule 6.6)
- Attack with troops (rules 6.4, 6.7 - 6.15). After the point/points are spent then it is VM’s turn. VM and FEF take turns to spend operation points until both sides have spent ten points each.
Time to bring on an airstrike if possible:
- Airstrike if possible on regiments of the 312 which are threatening
Na San from hex O14. Looks like it’s possible, with -1 for forest, +1
for 6 or more stacking, net 0 modifiers, roll 10 which is
DG & DL, a lucky break for the FEF. - Combat on above unit at O14, odds 25:12, hence 2:1 with -1 for
defender in forest, roll 9 - 1 for 8 is
EX. VM is already DG, FEF rolls 6, which is pretty auto DG, especially since defender’s hex is forest, which applies +2 to the attacker’s DG roll.
VM 3
VM rolls 2 for 1 operation.
After several hours of deliberation, the VM decide to move the Spending SD into Nghia Lo to allow an overrun to the south to proceed without running out of supply.
FEF 3
FEF rolls 1 for 1 Operation Point. This one is easy, the FEF chooses to remove 2 of the DG markers. There does not seem to be a requirement for proximity to a Spending Supply to remove DG.
VM 4, 5
VM rolls 4 for 2 OP.
- First operation is removing DG markers.
- Barrage W12, that stack is too dangerous to operate so closely to
Tuyen Quang. DRM net 0 roll 8 for
DG.
FEF 4, 5, 6
- Airstrike on V12 to attempt, no net DRM roll 8 for
DG. - Remove DG from stack in W12.
- Attack with all adjacant units on V12 odds 52:16 or 3:1 with DRM -1
for defender in forest +4 for morale shift net +3. Since the VM unit
is DG, it cannot ambush and cannot retreat. It wouldn’t retreat
anyway given it’s positioned right in front of Tuyen Quang, which is
a victory hex. Roll 5 (!) + 3 for 8 which
EX-DL. FEF DG roll 3 - 1 (morale 4+) passes. Sadly, the VM loses an extra step by standing fast as none of the attackers are DG
VM 6, 7
- VM remove DG markers.
- VM attack Na San at 1:1, no DRM roll 9 for
EX. Both are DG by dint of failing the DG roll.
FEF 7
Single operation only, attack V12 at 54:9 which 6:1 with morale +4, this
rolls on the 5:1 table, roll 8 + 3 for 11 which is 2xDL. VM choose to
retreat instead of taking second step loss out of artillery unit.
It’s looking good for FEF here, they seem to have a chance to take Tuyen Quang.
VM 8, 9, 10
This is the last 3 operations for VM this turn, let’s see if we can make something of them. VM really need to DG the mega stack threatening Tuyen Quang, but if the barrage fails to DG, that would be a disaster for the defense. On the other hand, with three operations, there is pretty good chance of making it succeed. Sadly, they don’t have any supply spend to conduct the barrage.
- Move 102/308 to help defend.
- Remove DG, necessary.
- Move 88/308 to Phu Doan.
This will make it very expensive for the FEF to take Tuyen Quang.
FEF 8, 9, 10
FEF needs to focus on staying in supply. To that end, since the DNA is wasting it’s time up north, it needs to make a supply run to Hanoi.
- DNA to Hanoi.
- DNA loads supply from Hanoi moves back north to the action.
- 4:1 attack on VM in U12, roll 3 + 1 morale for 4 which is
Ex. VM failed DG roll, and loses an extra step standing fast.
And that’s the end of that.
Spending Supply markers are now removed (6.2)
Supply Check Phase (rule 7.0):
14. All units check for supply (rules 7.1 - 7.4). If a unit
is not in supply then it is marked with an OoS
marker (rule 7.5).
VM Supply
All VM units are in or back in supply.
FEF supply
All FEF units are in supply.
15. Reset the Phase marker, the VM truck transport
marker, the FEF air transport marker and move
the Month marker and start at number 1 again
(rule 1.10) or
End of Turn 2
This is getting easier to play. The biggest problem I’m having with it is the Little Dudes. I vastly prefer NATO symbols, because all the Little Dudes look the same to me, and it’s difficult to tell which units are which.
No picture because it’s dark out and the light is very yellow in the evening.
Turn 3, Dec. 1952
Recap previous turn, and present challenges for both players for this upcoming turn.
The FEF is putting some pretty serious pressure on Tuyen Quang, and the VM may or may not be able to resist. It doesn’t seem likely that the VM will be able to take Na San, nor does it seem likely the FEF will retake Nghia Lo. The most likely result appears to be a marginal victory for one side or the other.
Replacement & Reinforcement Phase (rule 2.0):
1. VM receives reinforcement, if the VP level is equal to
or less than the current VM number (rule 2.1).
No reinforcements this game.
2. VM decides on mix of SD and Replacement Points
(rule 2.2). Regiments may receive replacements.
VM replacements: 1 at Tuyen Quang, the other for 88/308 in U12. SD placed in hex U11.
3. VM non-motorized regiments may replace steps by
absorbing Tieu Doans within 2 hexes (rule 2.3).
1 TD absorbed at Na San.
4. VM may mobilize an equal number of Tieu Doans
from Tieu Doan/Pathet Lao Box 2 as half the number
of VM-friendly VP hexes. Place them within 2 hexes
of a Vietnamese mobilization center (rule 9.0-2).
VM may place a Pathet Lao, from the same box, in a
VM-friendly mobilization center in Laos if there are
more VM-friendly centers in Laos than there are
Pathet Laos. Finally, move all units from box 1 to
box 2 (rule 2.4).
No TD mobilization this game.
5. FEF receives reinforcement and pays VP, or places
them on the Turn track (rule 2.5).
No FEF reinforcements this game.
6. FEF decides on mix of SD and replacement points
(rule 2.6). Units may receive replacements.
4 replacements for FEF applied to stack at Tuyen Quang.
7. FEF withdraws units (rule 2.7).
Nothing to withdraw this game.
VM Player Movement Phase (rule 3.0):
8. VM may move all VM units (rules 3.1, 3.8, 4.5, 6.14,
7.5). Units may double move (rule 3.2) and use
transports (rules 3.3, 3.4). Units may overrun
(rule 6.4).
The VM are falling back from Na San in favor of protecting a marginal win by reinforcing Nghia Lo. Other units are bolstered.
FEF Player Movement Phase (rule 3.0):
9. All FEF units may move (rules 3.1, 3.8, 4.1, 4.3, 6.14,
7.5). Units may double move (rule 3.2)
use transports (rules 3.3 - 3.7). Units may overrun
(rule 6.4).
FEF is going for the complete victory by attempting to take both Tuyen Quang and Nghia Lo. Will be interesting to see if this can be done. It’s hard for the FEF to move into position since double moves are negated by the number of units in contact with each other.
Attrition Phase (rule 5.0):
10. All units with an OoS marker will lose 1 step each as
attrition unless able to draw supply (rule 5.0).
All units in supply, no attrition this turn.
Operation Phase (rule 6.0):
11. Both players receive 10 operation points and both decide whether to spend an SD or not (rule 6.2).
- VM spending at Nghia Lo.
- FEF spending at Saigon.
12. VM rolls to get 1, 2 or 3 operation points (rule 6.1).
VM 1, 2
VM rolls 3 for 2 operations.
- Entrench Nghia Lo and to the east and north, spend SD at S11.
- Move 209/312 onto HQ at S11 to reinforce.
Each point (rule 6.3) allows you to either:
- Remove 3 DG / destroyed road markers (rule 4.5).
- Exchange an SD for 3 trench markers.
- Move a stack of units (see number 8 above).
- Destroy roads (rule 6.7). If an SD was spent then you may also choose to
- Barrage with artillery (rule 6.6)
- Attack with troops (rules 6.4, 6.7 - 6.15). After the point/points are spent then it is FEF’s turn.
13. FEF rolls to get 1, 2 or 3 operation points (rule 6.1).
FEF 1, 2
FEF rolls 4 for 2 Operation Points.
- Airstrike on VM HQ, roll 8 - 1 forest - 1 trench net 6 for
DG. - Move motorized to attempt to encircle Tuyen Quang.
Each point (rule 6.3) allows you to either:
- Remove 3 DG / destroyed road markers (rule 4.5).
- Exchange an SD for 3 trench markers.
- Move a stack of units (see number 8 above).
- Barrage with airstrike/Navy (rule 6.6)
- Destroy roads (rule 6.7). If an SD was spent then you may also choose to
- Barrage with artillery (rule 6.6)
- Attack with troops (rules 6.4, 6.7 - 6.15). After the point/points are spent then it is VM’s turn. VM and FEF take turns to spend operation points until both sides have spent ten points each.
VM 3
Roll 2 for 1 OP.
- Move Tieu Doan to Nghia for defending.
FEF 3, 4
Roll 4 for 2 OP.
- Move GM 1 and GM 4 to north of Tuyen Quang, overrunning the bare SD. This will prevent it from being used to trench up in Tuyen Quang.
- Move DNA to Hanoi to acquire spending SD.
VM 4
- Move 98/316 to Tuyen Quang.
FEF 5
- DNA north for supplying battle.
VM 5, 6, 7
This probably saves the VM’s game.
- remove DG markers
- Move 308 regiments north.
- Move 45/351 arty onto Tuyen Quang.
FEF 6
- Units from Nghia Lo area to help on the Tuyen Quang attack.
VM 8
VM rolls 6, decides to use only 1 OP, moves 141/312 towards Tuyen Quang.
FEF 7, 8
- Airstrike on Tuyen Quang, roll 6 + 1 (stacking) for
DG. - Attack at Tuyen Quang: 50:20 is 2:1 +3 drm, roll 5 + 3 for 8 which is
EX. Both are DG.
I don’t see any way the FEF can take Tuyen Quang.
VM 9
- Remove DG.
FEF 9, 10
Remove DG, no point in attacking, no way to destroy that many units in Tuyen Quang.
Supply Check Phase (rule 7.0):
14. All units check for supply (rules 7.1 - 7.4). If a unit
is not in supply then it is marked with an OoS
marker (rule 7.5).
All units in supply.
15. Reset the Phase marker, the VM truck transport
marker, the FEF air transport marker and move
the Month marker and start at number 1 again
(rule 1.10) or
End of Turn 3
Win for VM, proceed to End of Game Sequence.
End of the Game Sequence (rule 8.0):
16. If it is the last game turn then conduct the End of the
game sequence instead (rule 8.0).
End of Game Sequence is another movement and attrition phase, not necessary in this case as there is no way for the FEF to win it.
AAR
Marginal victory for VM, which held Tuyen Quang and Nghia Lo at game’s end.
Two things the French could have done better:
- Worked harder to hold Nghia Lo, because if it falls it will be very difficult to recapture.
- Attempt to grab the VM HQ, which was pretty vulnerable at the end of Turn 2. This might have forced the VM to remove units from the victory hexes to prevent suddent death.
All in all, a pretty good game. It took me a really long time to complete it (finishing on March 27, 2016) due to overworking at work and the novelty of the rule system. The system is somewhat different than other games, especially the movement costs.
Notes
-
Spending Supply marker must be within 3 hexes of the units using that supply for attack or barrage in Operations Phases F & G.
-
No overruns were conducted during this game (other than an SD), which feels like a mistake, as there aren’t enough operation points to achieve victory.
Questions
-
ZOCs seem to have very little effect in this game, at least much less effect then in many other games where entering a ZOC halts movement, and ZOCs induce movement costs either entering or leaving, and disrupt supply lines. In Tonkin, ZOCs do none of these things.
-
SD (supply dump) markers seem to be used at the rate of 1 per turn, simply allowing the Operations Phase to proceed for each side spending an SD.
-
For Air Strikes, it’s not clear how many of these may be used. Apparently, the FEF could use full air strike for every operation point on every turn.
Blunders
-
Evidently, Na San scenario (#6) has FEF trenches, which I did not see in the OOB for setup. This probably would have made a difference at Nghia Lo, but no bug deal. I emplaced them at the start of Turn 2. As it turned out, trenches are removed when either 1. the unit leaves the hex, or 2. an enemy unit occupies the hex.
-
Attacking when supply is more than 3 hexes away. Spending at Saigon doesn’t support combat at Na San.
-
On Turn 3, the VM spent supply at Nghia Lo, which was a mistake costing the ability to use the artillery at Tuyen Quang to barrage attacking FEF.
-
Step Loss markers reduce the combat/barrage, morale and stacking value by 1.