Operation Dynamo from France '40
France ‘40 is a pretty good deal: two games in the box! I’ve already played Sickle Cut a couple of times, now it’s time to check out the other game in the box, Operation Dynamo.
This scenario simulates the BEF’s withdrawal from Dunkirk, but even more importantly, it shows what the French had to do to allow the British to withdraw. That’s not something I’ve read much about. Given the game is a reasonable simulation in terms of order of battle and initial position of forces, the French performed admirably to allow so much of the British force to evacuate at Dunkirk.
In my opinion, the game is worth playing for this alone.
Turn 1, May 24, 1940
This being the beginning of the game, the only thing which needs done is rolling to remove the Halt! orders on two panzer divisions. In this case 8 Pz and 4 Pz are freed up.
Since I haven’t played this scenario yet, I’m not sure what the Germans need to do exactly. Short term is to take Calais.
German Player Turn 1
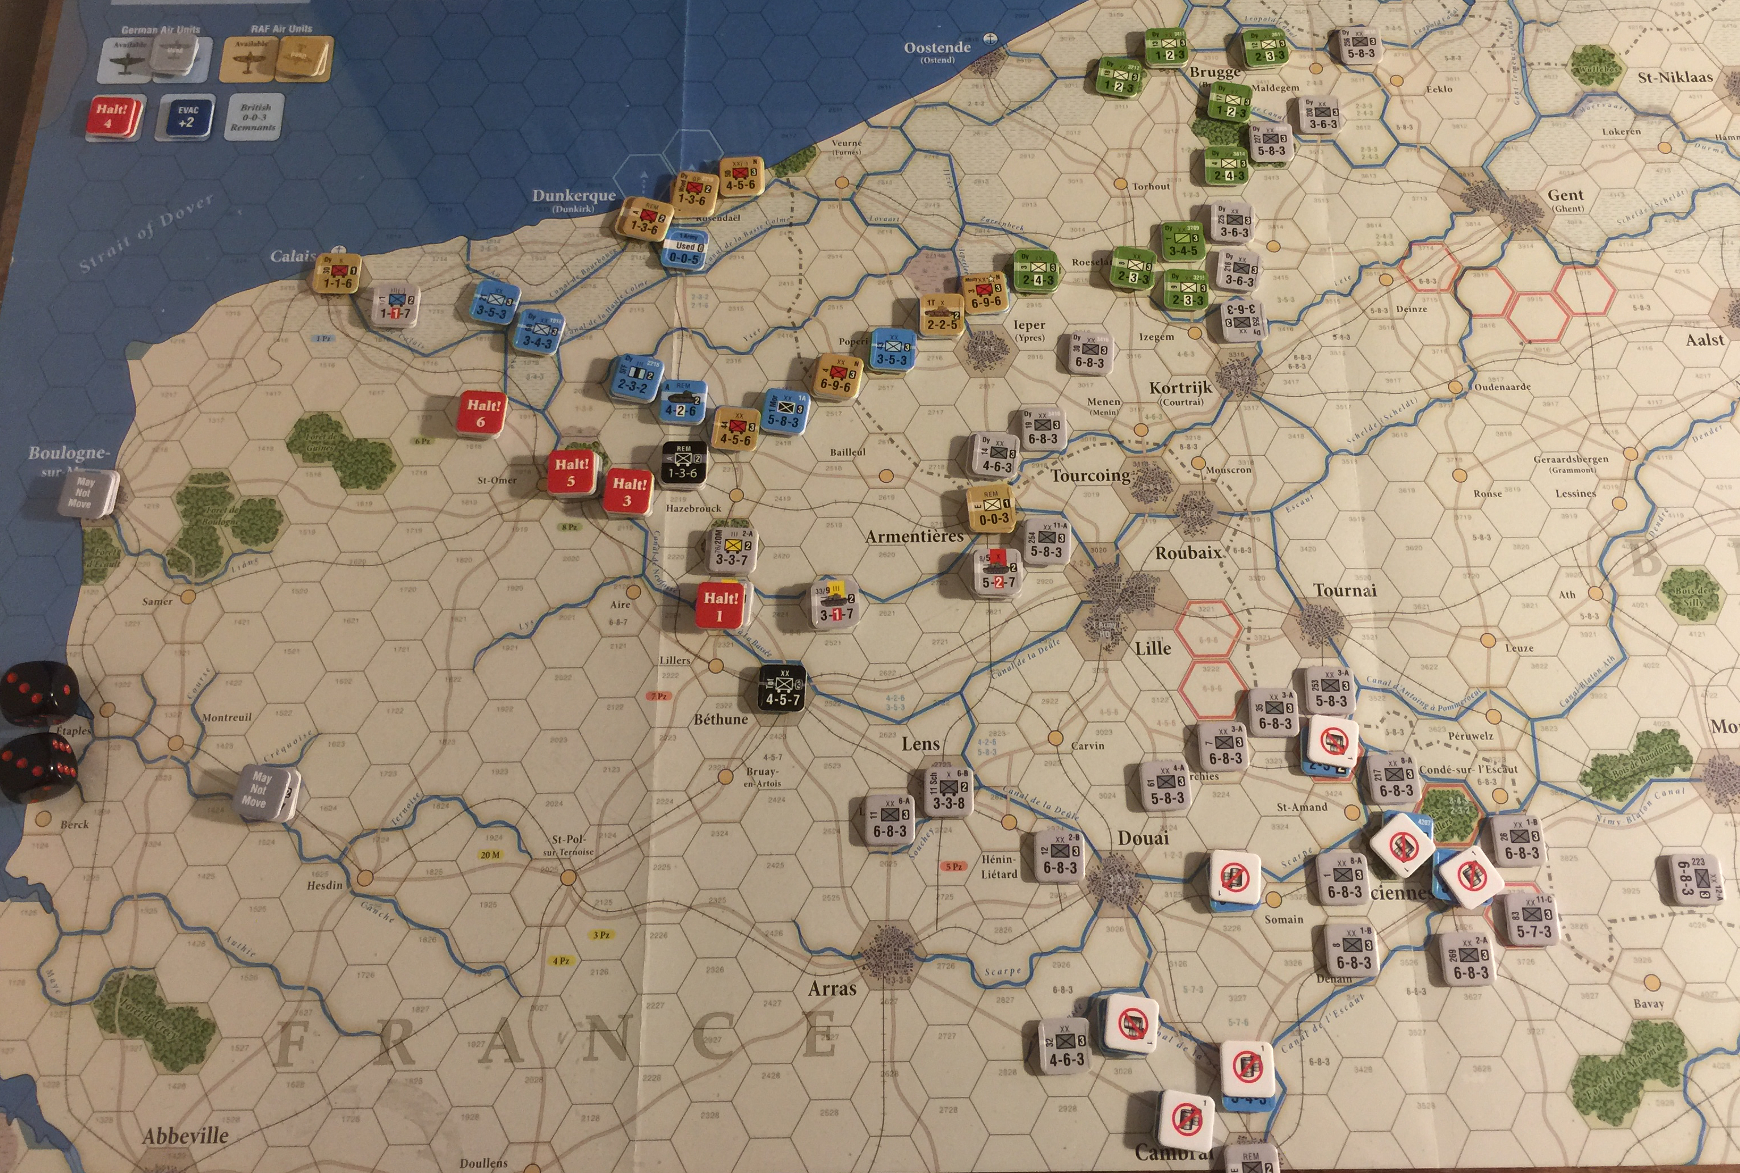
Germans will attempt to pinch off the Allied salient by squeezing with panzer divisions from the southwest and the IDs from the east.
German Initial Phase
Air units flipped.
German Movement Phase
As noted above, the IDs squeeze from the east, while the armored and motorized infantry squeeze from the southwest. Inparticular, Rommel’s 7 Pz is in position to force a break in the line near the village of Hazebrouck, supported by SS Verf. division. Getting a breakthrough here could cut off the Allied retreat. In the east, the situation is more complicated, with a higher density of Belgian units. There won’t be a fast push into the hinterland, but it may force the Belgians to retreat to firm up their line.
German Combat Phase
Highlights:
- Remember to use armor shift in the open.
- 1 Pz tank eliminated by defenders at Calais.
- Rommel punched through, probably had a defender step loss but I think I read the odds table wrong. That would have allowed an overrun. No big deal, we’ll see how it plays out.
German Recovery Phase
No disruption markers.
German Supply Phase
All good in supply.
Allied Player Turn 1
Allies are going to try and pull back while limiting the German advance. The French are gonna get hosed, I can see it now.
Allied Initial Phase
Big question: use air for offense or defense?
Allied Movement Phase
So I moved all the Allied forces back, then read the victory conditions whereby getting forces off the south edge of the map also counts. That would have changed my movement a little bit I think.
Allied Combat Phase
Allies are definitely taking a stand against 8 Pz! 6:1 with Allied
aricraft back in play; the German aircraft are still out. But 5:1 with
the Rommel shift. Rollem: 5 for D1, 8 Pz goes for Determined
Defense, which turns out to be a bad idea because the it holds with a
step loss for the lead unit. This takes 8 Pz out of the game. Bummer
for the Germans. Also bummer for the remains of 7 Pz, as they are badly
exposed, but could have retreated (albeit with losing panzer brigade).
Allied Recovery Phase
Nothing to recover.
Allied Supply Phase
All in supply. Halt! markers placed then removed from 5 and 8 Pz.
End Phase of Turn 1
Turn 2, May 25, 1940
The Germans got a bad break, or possibly, got what they deserved for their hastiness, with 8 Pz getting gutted. The Allies probably need to consider getting some of the French off the south side of the map. Otherwise, business as usual: the Germans attempt to pinch off the salient, while the Allies bolt down the closing corridor.
German Player Turn 2
Continue to squeeze. Two more turns and the Halt! markers come off.
German Initial Phase
Air units flipped.
German Movement Phase
As before, squeezing from both sides to put some serious pressure on the Allies.
German Combat Phase
Combat result against Belgians:
- 2:1 roll 6
D1. - 3:1 roll 3
DRwith DD roll 2 but low TQ hence lose step and retreat. - 3:1 roll 4
DR. - 5:1 roll 6
DS. - 6:1 roll 5
DS. - 3:1 roll 3
DRwith DD roll 4 no effect.
Bad news for the Belgians.
Now against the French, two retreat results with no steps losses for either side.
German Recovery Phase
No Germans disrupted.
German Supply Phase
All German units in supply.
Allied Player Turn 2
Describe the main challenge to the Allied player this turn, and one or more potential resolutions to the challenge. Explain the situation with respect to overall goal.
This is a make or break turn for the Allies. They need to shore up a line around Dunkirk else the Germans are going to cut them off.
Allied Initial Phase
Air units flipped.
Allied Movement Phase
Constricting the lines up north, while in the south, the French attempt a breakthrough.
Allied Combat Phase
Two attacks. The first against the remains of 8 Pz with Verf. sort of
failed with an EX result. Really needed a defender retreat here.
Allied Recovery Phase
Disrupted removed, Retreat to Disrupted.
Allied Supply Phase
All Allied units still in supply.
Halt! markers placed, and removed from 5 and 8 Pz, so, no change as it turns out.
End Phase of Turn 2
It does not look good for the Allies. The French bolting to the south really opens it up for swarming, and since they didn’t break through, they’re just going to get starved out by attrition.
Turn 3
The British are likely cursing the French who attempted to bolt to the south and will probably get trapped, because that’s one the main objectives for this turn for the Germans: run the entrapped French out of supply, and attrit them away. In the north, the Germans will continue to pressure the Belgians, who will continue to resist. Not resist well, but resist none-the-less. Over in the west, the front around Lille has opened up a bit. The Germans don’t want to get counterattacked by full strength Biritsh and French units. Might as well wait until the panzers come active. The Allies will use this breathing room to further consolidate.
German Player Turn 3
As noted above, encircling the French in the south should get some free kills by attrition. But don’t want to tie up too many infantry here, they will be needed once the panzers start to withdraw.
German Initial Phase
Air units ready.
German Movement Phase
Reinforcement enter south of Lille, and move into the open area between the lines.
The French in the south are now encircled. The units in Valenciennes will still be in supply, but the others to the west will not be in supply.
Much pressure on the Belgians.
German Combat Phase
Mostly in the north, against the Belgians, which went fairly well. Against the Brits in Armentieres, 5 Pz lost a step on a Determined Defense, but an adjacent Advance After Combat probably trapped those defenders.
German Recovery Phase
No Germans disprupted.
German Supply Phase
All Germans in supply
Allied Player Turn 3
Describe the main challenge to the Allied player this turn, and one or more potential resolutions to the challenge. Explain the situation with respect to overall goal.
Allied player now in a real bind as the Germans are penetrating into the rear areas closer to Dunkirk. May have to abandon units trapped in Armentieres. The rest will pull back to tighten up the line, make it smaller, hopefully harder to penetrate.
Allied Initial Phase
Nothing to do here.
Allied Movement Phase
Allies make a crescent-shaped perimeter around Dunkirk, about 3-4 hexes out, to have room for retreating. 23 and 46 BEF ID abandoned in Armentieres. French still trying to break out of the south.
Allied Combat Phase
Took a shot at 8 Pz mechanized units with Verf. at 4:1, roll 1 for EX,
which is the worst result on that column. Actually, it’s not that bad as
it eliminated the SS Verf., which is a VP for the Allies. Which is
actually wrong again, Verf. goes to Remnant.
The French managed to break out in the south, the Germans have to decide whether to pursue or move north. Looks like the Germans will be able to surround them.
Allied Recovery Phase
Five Disruption markers come off this turn.
Allied Supply Phase
- Place Halt! on Turns 1-3 (Operation Dynamo)
- Check supply status (18.0) for all Allied units
- Roll for attrition (18.5) for
- out of supply units
- units adjacent to enemy units
Seven French units on the south side are out of supply. Will need to for attrition on the next turn.
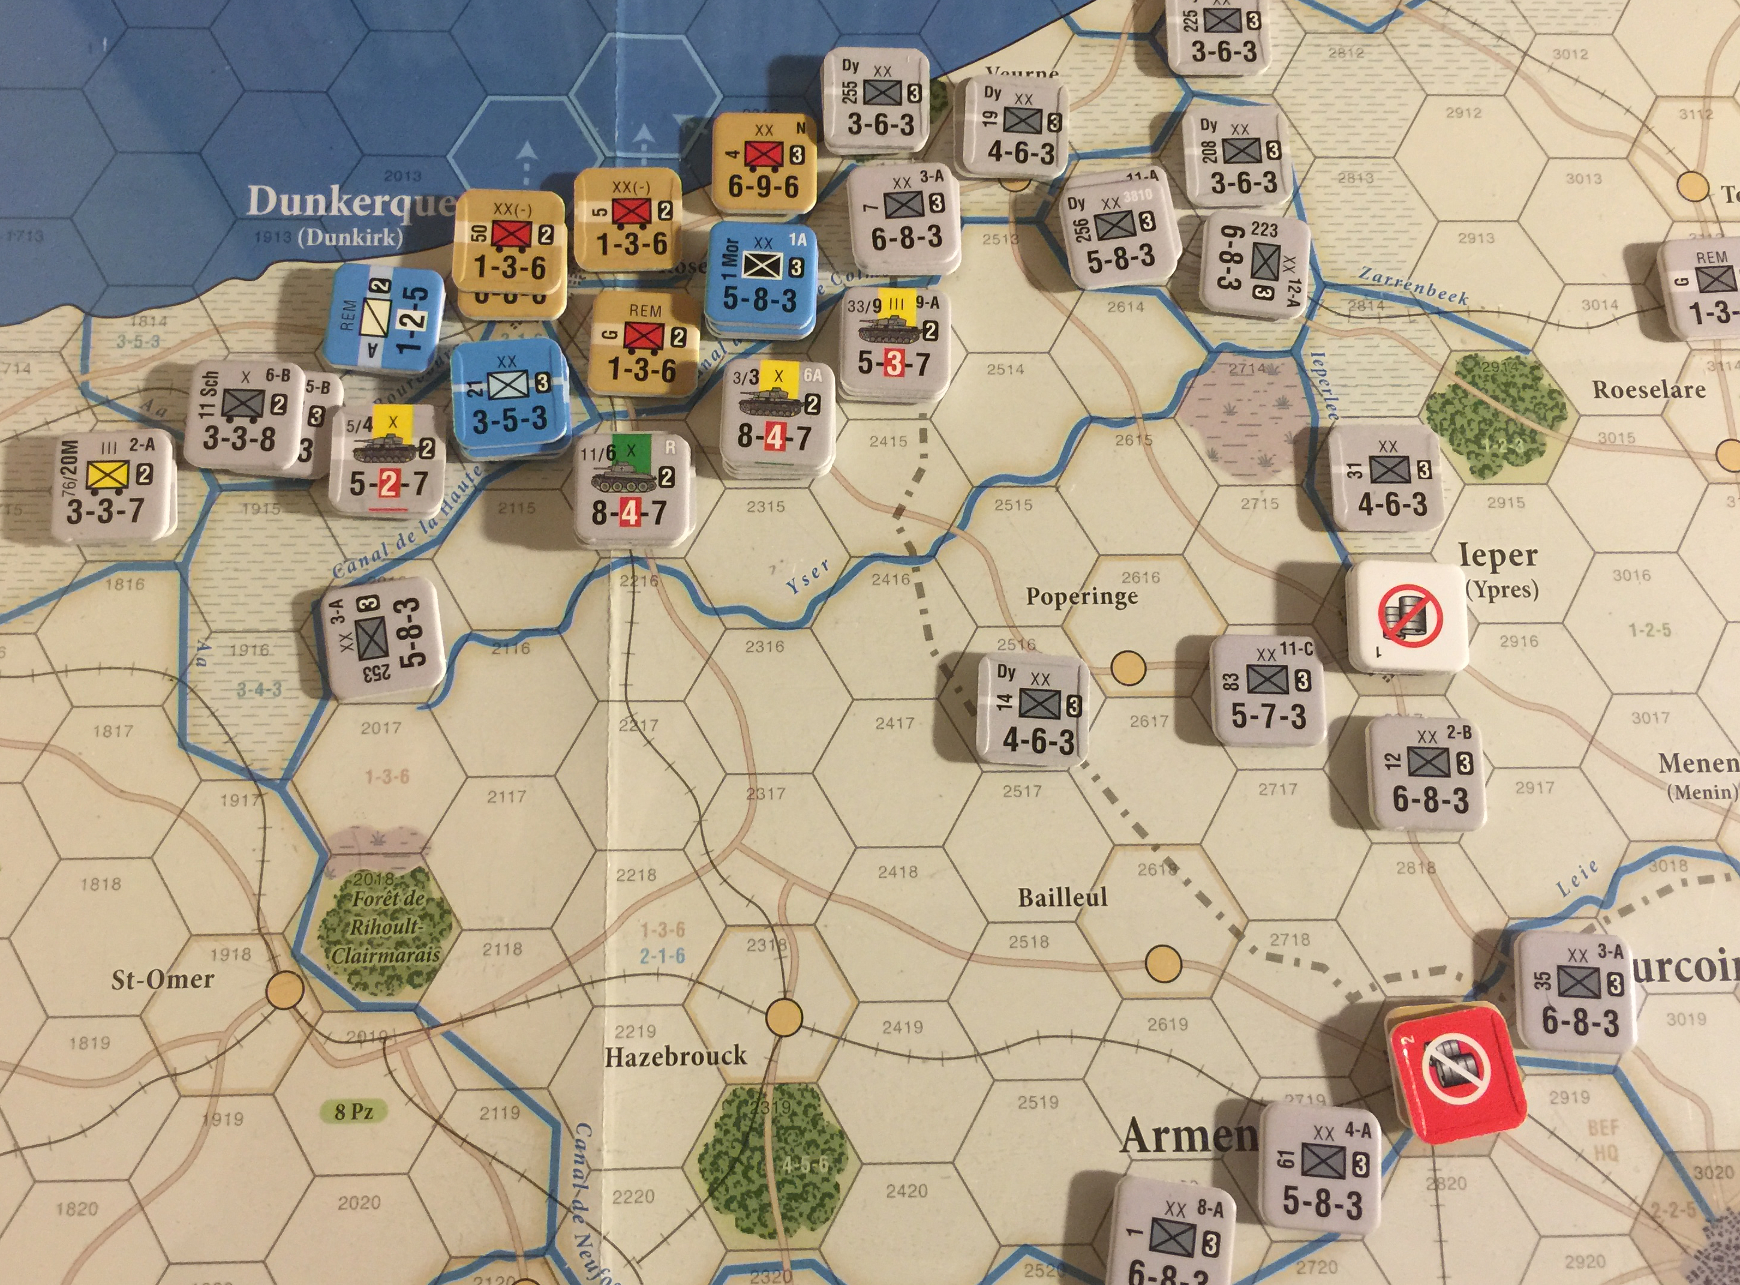
End Phase of Turn 3
Here’s what it looks like at the end of Turn 3:
Turn 4
The Halt! markers come off this turn, and the panzers are going to try to overrun in the west. The Allies are about to learn they need to keep an eye on the western edge of the action.
German Player Turn 4
As noted, panzers are back in gear, and going to push hard to the northeast to attempt capture Dunkirk.
German Initial Phase
Air units flipped.
German Movement Phase
With panzers in motion and the infantry pushing hard on the Belgians, the battle is now split between what’s going on around Dunkirk, and a sideshow south of Duoai. The French just might escape. Around Dunkirk, all the panzer divisions are lined up abreast. If I were the Brit, I’d be crapping trousers about right now.
The Germans pretty much have to break through on this turn or the next, because panzers start getting pulled for refit on Turn 6.
German Combat Phase
This is a complex combat turn for the Germans.
Here’s an interesting situation:
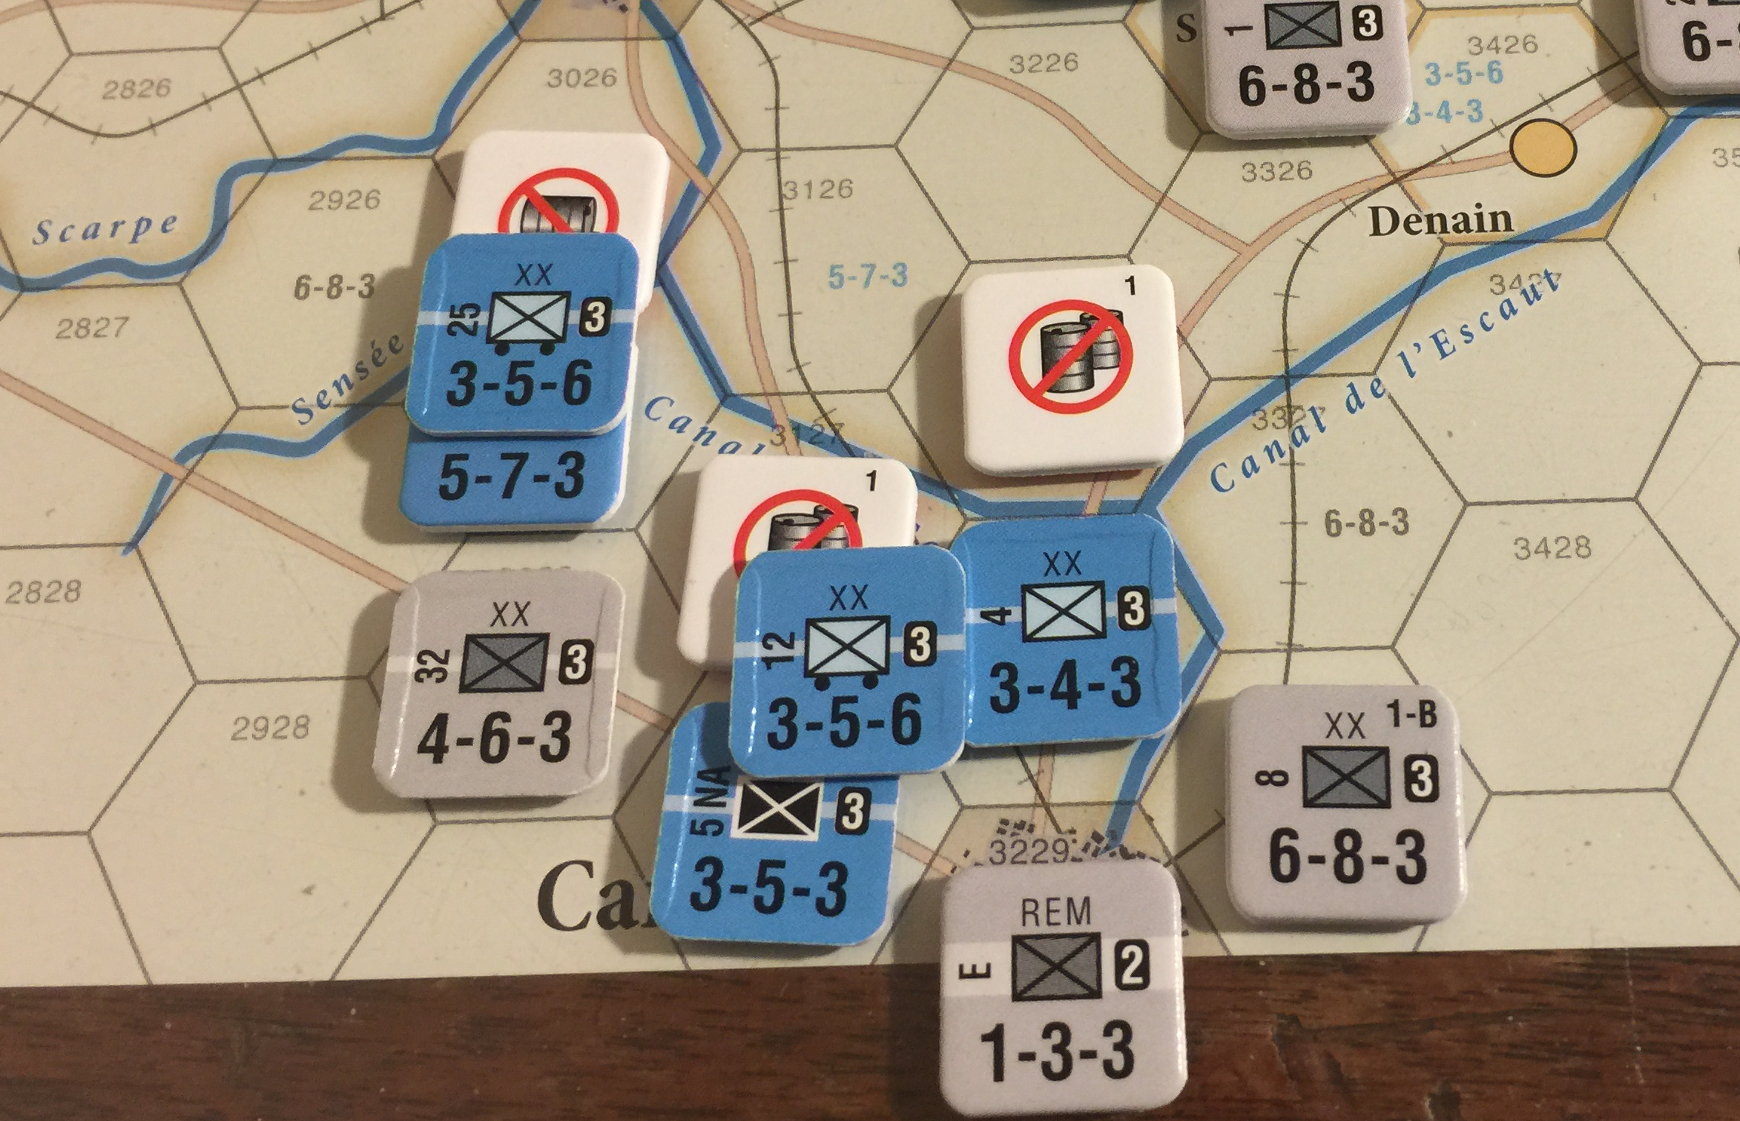
What the Germans are going to do here is use the REM E in Cambrai along with the reduced
32 ID to attack 12 ID and 5 NA at 1:1 odds. If they get a retreat (50% chance)
as I read the rules the French would be eliminated, even though they are right
on the edge of the map, and would exit on their next turn anyway. This sort of
makes sense in this particular situation as either hex the French could move
into would be an EZOC, implied in the imaginary, off map hex southwest Cambrai.
Germans roll a 4, which is an EX, which puts German 32 ID and French 12 ID into
remnant mode, and leaving the French to exit during their turn.
However, it also turns out from the Section 12.1 in the rules that 12 and 5 could retreat through 4 ID, as it negates EZOCs for retreat purposes.
Now the 8 ID goes for the French 4 ID at 1:1, rolls a 6 for A1D1.
German 8 ID is reduced, French 4 ID goes to remnant and retreats to
3126. This unit is not likely to get off the board as a couple of other
German IDs are in position to catch it. However, it’s not clear yet
whether that German infantry would be better served up around Ypres.
In the northeast, the Belgians, as usual, are getting slaughtered.
Panzer time.
And whoa! Crappy results for the panzers! A D1 and 2 EX! Rommel is reduced!
Bummer for the Germans. This is going to make it hard for them as it lets
the Brits swing their motorized around to the south of Dunkirk to shore up
the defenses.
German Recovery Phase
Nothing to recover.
German Supply Phase
All German units are in supply.
Allied Player Turn 4
Describe the main challenge to the Allied player this turn, and one or more potential resolutions to the challenge. Explain the situation with respect to overall goal.
The Allies managed to hold against the panzers. Now, it’s super critical they redeploy their strong mechanized units to hold a perimeter allowing as many Brits to get off at Dunkirk as possible. The conundrum of course being that these same mech units need to evacuate at some point.
They should also keep an eye out for ensuring whatever French remain stay in supply, which is traced to a friendly port.
Allied Initial Phase
Air units flipped to ready.
Allied Movement Phase
Some notes:
- Belgians are gone, surrendered. They did a good job.
- 2 units got evacuated from Dunkirk, 1 from beach.
- Remaining French and British drawing up tight around Dunkirk, but with just enough room to retreat 2 if necessary.
- 2 French units managed to escape off the south of the map.
Big blunder here: For some reason the Turn Track marker was on Turn 5, but it’s actually Turn 4, and I’ve pulled the Belgians off the map. I’m going to play it out anyway, at least for a few more turns, just to see what happens. I think the Brits are in a pretty strong position anyway.
Another blunder: beach evacuation doesn’t start until Turn 5. So this might help negate the Belgian Surrender blunder.
These things happen playing these games solo one phase at a time, nothing to worry about really.
Allied Combat Phase
Three combats, both against panzer stacks in an attempt to reduce them a little bit. Attackers are prepared to lose a step.
-
3 Pz defending: 28:6 is 4:1, 1L for elite, armor shifts cancel, we’ll go with 3:1 and put the air on the other fight. Roll 3,
DR. No big deal either way, buys a turn maybe for the Allies as 3 Pz needs to recover from disruption. -
8 Pz defending, in polder so no armor shift, TQ shift 1L, Air shift 1R for 1:1 final odds…roll 5 (lucky!) for
DR. -
Out of supply units make a 1:1 attack on northwest of Cambrai, roll 6 for
D1, which is against a remnant unit, which is a VP and they get to advance after combat. This gets 2 NA and 25 ID off the board, with remnant French right at the board’s edge. The Germans will have to deal with this one to save a VP.
Allied Recovery Phase
One disruption marker removed from remnant, Belgians already removed (see above).
Allied Supply Phase
- Place Halt! on Turns 1-3 (Operation Dynamo)
- Check supply status (18.0) for all Allied units
- Roll for attrition (18.5) for
- out of supply units
- units adjacent to enemy units
Out of supply flipped to red side, attrition rolls:
- N/E.
- 87/101 loses a step.
- N/E for 32 ID.
- N/E for 84/101.
Lucky rolls for the French.
End Phase of Turn 4
Despite removing the Belgians a turn early, the Allies did ok this turn. We’ll see how it plays out next turn as the German infantry now have a clear front ahead of them.
Turn 5, May 28 1940
(Turn 1) Provide a broad description of the situation, and some notion of the challenges faced by the Allied and German players. (Remaining turns) Recap the preceding turn, describe challenge for each player in upcoming turn.
With the Belgians off early, the Germans have a chance to bring their infantry divisions up to the coast even faster. This will make it a bit tougher for the Allies to protect Dunkirk, as they do need room to retreat. The Allies will almost surely need to invoke desperation defense pretty soon.
German Player Turn 5
Panzers are going to try to break through southwest of Dunkirk, with the infantry pressing hard from the east.
German Initial Phase
Air units flipped to ready.
German Movement Phase
The IDs around Douai and Valenciennes split up. Some go north to pressure Dunkirk, others go south to eliminate remnant French, a few stay put to drive attrition on out of supply units remaining. No need to even fight and risk losing a step, these French will be attrit away.
4 and 7 Pz stay in position to wale on 44th Mech, which has been punching them in the nose. This turn, not gonna happen, gonna get the breakthrough.
A mass of infantry is bearing down on Monty. They will attack at probably somewhat low odds, but have a good chance at driving Monty back.
German Combat Phase
German player conducts all attacks (8.0) including Overruns (15.0) and Disengagement Attempts (20.4).
One of the two units survives in the south survives, and will get off the board before the Germans can catch them. This is the benefit of the three hex retreat. Benefit for the French in this case. The Germans decline to advance, that will just put them further away from Dunkirk, for no good reason.
With 4 and 7 Pz, each brings 7+ attack to 7 defend for 2:1, with 1R TQ,
and 1R air. Germans get a re-roll with Rommel. Brits use remaining air
to shift 1L, the panzers are much more dangerous in advance after combat.
So, 3:1, roll 4 yields DR Rommel will take it. Sadly for the Germans, the
perimeter is too tight for them to break through, ZOC bonds both east and
west.
For Monty, 18 attack on 14 defense with 2R for air yields 3:1. Would like
reduce the Monty unit. Roll 5 for A1D, great for the Germans!
9 Pz breaks through, brings along a bunch of infantry to cut off a pair of French units.
All of a sudden, the Allies are in a lot of trouble.
German Recovery Phase
Disruptions cleared from 3 and 6 Pz.
German Supply Phase
Germans all in supply.
Allied Player Turn 5
Describe the main challenge to the Allied player this turn, and one or more potential resolutions to the challenge. Explain the situation with respect to overall goal.
Allies in big trouble! There are only two units ready to evacuate, which happens in Initial Phase, which makes it tough to choose who stays and defends.
Allied Initial Phase
- Sickle Cut: Flip all non-Disrupted HQ from Used to Ready (17.2.1).
- Dynamo: Flip all RAF units from Used to Ready (22.6).
Air units flipped, and will now be used for defensive purposes only.
Evacuation: Dunkirk 2, except there is only one unit there, darn, beach roll is 6, so that unit exits for a VP.
Allied Movement Phase
Well, crap, I just moved a bunch of Germans. It probably won’t hurt as these were all way south and moving north, and will not have any chance of combat or other interaction with Allied units this or the next turn in any case. So no harm done. And they’re marked with 6mm dice, so I will know which ones not to move on German Turn 6.
Allies, regroup and retrench. Only one unit to Dunkirk and one to beach, the others needed for defense.
One more French unit slipped off the south side.
Allied Combat Phase
Allies choose not to counterattack this turn.
Allied Recovery Phase
Markers removed.
Allied Supply Phase
French unit at Armentieres goes out of supply.
End Phase of Turn 5
I don’t think this game is going to go the distance, as the Germans are going to attempt to take Dunkirk to prevent any more evacuations. Then again, the Allies have put up a pretty good fight, so they might get 15 VP without getting 10 Brits off at Dunkirk.
Turn 6, May 29 1940
Hitler is now starting to call back some of the panzer divisions for use in further south, so the Germans really have to push very hard this turn to eliminate or push back the Brits and occupy Dunkirk. The Brits just need to hold off this turn and the next, and everything should get a lot easier, they should be able to get 5 more units evacuated.
German Player Turn
4, 5 and 7 Pz driving hard up the middle. A huge mass of infantry going after the British mechs on the east. Panzers on the attack everywhere.
German Initial Phase
Flip all Air units from Used to Ready side.
German Movement Phase
Squeeze ‘em up.
German Combat Phase
First attack is against Monty at 2:1, roll 5 for A1D1 and Monty is
going to do a Determined Defense; roll 1, ugh, reroll for 5, Monty is
eliminated, that unit goes to remnant. I’m not sure why that was a good
idea, except that there won’t be a retreat, which is good.
Second up is 4 and 5 Pz attacking at 14:13 with 1R TQ and 2R air, with
the Brits defending with 1L air for 3:1; roll 5 for A1D1; Determined
Defense roll 6! Germans are stymied in the polder!
Third battle is 6 and 7 Pz leading at 4:1, roll D1*, bummer for the Allies.
Fourth battle resolves to 3:1, roll 3 for DR, no reason for Allies to do
Determined Defense as the advance cannot break the ZOC bond here.
German Recovery Phase
Nothing to recover.
German Supply Phase
All Germans are in supply.
Allied Player Turn 6
Pretty tense for the Allies. As before, balance between keeping Germans at bay and getting units on to the beach for evac.
Allied Initial Phase
- 2 off of Dunkirk.
- (+2) for beach.
Leaving the Allies mighty thin on the ground. The Brits need to get 3 more units off to get a sudden death victory. This will take another two turns, up to Turn 8 to achieve this.
Allied Movement Phase
Huddle up around Dunkirk. Not much else to do. Nothing else to do.
Allied Combat Phase
Allies choose not to counterattack.
Allied Recovery Phase
Disruption markers off (which were forgotten to be placed after the German attacks, but it doesn’t matter as there is no place to move anyway).
Allied Supply Phase
More attrition.
End Phase of Turn 6
And that’s half the game, but to be sure, the long half of the game. The rest of it will play out pretty fast.
Turn 7, May 30 1940
5 and 7 Pz and SS Tot. are called back. This relieves the Allies substantially, without getting them out of immediate danger. The Germans have plenty enough force left to push hard, and that’s what they’re going to do.
German Player Turn 7
Push really hard for Dunkirk and beach hexes to deny the Allied evacuation.
German Initial Phase
Flipped all Air units from Used to Ready side.
German Movement Phase
8 Pz and Verf. (Rem) start pulling away to the south to get out of the way, they’re going to be recalled next turn, and there’s no room for them to fight around Dunkirk anyway. The infantry divisions coming up from the south are swinging west to cover the upcoming panzer division recalls. They should be in place as the recalls occur. The panzers continue to press around Dunkirk, nothing much to do for movement there.
German Combat Phase
German player conducts all attacks (8.0) including Overruns (15.0) and Disengagement Attempts (20.4).
-
6:1 on Rem F and a tank Bn, roll 5 for
DSwhich is elimination for the French tank Bn, but the remnent goes to 0-0-3 and can retreat to Dunkirk proper. -
3:1 west of Dunkirk with 4 Pz. This unit has no place to retreat to, so will conduct Determined Defense; roll 6 -1 (TQ) for 5, retreat cancelled! Very fortunate, albeit with another step loss (elimination) for the defenders. Still, that hold the Germans out of Dunkirk for at least one more turn, as the Allies will have a chance to reinforcement on their Turn 7.
-
Big battle against full strength British 2d Mech. 33:9 raw for 3:1, TQ shift 1R + 3R air - 2L air defense yields 5:1, roll 3 for
A1D1. Determined Defense cancels retreat will a roll of 4, costing another step producing a Rem for 2d Mech. Bummer for BEF.
German Recovery Phase
No Germans disrupted.
German Supply Phase
All German units in supply.
Allied Player Turn 7
Describe the main challenge to the Allied player this turn, and one or more potential resolutions to the challenge. Explain the situation with respect to overall goal.
It’s almost over for the Allies. Hopefully, they will be able to evacuate 3 units this turn from Dunkirk, which should put them very close to sudden death victory. If they don’t get sudden death this turn, they will almost certainly get it next turn, as there is no way the Germans will be able to shut down Dunkirk before one last British unit can exit.
I’m going to make the evacuation roll, then call the game here.
Allied Initial Phase
Dunkirk evacuation roll 1, evacuate 0-0-3 Rem, beach unit already has a (+2 Evac), so it’s an automatic evacuation. This puts 14 units evacuated with 9 of them British. Two British remain on Dunkirk, and one each in the beach hexes. Around Dunkirk and the beach hexes is a solid perimeter of Allied units which will almost surely break next turn, but have already held long enough to allow at least one more British unit to evacuate, thus achieving sudden death victory conditions.
This is good enough, I’m calling it an Allied win on Turn 7.
Situation around Dunkirk at the end of German Turn 7. There is no way for the Germans to prevent at least one British unit from escaping. Game called here for Allied win.
AAR
The key to the Allied victory here was getting five French units off the map to the south. This allowed the sudden death condition of 15 or more Allied units evacuated.
The victory points otherwise look like the following:
- 14 Allied evacuated from Dunkirk or via south edge.
- 8 French units still in supply on the map. This would decrease by 2 or 3 next turn for sure.
- 4 German units eliminated.
- -6 for eliminated and still on the map British units.
This totals to 20 VPs, clear allied win.
If the Germans were able to prevent another British unit from evacuating, and had prevented French escape to the south, this would be a different story.
It might have been interesting to play it out another couple of turns, but I want to get something else on the table, possibly even something new.
Blunders
-
1 Pz came out from under Halt! and decided to attack Calais…at reduced strength. This was probably a bad idea as the tank brigade was eliminated in the combat. It would have been better to wait for a turn where 1 Pz stayed under Halt! and then got a replacement. It’s not like 30 Inf Brigade is going to move from Calais. They’d get slaughtered without the double defense from the city hex. Actually, this doesn’t matter because 1 Pz doesn’t get a Halt! marker until Calais is cleared. More thought is necessary here.
-
VP for Allies includes exiting from the south side of the map, which makes sense historically (and illustrates the difficulty with this game attempting to run a combined campaign scenario between Sickle Cut and Dynamo). I didn’t take this into account on my first turn moves for the Allies.
-
Forgot to bring in the German 251 ID for reinforcement on Turn 5. This might have helped prevent French retreat to the south, so it definitely counts as a blunder. The rules aren’t clear whether the reinforcement can enter at a later turn in the condition where it is not blocked by EZOC, etc. I would rule that allowing any entry on a later turn implies allowing all entry on later turns, whether specifically blocked or not. Would be a good question for the forum.