Karelia '44
Karelia ‘44 is my first Standard Combat Series (SCS) game. The SCS somewhat resembles Operational Combat Series (OCS) by having exploitation and supply phases. Karelia also has a reaction phase for the Finns, but not the Russians. Supply is limited to trace supply. Overall, the rules are much, much simpler than OCS, while still maintaining a certain amount of the same flavor.
Turn Sequence
Recap the last turn for both sides, and present the current challenges facing each side in the upcoming turn.
Pre-Game Turn
Each turn requires some nominal initialization.
The Boss’s Patience
Roll d6: 1-3 reduce Boss Point total by 1, on 4-6 plays continues with current Boss Point Total (K 2.1b). Get more Boss Points by removing units from play or achieving territorial goals, as indicated by the scenario (K 2.1c). Game ends when Boss Point total equals 0 (K 2.1d).
Air Point Determination Phase
Each player rolls 1 d6, subtract smaller from larger adjusting for Finnish Group Kuhlmey (K 1.7). See also Air Point Availability Table on page 8 (back cover) of the Karelia-specific rules.
Soviet Turn
The Soviets recap the last turn, and make plans for the upcoming turn.
Prepared Offensive Prep Marker
Prepared Offensives may be conducted every 3 turns; the Prepared Offensive Track controls when it’s available. Move the marker from Ready to 3 after playing a Prepared Offensive, and one space to the right each turn.
Prepared Offensive Announcement
- Reduce Prepared Offensive counter.
- Move Prepared Offensive Prep marker to 3.
- 2nd Wave Designation Segment.
- Massive Barrage target Designation.
Reinforcement Phase
Russian reinforcements may arrive during this phase in any turn, up to a maximum of 6, from any rail, track or road leading off map from Finnish MLR. Refer to SCS Section 5 for basic reinforcement rules.
Barrage Phase
Barrage range is 1-4 hexes (K 1.6a). Regular Barrage does not need a spotter, Soviet Massage Barrage requires an adjacent Soviet unit (K 1.6a). No line of sight restriction (K 1.6a). One barrage per unit, no split fire, must be in supply (K 1.6b). Complete rules in Section 1.6.
Movement Phase
Friendly and enemy units may not occupy the same hex (SCS 3.3a). A unit may always move 1 hex regardless of movement cost, subject to restrictions on prohibited terrain (SCS 3.1e). Movement costs are paid before entering a hex (SCS 3.2a). Hexside features may add to movement costs (SCS 3.2c). Refer SCS rules Section 3.
Combat Phase
- Units in a stack may attack different hexes (SCS 7.2b).
- All units in a hex defend as one (SCS 7.2c).
- Only one overrun attack per phase, but eligible units may attack after an overrun (SCS 7.2d).
- Zero attack strength units may participate in combat, and may be used to soak up step losses (SCS 7.2e).
- Step losses must come from the strongest attacking or defending unit first, than player may choose how to distribute (SCS 8.0a).
- All units in a particular combat must absorb a first step loss before any unit absorbs two step losses (SCS 8.0b).
- Soviet units cannot attack from more than 2 hexes with exception of Guards units (K 2.5a).
- No more than 3 Soviet artillery may fire in a single barrage (K 2.5b).
- Only Exploit-capable and Guards units may overrun (K 2.5c).
- Soviets attacks at less than 2:1 are no effect, exception for Prepared Offensive (K 2.5d).
Supply Phase
Use SCS Supply Rules (SCS 12.0). Soviet non-HQ units must be supplied by HQ unit which must itself be in trace supply (K 1.4a). Trace supply for Soviets is any road, track or railroad running off map south of Finnish MLR (K 1.4d). Attack, defense and movement are 1/2 and out of supply artillery may not barrage (K 1.4c).
Finnish Reaction Phase
Any Finnish unit not in an EZOC at the moment it chooses to move can move in the Reaction Phase during the Soviet player’s turn, including disorganized (DG) and out-of-supply units (K 3.5, see also 3.4).
Exploitation Phase
- Exploitation capable units have a color band under the capability numbers at the bottom of the counter (SCS 11.0a).
- Exploitation allows moving and overrunning for eligible units which do not start from an EZOC (SCS 11.0b).
Cleanup Phase
- Phasing player removes all DG markers from units, including units out of supply (K 1.5a).
Finnish Turn
Recap previous turn (if any) and plan operations for upcoming turn.
Reinforcement Phase
Finnish reinforcements arrive according to reinforcement schedule controlled by a d6 (K p.8) from Vipuuri/Vyborg or any road or railroad hex leading out of the northern or western side of the map.
Movement and Barrage Phase
Friendly and enemy units may not occupy the same hex (SCS 3.3a). A unit may always move 1 hex regardless of movement cost, subject to restrictions on prohibited terrain (SCS 3.1e). Movement costs are paid before entering a hex (SCS 3.2a). Hexside features may add to movement costs (SCS 3.2c). Refer SCS rules Section 3. Barrages are conducted in parallel with movement for the Finns (K 3.4).
Combat Phase
- Units in a stack may attack different hexes (SCS 7.2b).
- All units in a hex defend as one (SCS 7.2c).
- Only one overrun attack per phase, but eligible units may attack after an overrun (SCS 7.2d).
- Zero attack strength units may participate in combat, and may be used to soak up step losses (SCS 7.2e).
- Step losses must come from the strongest attacking or defending unit first, than player may choose how to distribute (SCS 8.0a).
- All units in a particular combat must absorb a first step loss before any unit absorbs two step losses (SCS 8.0b).
Supply Phase
Use SCS Supply Rules (SCS 12.0). Trace supply for Finnish units is any road, track or railroad running off map north or west (K 1.4e). Attack, defense and movement are 1/2 and out of supply artillery may not barrage (K 1.4c).
Exploitation Phase
- Exploitation capable units have a color band under the capability numbers at the bottom of the counter (SCS 11.0a).
- Exploitation allows moving and overrunning for eligible units which do not start from an EZOC (SCS 11.0b).
Cleanup Phase
- Phasing player removes all DG markers from units, including units out of supply (K 1.5a).
End of Turn
Playing the game
Two main aspects of Karelia require some attention:
- The Soviets have Prepared offensives (K 2.6).
- The Finns have a combined movement and barrage capability (K 3.4).
Each of these capabilities require a bit more thought to employ effectively, especially as the Soviets can start the game with a prepared offensive.
Prepared Offensive for Turn 1
The following discusses what the Soviets will be doing as part of their Turn 1 Prepared Offensive. Getting this out of the way now will help the game play go a lot faster.
For a Prepared Offensive, the Soviet player may:
- Use Prepared Offensive shift on CRT for both regular and overrun (K 2.6d)
- Low Odds restriction is lifted (K 2.6e).
- Make up to 6 barrages on the Massive Barrage table (2.6f), however these barrages must be spotted. No regular Soviet artillery unit may fire during Massive Barrage turn, but a single hex can be targeted with up to two Massive Barrages (2.6f).
- Non-exploitation capable units (stacks) may exploit as part of a “2nd Wave,” which is denoted by the provided markers (K 2.7). Stacks may not be in EZOC and in 2nd Wave. 2nd Waves are constrained by the number of marker counters. 2nd Wave stacks can move, but may not barrage or combat or enter EZOC until released into Exploitation Phase (K 2.7b).
So the upshot appears to be the following:
- Figure out which units can be 2nd Wave.
- Determine appropriate Massive Barrage targets.
Turn 1
Recap the last turn for both sides, and present the current challenges facing each side in the upcoming turn.
As this is the first turn of the first game, I have no idea what I’m doing in general, and only a fuzzy notion of what to do in specific. For this turn, the Soviets will conduct their prepared offensive against the MLR, and the Finns will see what happens, whether they need to fall back or can hold the MLR into the second turn.
Pre-Game Turn
Each turn requires some nominal initialization.
The Boss’s Patience
Roll d6: 1-3 reduce Boss Point total by 1, on 4-6 plays continues with current Boss Point Total (K 2.1b). Get more Boss Points by removing units from play or achieving territorial goals, as indicated by the scenario (K 2.1c). Game ends when Boss Point total equals 0 (K 2.1d).
Roll d6 for 2, Boss’s Patience reduced to 2! Could be a short game.
Air Point Determination Phase
Each player rolls 1 d6, subtract smaller from larger adjusting for Finnish Group Kuhlmey (K 1.7). See also Air Point Availability Table on page 8 (back cover) of the Karelia-specific rules.
- Soviets roll d6 for 6.
- Finns roll d6 for 1.
Soviets get 4 air points on a roll of 6, the Finns 0, hence 4 - 0 = 4 Soviet air points. Good roll for the Soviets.
Soviet Turn 1
The Soviets recap the last turn, and make plans for the upcoming turn.
Nothing to recap since this is the first turn. Going into the turn is the first Prepared Offensive, where the Soviets plan to crack the MLR and pour through the breach to rip into the Finn’s rear areas. The focus is at the southwest end of the MLR, in part because there is a VP hex there.
Prepared Offensive Prep Marker
Prepared Offensives may be conducted every 3 turns; the Prepared Offensive Track controls when it’s available. Move the marker from Ready to 3 after playing a Prepared Offensive, and one space to the right each turn.
Prepared Offensive Announcement
- Reduce Prepared Offensive counter.
- Move Prepared Offensive Prep marker to 3.
- 2nd Wave Designation Segment.
- Massive Barrage target Designation.
Prepared Offensive number shifted to 2.
Reinforcement Phase
Russian reinforcements may arrive during this phase in any turn, up to a maximum of 6, from any rail, track or road leading off map from Finnish MLR. Refer to SCS Section 5 for basic reinforcement rules.
Soviets bring in the 314 ID on the railroad at map edge below hex 49.01.
Barrage Phase
Barrage range is 1-4 hexes (K 1.6a). Regular Barrage does not need a spotter, Soviet Massage Barrage requires an adjacent Soviet unit (K 1.6a). No line of sight restriction (K 1.6a). One barrage per unit, no split fire, must be in supply (K 1.6b). Complete rules in Section 1.6.
Massive Barrage against 4 units in 3 hexes the MLR, 2 Massive Barrages against each hex:
- 26/10 and Er 20/10 in hex 43.02. First: roll 2d6 for 6 which DG; second roll 7 for DG, net DG.
- 58/10 in hex 45.03: roll 9 for 1 step loss (and DG, K 1.5). Second roll is 7, net DG.
- 1/10 in hex 46.04: roll 5 for DG, second roll is 7, net DG.
This is good for the Soviets, all the Finnish units defend at half strength.
Movement Phase
Friendly and enemy units may not occupy the same hex (SCS 3.3a). A unit may always move 1 hex regardless of movement cost, subject to restrictions on prohibited terrain (SCS 3.1e). Movement costs are paid before entering a hex (SCS 3.2a). Hexside features may add to movement costs (SCS 3.2c). Refer SCS rules Section 3.
What the Soviets really want to do here is knock a hole in the MLR. I can see right now that having too many ground units under 2d Wave markers isn’t letting me get enough units up to the line to attack effectively.
Without going into gruesome detail, the Soviets move as many line infantry and guards units they can into positions for assaulting the MLR. This will result in five combats, unfortunately only 3 of which are against DG’ed opponents.
Combat Phase
- Units in a stack may attack different hexes (SCS 7.2b).
- All units in a hex defend as one (SCS 7.2c).
- Only one overrun attack per phase, but eligible units may attack after an overrun (SCS 7.2d).
- Zero attack strength units may participate in combat, and may be used to soak up step losses (SCS 7.2e).
- Step losses must come from the strongest attacking or defending unit first, than player may choose how to distribute (SCS 8.0a).
- All units in a particular combat must absorb a first step loss before any unit absorbs two step losses (SCS 8.0b).
- Soviet units cannot attack from more than 2 hexes with exception of Guards units (K 2.5a).
- No more than 3 Soviet artillery may fire in a single barrage (K 2.5b).
- Only Exploit-capable and Guards units may overrun (K 2.5c).
- Soviets attacks at less than 2:1 are no effect, exception for Prepared Offensive (K 2.5d).
Soviets engage in 5 places on the MLR, high rolls are better just as in the OCS series games:
- 26/10 and Er 20/10 defending with in hex 43.02. Attacking is 12 combat
factors of Russians for 12:5, 2:1 odds using SCS rounding (SCS v1.7, 7.4).
Roll 2d6 for 5,
A2D1even with 1R. - 58/10 defending with 5 in hex 45.03. Soviets attacking with 15 for
3:1 odds. Roll 5 for
A2D1even with 1R. - 1/10 defending with 7 in hex 46.04. Soviets attacking with 19, 3:1
odds. Roll 5 for
A2D1. - 7/2 defending with 12 in hex 48.05. Soviets attacking with 9, 1:1
odds. Roll 7 on 4:1 (1R PO + 2R air) is
D2r1. This removes the ghost unit from 49.06. - Er 12/2 and 49/2 defending with 16 in hex 50.07, Soviets attacking
with 18, 1:1 odds. This could have been 4:1 if this unit was DG’ed.
Roll 3 on 4:1 is
A2D1.
The Soviets rolled really shitty. This could be a short game. On the other hand, the Soviets did make a hole in the line, and at least some of the second wave units will be able to advance up to the line.
Supply Phase
Use SCS Supply Rules (SCS 12.0). Soviet non-HQ units must be supplied by HQ unit which must itself be in trace supply (K 1.4a). Trace supply for Soviets is any road, track or railroad running off map south of Finnish MLR (K 1.4d). Attack, defense and movement are 1/2 and out of supply artillery may not barrage (K 1.4c).
Soviets are all definitely still in supply this turn.
Finnish Reaction Phase
Any Finnish unit not in an EZOC at the moment it chooses to move can move in the Reaction Phase during the Soviet player’s turn, including disorganized (DG) and out-of-supply units (K 3.5, see also 3.4).
The Finns have a hard decision to make here. The MLR is excellent for defense, but the amount of Soviet artillery even without Massive Barrage will ensure the Line is lost within another couple of turns. Since the Line has already been breached, it’s probably best to pull back to the VT Line. However, K 3.4 allows movement and barrage by eligible units (in this case artillery units). Probably the best thing is to try to DG as many forward Soviet units as possible, focusing on the Gaurds units, then pull everything off the MLR and attempt to outrun the Soviets to the VT.
First, move eligible artillery to single out 63 Guards. Roll 2d6 for a 4, which is miss, needed a 5 or better. Dang. And it turns out these units will now be exposed to exploitation because they moved then fired. Would have been better to fire, then move.
Ok, this turned into a total blunder. Given the Finns lost the movement for the artillery, they should have held the line instead of bolting for the VT. Holding the MLR through the exploitation phase would have stymied the Soviet exploitation and 2d Wave, and the units could have as easily moved back during their movement turn. Since their movement factors are higher than most Soviet units movement factor, in a race to VT, the Finns would mostly win. And where they didn’t win, the Soviets would be exposing armor.
Here’s the situation at the end of the Finnish reaction phase.
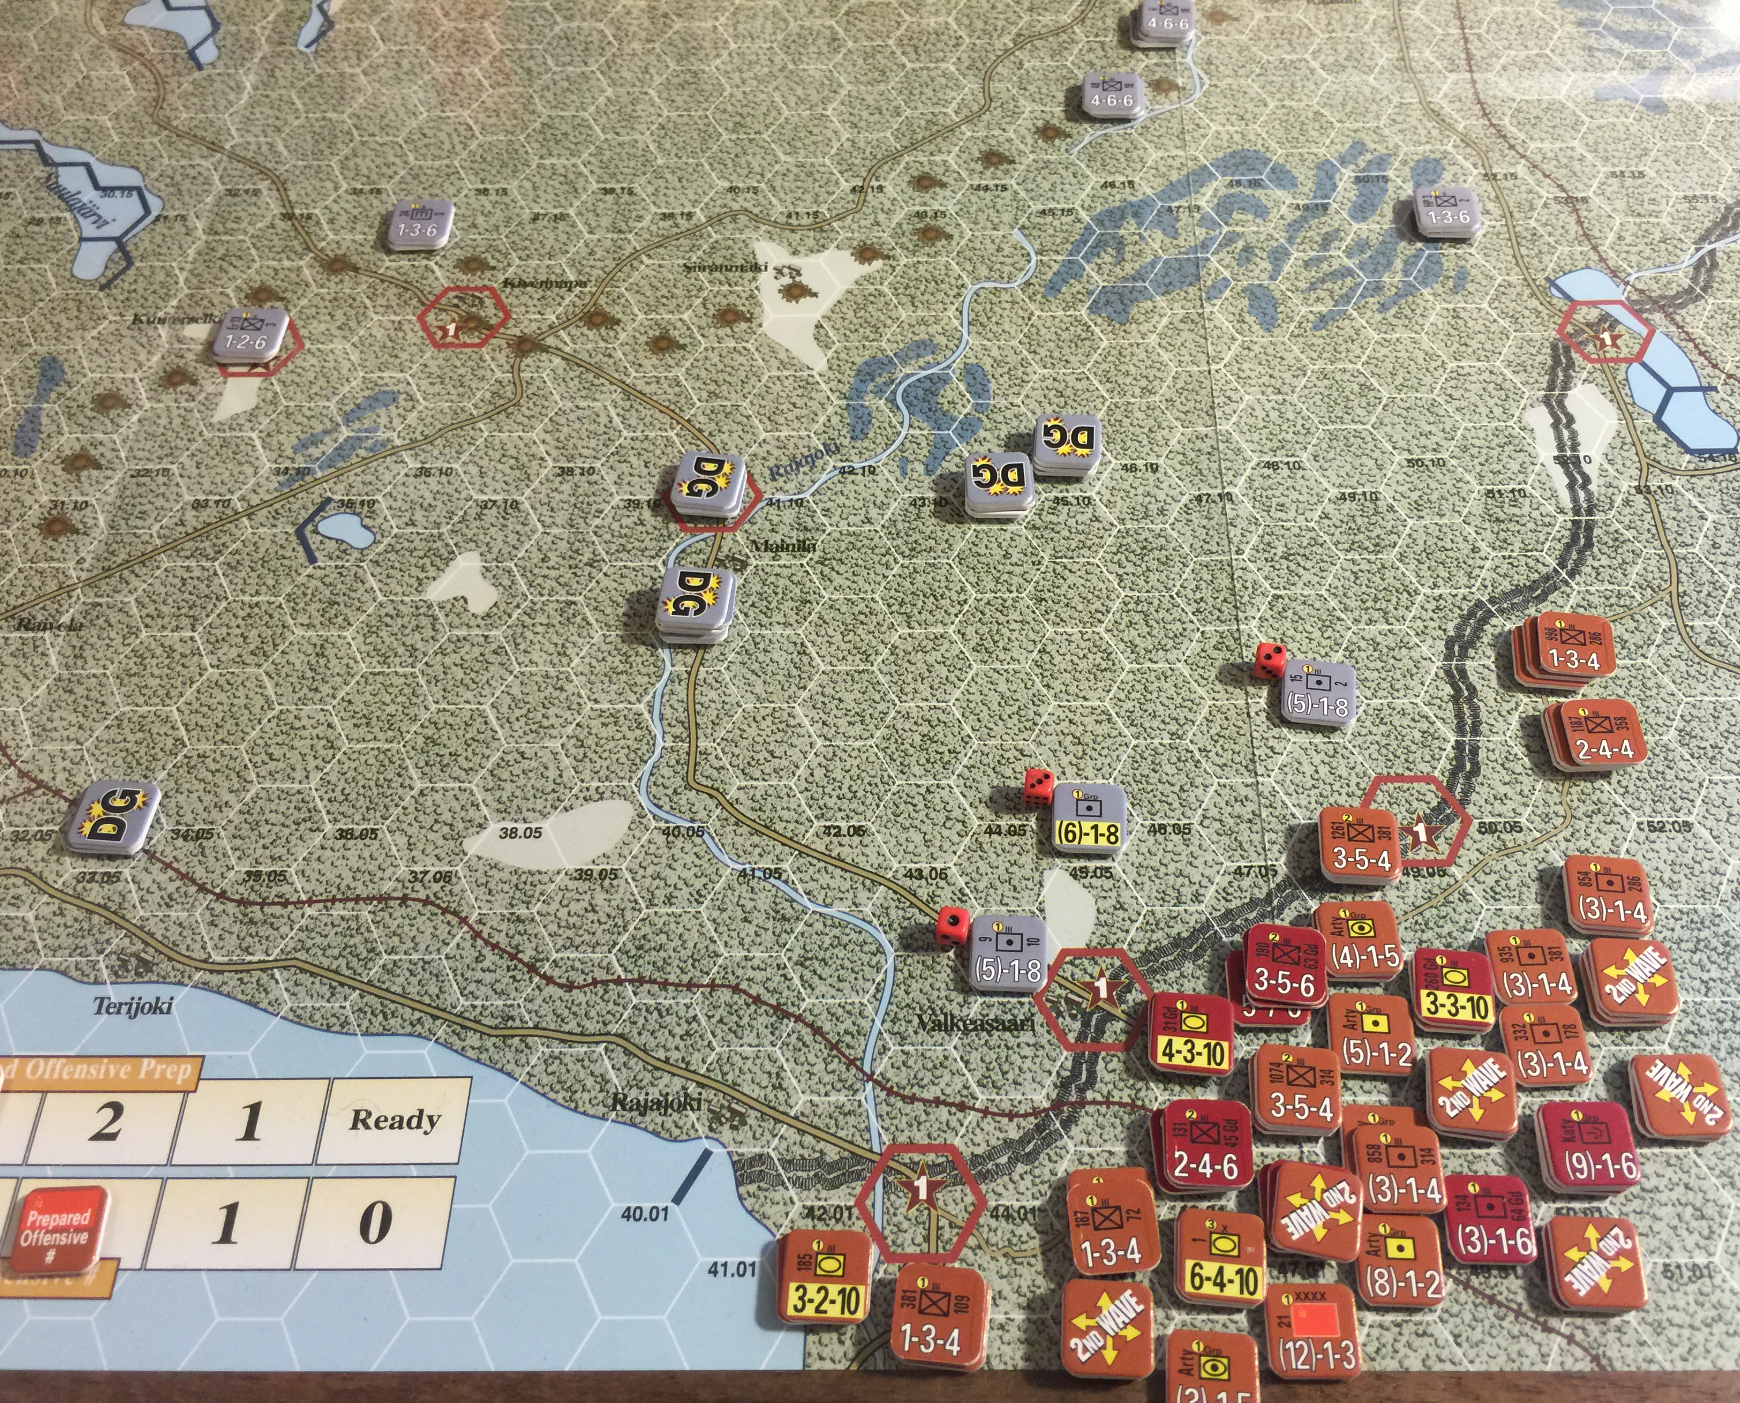
Note another blunder here: the Finnish units which are DG’ed moved their full movement instead of half their movement allowance.
Exploitation Phase
- Exploitation capable units have a color band under the capability numbers at the bottom of the counter (SCS 11.0a).
- Exploitation allows moving and overrunning for eligible units which do not start from an EZOC (SCS 11.0b).
First thing is overrunning the Finnish artillery:
- 152 attacking 9/10 at 6:1 with 1R for Prepared Offensive, roll 3 (!)
A1D1, which eliminates the 9/10. - The 1 attacking Grp Artillery at 7:1 roll 11 for
D3r3. - 31 and 260 Gd attacking 15/2, roll 3, again,
A1D1. That really hurts the Soviets as those Guard units are single step.
As it turns out, this was a blunder as it costs 3 MF for armor and motorized to move through forest hexes. Along with the +4 to enter an EZOC and overrun, possibly only one, maybe two of these artillery units would have lost. But the game must go on…
Next, the 2d Wave units can move up. This turned out well for the Soviets since the MLR was abandoned. Soviets get a Boss Point back.
Cleanup Phase
- Phasing player removes all DG markers from units, including units out of supply (K 1.5a).
Nothing for Soviet player to do in this cleanup phase.
Finnish Turn 1
Recap previous turn (if any) and plan operations for upcoming turn.
The Finns are in a pickle, having lost all their front line artillery, and having most of their other front line units retreating in DG status. This will not allow them all to reach the safety of the VT line this upcoming turn. We’ll see what we can do with them anyway.
Reinforcement Phase
Finnish reinforcements arrive according to reinforcement schedule controlled by a d6 (K p.8) from Vipuuri/Vyborg or any road or railroad hex leading out of the northern or western side of the map.
The Finns really need to succeed on the reinforcement roll here…roll d6 for 3, no reinforcements this turn. Bummer.
Movement Phase
Friendly and enemy units may not occupy the same hex (SCS 3.3a). A unit may always move 1 hex regardless of movement cost, subject to restrictions on prohibited terrain (SCS 3.1e). Movement costs are paid before entering a hex (SCS 3.2a). Hexside features may add to movement costs (SCS 3.2c). Refer SCS rules Section 3.
Run for the hills!
Basically, all the Finns can do is try to get everything onto the VT Line as fast as possible. There is still one stack out in the open, under DG marker, just couldn’t make it in, so it will be subject to overrun next Soviet turn.
Combat Phase
- Units in a stack may attack different hexes (SCS 7.2b).
- All units in a hex defend as one (SCS 7.2c).
- Only one overrun attack per phase, but eligible units may attack after an overrun (SCS 7.2d).
- Zero attack strength units may participate in combat, and may be used to soak up step losses (SCS 7.2e).
- Step losses must come from the strongest attacking or defending unit first, than player may choose how to distribute (SCS 8.0a).
- All units in a particular combat must absorb a first step loss before any unit absorbs two step losses (SCS 8.0b).
No combat for Finns this turn.
Supply Phase
Use SCS Supply Rules (SCS 12.0). Trace supply for Finnish units is any road, track or railroad running off map north or west (K 1.4e). Attack, defense and movement are 1/2 and out of supply artillery may not barrage (K 1.4c).
Exploitation Phase
- Exploitation capable units have a color band under the capability numbers at the bottom of the counter (SCS 11.0a).
- Exploitation allows moving and overrunning for eligible units which do not start from an EZOC (SCS 11.0b).
The big question here is whether the exploitation capable Finnish units can move into a position where 1. they all survive, and 2. are able to EZOC protect the currently DG’ed stack stuck out in the open.
Cleanup Phase
- Phasing player removes all DG markers from units, including units out of supply (K 1.5a).
DG markers removed.
End of Turn 1
This was interesting. The reviews pretty much agree that the Finns are very difficult to beat, and maybe that’s so, but still, they can’t afford to make any big mistakes or the Soviets will crush them.
Turn 2
Recap the last turn for both sides, and present the current challenges facing each side in the upcoming turn.
In Turn 1, we saw the Soviets break through the MLR, and put the Finns on the run back to the VT Line. Not all the Finns made it back. The Soviets need to figure out if it’s worth trying to end run the exposed Finns and destroy them, or go straight for the VP hexes, which are much better protected.
Pre-Game Turn
Each turn requires some nominal initialization.
The Boss’s Patience
Roll d6: 1-3 reduce Boss Point total by 1, on 4-6 plays continues with current Boss Point Total (K 2.1b). Get more Boss Points by removing units from play or achieving territorial goals, as indicated by the scenario (K 2.1c). Game ends when Boss Point total equals 0 (K 2.1d).
Roll 2, Boss Point reduced by 1 from 3 to 2.
Air Point Determination Phase
Each player rolls 1 d6, subtract smaller from larger adjusting for Finnish Group Kuhlmey (K 1.7). See also Air Point Availability Table on page 8 (back cover) of the Karelia-specific rules.
Finns roll 3, Soviets 2, Soviets get 2 Air Points for Turn 2.
Soviet Turn
The Soviets recap the last turn, and make plans for the upcoming turn.
As noted above, the Soviets need to figure out whether to cut off the stranded Finns, or go straight for VP hexes, or perhaps some combination of both. The stranded units are far enough away that it will be tough to surround them with strong units in this turn. It might be smart to lock them into a ZOC though, to prevent further retreat, although a counter attack could cost the Soviets one or more exploit capable units, as these are the only units which have enough movement ability to get there.
Prepared Offensive Prep Marker
Prepared Offensives may be conducted every 3 turns; the Prepared Offensive Track controls when it’s available. Move the marker from Ready to 3 after playing a Prepared Offensive, and one space to the right each turn.
Moved.
Prepared Offensive Announcement
- Reduce Prepared Offensive counter.
- Move Prepared Offensive Prep marker to 3.
- 2nd Wave Designation Segment.
- Massive Barrage target Designation.
None.
Reinforcement Phase
Russian reinforcements may arrive during this phase in any turn, up to a maximum of 6, from any rail, track or road leading off map from Finnish MLR. Refer to SCS Section 5 for basic reinforcement rules.
Artillery and armor coming on on 43.01, all exploit capable. Half of the 90th coming in on 47.01.
Barrage Phase
Barrage range is 1-4 hexes (K 1.6a). Regular Barrage does not need a spotter, Soviet Massage Barrage requires an adjacent Soviet unit (K 1.6a). No line of sight restriction (K 1.6a). One barrage per unit, no split fire, must be in supply (K 1.6b). Complete rules in Section 1.6.
No Finn units are in range for barrage this turn, skip.
Movement Phase
Friendly and enemy units may not occupy the same hex (SCS 3.3a). A unit may always move 1 hex regardless of movement cost, subject to restrictions on prohibited terrain (SCS 3.1e). Movement costs are paid before entering a hex (SCS 3.2a). Hexside features may add to movement costs (SCS 3.2c). Refer SCS rules Section 3.
Now for the meat of the turn, the stuff that matters for the Soviets in Turn 2: where should they go?
About half the leg units can’t do anything more than 4 hexes and aren’t close to a road, so they’re easy, just point them northwest and go.
The obvious targets are Raivula and Kiverpuna. (If these are misspelled, it’s because the forest texture image on the map renders the town names perfectly unreadable to my eyes, so I do the best I can.)
Raivula allows two hex attacks as does Kiverpuna.
After some examination, it looks like my best bet as the Soviets is to position everything for a Prepared Offensive on Turn 4, and hope Uncle Joe doesn’t blow a cork before then. Or that the Finns get reinforced.
Combat Phase
- Units in a stack may attack different hexes (SCS 7.2b).
- All units in a hex defend as one (SCS 7.2c).
- Only one overrun attack per phase, but eligible units may attack after an overrun (SCS 7.2d).
- Zero attack strength units may participate in combat, and may be used to soak up step losses (SCS 7.2e).
- Step losses must come from the strongest attacking or defending unit first, than player may choose how to distribute (SCS 8.0a).
- All units in a particular combat must absorb a first step loss before any unit absorbs two step losses (SCS 8.0b).
- Soviet units cannot attack from more than 2 hexes with exception of Guards units (K 2.5a).
- No more than 3 Soviet artillery may fire in a single barrage (K 2.5b).
- Only Exploit-capable and Guards units may overrun (K 2.5c).
- Soviets attacks at less than 2:1 are no effect, exception for Prepared Offensive (K 2.5d).
No combat for the Soviets this turn.
Supply Phase
Use SCS Supply Rules (SCS 12.0). Soviet non-HQ units must be supplied by HQ unit which must itself be in trace supply (K 1.4a). Trace supply for Soviets is any road, track or railroad running off map south of Finnish MLR (K 1.4d). Attack, defense and movement are 1/2 and out of supply artillery may not barrage (K 1.4c).
All Soviet units are in supply.
Finnish Reaction Phase
Any Finnish unit not in an EZOC at the moment it chooses to move can move in the Reaction Phase during the Soviet player’s turn, including disorganized (DG) and out-of-supply units (K 3.5, see also 3.4).
The Finns take this opportunity to bolt to the VT Line.
Exploitation Phase
- Exploitation capable units have a color band under the capability numbers at the bottom of the counter (SCS 11.0a).
- Exploitation allows moving and overrunning for eligible units which do not start from an EZOC (SCS 11.0b).
Not much to do, bring up a couple of motorized units just a little more forward.
Cleanup Phase
- Phasing player removes all DG markers from units, including units out of supply (K 1.5a).
Nothing to do.
Finnish Turn 2
Recap previous turn (if any) and plan operations for upcoming turn.
The Finns made it back to the VT Line at the cost of a few units and some step losses. Parts of the line are weak, so this turn the Finns need to shift some defense strength to the weak parts to harden up the line. The Soviets only need one more VP hex by the end of the game, so if they get lucky, this could end quickly, and not well for the Finns.
Reinforcement Phase
Finnish reinforcements arrive according to reinforcement schedule controlled by a d6 (K p.8) from Vipuuri/Vyborg or any road or railroad hex leading out of the northern or western side of the map.
Roll 2, no reinforcements.
Movement Phase
Friendly and enemy units may not occupy the same hex (SCS 3.3a). A unit may always move 1 hex regardless of movement cost, subject to restrictions on prohibited terrain (SCS 3.1e). Movement costs are paid before entering a hex (SCS 3.2a). Hexside features may add to movement costs (SCS 3.2c). Refer SCS rules Section 3.
The main goal is shifting strength southwest along the VT Line to shore up some weakly defended VP hexes. If the Katys get emplaced before these hexes can be built up, the Soviets will break through.
Two barrages were conducted, one struck a DG on a stack of two Russian legs which were out in front. That will be helpful as this stack won’t have enough MF to close into Finnish EZOC next turn.
Combat Phase
- Units in a stack may attack different hexes (SCS 7.2b).
- All units in a hex defend as one (SCS 7.2c).
- Only one overrun attack per phase, but eligible units may attack after an overrun (SCS 7.2d).
- Zero attack strength units may participate in combat, and may be used to soak up step losses (SCS 7.2e).
- Step losses must come from the strongest attacking or defending unit first, than player may choose how to distribute (SCS 8.0a).
- All units in a particular combat must absorb a first step loss before any unit absorbs two step losses (SCS 8.0b).
No combat this turn.
Supply Phase
Use SCS Supply Rules (SCS 12.0). Trace supply for Finnish units is any road, track or railroad running off map north or west (K 1.4e). Attack, defense and movement are 1/2 and out of supply artillery may not barrage (K 1.4c).
All Finns are in supply.
Exploitation Phase
- Exploitation capable units have a color band under the capability numbers at the bottom of the counter (SCS 11.0a).
- Exploitation allows moving and overrunning for eligible units which do not start from an EZOC (SCS 11.0b).
Everything is currently positioned right where the Finns want it, no need for exploitation movement this turn.
Cleanup Phase
- Phasing player removes all DG markers from units, including units out of supply (K 1.5a).
Nothing DG or out of supply.
End of Turn 2
Here’s the situation:

The Finns do have some weak spots, and losing that artillery did not help at all, but the Soviets won’t have any easy time closing.
Turn 3
Recap the last turn for both sides, and present the current challenges facing each side in the upcoming turn.
Turn 2 saw the Soviets advancing and the Finns consolidating their position on the VT Line.
Pre-Game Turn
Each turn requires some nominal initialization.
The Boss’s Patience
Roll d6: 1-3 reduce Boss Point total by 1, on 4-6 plays continues with current Boss Point Total (K 2.1b). Get more Boss Points by removing units from play or achieving territorial goals, as indicated by the scenario (K 2.1c). Game ends when Boss Point total equals 0 (K 2.1d).
Roll 6, Boss’s Patience stays at 2.
Air Point Determination Phase
Each player rolls 1 d6, subtract smaller from larger adjusting for Finnish Group Kuhlmey (K 1.7). See also Air Point Availability Table on page 8 (back cover) of the Karelia-specific rules.
Soviets roll 5 for 4, Finns 2 for 0, hence 4 air points for the Soviets.
Soviet Turn 3
The Soviets recap the last turn, and make plans for the upcoming turn.
The Soviets need to pick a couple of VP hexes to mass some effort on. It would be better to mass on to one VP hex, but the nature of the line and the “ghost” units won’t allow the Soviets to get enough units around the defender to matter. All movement this turn will be to support the upcoming Prepared Offensive on Turn 4.
Prepared Offensive Prep Marker
Prepared Offensives may be conducted every 3 turns; the Prepared Offensive Track controls when it’s available. Move the marker from Ready to 3 after playing a Prepared Offensive, and one space to the right each turn.
Prepared Offensive Prep to 1.
Prepared Offensive Announcement
- Reduce Prepared Offensive counter.
- Move Prepared Offensive Prep marker to 3.
- 2nd Wave Designation Segment.
- Massive Barrage target Designation.
N/A this turn.
Reinforcement Phase
Russian reinforcements may arrive during this phase in any turn, up to a maximum of 6, from any rail, track or road leading off map from Finnish MLR. Refer to SCS Section 5 for basic reinforcement rules.
The other half of 90th ID and the full 46th ID come in below hex 48.01. This hex is the best for getting units to the north.
Barrage Phase
Barrage range is 1-4 hexes (K 1.6a). Regular Barrage does not need a spotter, Soviet Massage Barrage requires an adjacent Soviet unit (K 1.6a). No line of sight restriction (K 1.6a). One barrage per unit, no split fire, must be in supply (K 1.6b). Complete rules in Section 1.6.
Nothing within range to barrage.
Movement Phase
Friendly and enemy units may not occupy the same hex (SCS 3.3a). A unit may always move 1 hex regardless of movement cost, subject to restrictions on prohibited terrain (SCS 3.1e). Movement costs are paid before entering a hex (SCS 3.2a). Hexside features may add to movement costs (SCS 3.2c). Refer SCS rules Section 3.
Bring ‘em up!
No units really have enough MF to get up close to the VT, it’s that +1 to enter EZOC which is making it a bit more difficult. Next turn will do it.
Combat Phase
- Units in a stack may attack different hexes (SCS 7.2b).
- All units in a hex defend as one (SCS 7.2c).
- Only one overrun attack per phase, but eligible units may attack after an overrun (SCS 7.2d).
- Zero attack strength units may participate in combat, and may be used to soak up step losses (SCS 7.2e).
- Step losses must come from the strongest attacking or defending unit first, than player may choose how to distribute (SCS 8.0a).
- All units in a particular combat must absorb a first step loss before any unit absorbs two step losses (SCS 8.0b).
- Soviet units cannot attack from more than 2 hexes with exception of Guards units (K 2.5a).
- No more than 3 Soviet artillery may fire in a single barrage (K 2.5b).
- Only Exploit-capable and Guards units may overrun (K 2.5c).
- Soviets attacks at less than 2:1 are no effect, exception for Prepared Offensive (K 2.5d).
No combat this phase for the Soviets.
Supply Phase
Use SCS Supply Rules (SCS 12.0). Soviet non-HQ units must be supplied by HQ unit which must itself be in trace supply (K 1.4a). Trace supply for Soviets is any road, track or railroad running off map south of Finnish MLR (K 1.4d). Attack, defense and movement are 1/2 and out of supply artillery may not barrage (K 1.4c).
The Soviets are all in supply.
Finnish Reaction Phase
Any Finnish unit not in an EZOC at the moment it chooses to move can move in the Reaction Phase during the Soviet player’s turn, including disorganized (DG) and out-of-supply units (K 3.5, see also 3.4).
The Finns now get to barrage everything within range, in this case, 3 stacks from 4 artillery units, no hits. The dice hate the Finns this turn.
Exploitation Phase
- Exploitation capable units have a color band under the capability numbers at the bottom of the counter (SCS 11.0a).
- Exploitation allows moving and overrunning for eligible units which do not start from an EZOC (SCS 11.0b).
Soviets move a few armor units forward.
Cleanup Phase
- Phasing player removes all DG markers from units, including units out of supply (K 1.5a).
DG marker removed.
Finnish Turn 3
Recap previous turn (if any) and plan operations for upcoming turn.
The Finns really need the reinforcements about right now. Last turn would have been better, but all good if they can get on the map this turn. With or without reinforcements, the Finns have to hold the VT line for this game.
Reinforcement Phase
Finnish reinforcements arrive according to reinforcement schedule controlled by a d6 (K p.8) from Vipuuri/Vyborg or any road or railroad hex leading out of the northern or western side of the map.
Roll 2, no reinforcements! Bummer!
Movement and Barrage Phase
Friendly and enemy units may not occupy the same hex (SCS 3.3a). A unit may always move 1 hex regardless of movement cost, subject to restrictions on prohibited terrain (SCS 3.1e). Movement costs are paid before entering a hex (SCS 3.2a). Hexside features may add to movement costs (SCS 3.2c). Refer SCS rules Section 3. Barrages are conducted in parallel with movement for the Finns (K 3.4).
For movement, just shift some artillery a bit, the rest is low odds bombardment. Would help to get some lucky rolls here for the Finns…nothing, highest roll was a 7, really needed at least 8-10. Bah.
Combat Phase
- Units in a stack may attack different hexes (SCS 7.2b).
- All units in a hex defend as one (SCS 7.2c).
- Only one overrun attack per phase, but eligible units may attack after an overrun (SCS 7.2d).
- Zero attack strength units may participate in combat, and may be used to soak up step losses (SCS 7.2e).
- Step losses must come from the strongest attacking or defending unit first, than player may choose how to distribute (SCS 8.0a).
- All units in a particular combat must absorb a first step loss before any unit absorbs two step losses (SCS 8.0b).
The Finns don’t see any advantage in leaving the VT Line to attack. The Soviets are pretty heavily massed, and the Finns can’t really afford to lose any steps until reinforcemens arrive.
Supply Phase
Use SCS Supply Rules (SCS 12.0). Trace supply for Finnish units is any road, track or railroad running off map north or west (K 1.4e). Attack, defense and movement are 1/2 and out of supply artillery may not barrage (K 1.4c).
Finns are all in supply.
Exploitation Phase
- Exploitation capable units have a color band under the capability numbers at the bottom of the counter (SCS 11.0a).
- Exploitation allows moving and overrunning for eligible units which do not start from an EZOC (SCS 11.0b).
Nothing to exploit, sitting tight.
Cleanup Phase
- Phasing player removes all DG markers from units, including units out of supply (K 1.5a).
All good.
End of Turn 3
Not much happened in Turn 3. A lot is going to happen in Turn 4 as the Soviets get the Prepared Offensive. All they need to do is aquire one VP hex and hold it until the game ends. With a little luck, that might be Turn 5.

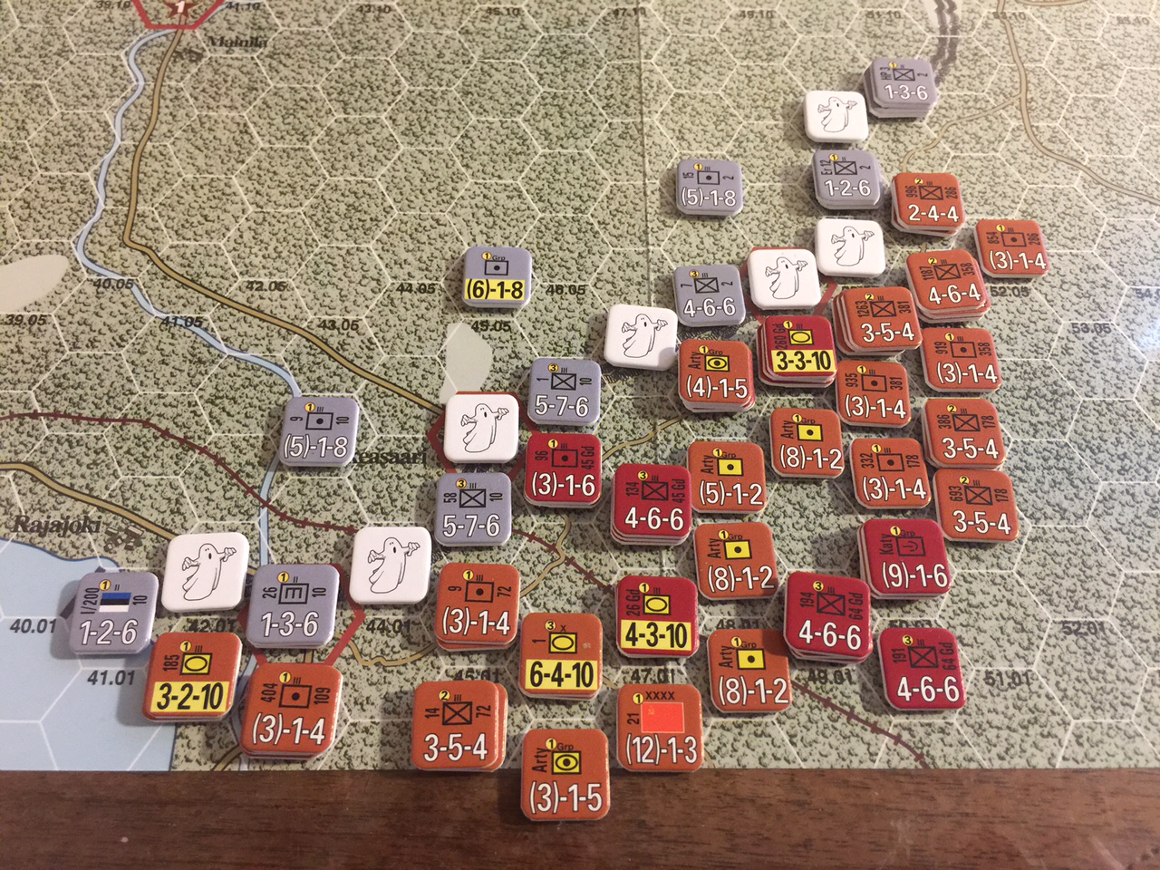
As can be seen in the photo, the Soviets are going to concentrate on the middle north and the extreme southwest of the VT Line. This is in part because roads and railroads make these areas easier to get to than other parts of the VT Line.
The picture was taken right at the start of the second Soviet Prepared Offensive. Finnish units shown DG in the VT Line were a result of Massive Barrage. 2d Wave markers are mostly emplaced.
Turn 4
Recap the last turn for both sides, and present the current challenges facing each side in the upcoming turn.
Pre-Game Turn
Each turn requires some nominal initialization.
The Boss’s Patience
Roll d6: 1-3 reduce Boss Point total by 1, on 4-6 plays continues with current Boss Point Total (K 2.1b). Get more Boss Points by removing units from play or achieving territorial goals, as indicated by the scenario (K 2.1c). Game ends when Boss Point total equals 0 (K 2.1d).
Roll 6, not going to Gulag next turn.
Air Point Determination Phase
Each player rolls 1 d6, subtract smaller from larger adjusting for Finnish Group Kuhlmey (K 1.7). See also Air Point Availability Table on page 8 (back cover) of the Karelia-specific rules.
Soviets roll 3 for 3, Finns 4 for 1, Soviets get 2 Air Points.
Soviet Turn 4
The Soviets recap the last turn, and make plans for the upcoming turn.
This is a Soviet Prepared Offensive turn, and as such, the Soviets are going to blast away at the VT Line. This time, however, they are going to take advantage of the auto-DG, and only go for a step loss with double bombard on the units in one of the VP hexes.
Prepared Offensive Prep Marker
Prepared Offensives may be conducted every 3 turns; the Prepared Offensive Track controls when it’s available. Move the marker from Ready to 3 after playing a Prepared Offensive, and one space to the right each turn.
Prepared Offensive Announcement
- Reduce Prepared Offensive counter.
- Move Prepared Offensive Prep marker to 3.
- 2nd Wave Designation Segment.
- Massive Barrage target Designation.
Note the 2d Wave units may move during Movement Phase, then move again as long as they do not enter or find themselves within an EZOC.
Reinforcement Phase
Russian reinforcements may arrive during this phase in any turn, up to a maximum of 6, from any rail, track or road leading off map from Finnish MLR. Refer to SCS Section 5 for basic reinforcement rules.
The 268 ID and half the 372 ID enter below 42.01.
Barrage Phase
Barrage range is 1-4 hexes (K 1.6a). Regular Barrage does not need a spotter, Soviet Massage Barrage requires an adjacent Soviet unit (K 1.6a). No line of sight restriction (K 1.6a). One barrage per unit, no split fire, must be in supply (K 1.6b). Complete rules in Section 1.6.
Result is 3 step losses, one of which resulted in outright elimination of the unit (1 Cav) from Vammelsuu. This is a blow to the Finns.
Movement Phase
Friendly and enemy units may not occupy the same hex (SCS 3.3a). A unit may always move 1 hex regardless of movement cost, subject to restrictions on prohibited terrain (SCS 3.1e). Movement costs are paid before entering a hex (SCS 3.2a). Hexside features may add to movement costs (SCS 3.2c). Refer SCS rules Section 3.
Soviets get up close and personal. Will have combat against 5 hexes in the VT Line. This isn’t enough to take them all, but it could be enough to take several of them.
Combat Phase
- Units in a stack may attack different hexes (SCS 7.2b).
- All units in a hex defend as one (SCS 7.2c).
- Only one overrun attack per phase, but eligible units may attack after an overrun (SCS 7.2d).
- Zero attack strength units may participate in combat, and may be used to soak up step losses (SCS 7.2e).
- Step losses must come from the strongest attacking or defending unit first, than player may choose how to distribute (SCS 8.0a).
- All units in a particular combat must absorb a first step loss before any unit absorbs two step losses (SCS 8.0b).
- Soviet units cannot attack from more than 2 hexes with exception of Guards units (K 2.5a).
- No more than 3 Soviet artillery may fire in a single barrage (K 2.5b).
- Only Exploit-capable and Guards units may overrun (K 2.5c).
- Soviets attacks at less than 2:1 are no effect, exception for Prepared Offensive (K 2.5d).
At 30.04, Vammalsuu, we have 15:6 which is 3:1 in the Soviets favor,
with shift 2R for both Air Points, roll 2d6 for 12! Boxcars! The Finns
collapse! This is a D3r3 result, and the Finns only have 2 steps
available. This would have been 6:1 anyway, with the Prepared Offensive
shift 1R.
Next hex north, 20:11 which 2:1 + 1R for Prepared Offensive is 3:1 roll
2d6 for 9, D2r2. The Finns have 4 steps here, need to take 2 loss and
retreat 2.
Third battle is 21:8 which 3:1 rounded + 1R is 4:1 roll 2d6 for 10
resulting in D2r2. There were only 2 steps here, so these Finnish
units are gone.
Fourth battle: 3:1 roll 2d6 for 7 resulting in A1D1r1.
Lastly, 2:1 on the most northwest position, roll 2d6 for 6, A1D1 but
the Soviets can well afford it.
Supply Phase
Use SCS Supply Rules (SCS 12.0). Soviet non-HQ units must be supplied by HQ unit which must itself be in trace supply (K 1.4a). Trace supply for Soviets is any road, track or railroad running off map south of Finnish MLR (K 1.4d). Attack, defense and movement are 1/2 and out of supply artillery may not barrage (K 1.4c).
All Soviet units are in supply.
Finnish Reaction Phase
Any Finnish unit not in an EZOC at the moment it chooses to move can move in the Reaction Phase during the Soviet player’s turn, including disorganized (DG) and out-of-supply units (K 3.5, see also 3.4).
It’s not apparent that there is anything the Finns can do to prevent a Soviet win at this point. There is only one VT Line hex which is still occupied by the Finns, and they could likely keep it for another couple of turns, at the risk of being encircled. Even if the reinforcements come in on the Finns turn, it’s too little too late, as they have too far to travel to make a significant difference, that is, kick the Soviets off the VT line.
Finns concede.
End of Turn for and Game
The situation after the second Soviet Prepared Offensive shows the Finns in desperate straits.
AAR
For this scenario (Scenario 2), it’s critical that the Finns retreat to the VT Line in good order. The Soviet machine is massive, a juggernaut, and the Finns need to slow it down as much as possible to run the clock.
It should be pointed out that in this game, the dice really didn’t work for the Finns at all. Had the luck been a little more even, the game probably would have gone into a Turn 5 or 6, or possibly longer.
This one of those games where it needs to be played a few times to see how the strategies and luck work together. Despite the Finns being stomped, I can see how they could do really well. They have very strong defense, more movement factors, are more robust on combat results against attacker, and have more flexible reaction and exploitation. That said, they need to be played well or none of that matters. Which makes for a good game in my world.
One thing which isn’t all that realistic that the Massive Barrage can be conducted when the majority of the artillery units are (for whatever reason) out of normal barrage range. The rules don’t make any provision for this, and for this game I just rolled with it, but it’s still a bit troublesome. It probably doesn’t matter because if the artillery isn’t in range enough to barrage normally, the Massive Barrage won’t have as much effect.
Ghost units do ont enforce a ZOC, they simply prevent the Soviets from entering a particular hex in a defensive line. One weakness in this system is there is no given way to denote which ghost hexes are “emplaced” by which units. This is important because when the emplacing unit leaves the line, so do all “attached” ghost units.
House-ruled clarifications:
-
The rules weren’t clear to me whether the ghost units provided an EZOC which would deny Soviet 2d Wave unit designation, but it seemed reasonable that they would, given the intent of the ghost units. Hence, Soviet units in ghost EZOC not eligible for 2d Wave.
-
Artillery participating in Massive Barrage during Prepared Offensive is unable to participate in 2d wave. This is because they would ordinarily be unable to fire if denoted 2d wave during regular barrage phase. The rules seem unclear here, but it makes sense to me that any unit involved in a Massive Barrage is going to be too busy to move.
Blunders
-
Setting up exploitation capable units in EZOCs, which means they will unable to move and fight during exploitation phase. This may be partly mitigated by moving them out of EZOC during movement phase, will need to check with the rules whether unit can move in both phases.
-
Putting too many units under 2d Wave markers during first Prepared Offensive. Those units are needed during the initial combat round on Turn 1.
-
Massive Barrage on too few Finnish units in MLR on first turn. The Massive Barrage is a guaranteed DG, which halves the defense strength, which is really important against units in MLR.
-
Moving, then firing Finnish artillery during the first turn reaction phase. These units should have fired from where they were, then moved back to not get overrun during Soviet exploitation phase.
-
DG movement is half regular, which was not observed by the Finns in the first turn reaction phase, as can be seen in the photo above.
-
HUGE BLUNDER: mechanized is 3 MF/hex in forest. This would probably have saved the Finnish artillery which was overrun, the armor would not have had enough MF to pay the +2 for entering the EZOC along with another +2 for conducting overrun. Oh well.
-
Forgot to pay the +3 for crossing a river for the Finns on retreat.
-
I’ve been moving all Soviet artillery as mechanized, which isn’t correct. Only the yellow background units are motorized. The units with no color background move as leg. This is helpful as the roads would get overly clogged, and some of the artillery would otherwise be limited to one hex of movement per turn.
-
It’s not just about strength in defensive positions. The critical psoitions need to be able to soak up enough step losses to survive without retreating, otherwise the line falls. With too few step losses, the risk is having defenders eliminated.
The next game
Some thoughts about what I intend on doing for a next game, based on the lessons learned during this game:
- Allow room on the first turn to bring in 6 units of reinforcements.
- Ensure the enough combat capable, non-artillery can get to the MLR on the first turn to take advantage of DG’ed Finnish units from Massive Barrage.