The Education of Periandrenn - Going Deep Vintage with SPI's Sorcerer
Continuing with the trend to vintage, I’m following up the initial play of The Wreck of the B.S.M. Pandora with another game of the same era, Sorcerer. The game gets a lot of flack for the multicolor pastel, oversized hexes on the map, but I actually think its pretty cool.
Today is May 24, 2020. It’s 2:10 in the afternoon. The plan is to work through a single turn of the first, solo scenario, to learn how movement and combat works. That will be plenty enough for this afternoon. While I will definitely play more turns on days following, I may choose to end the game once I’ve achieved sufficient understanding of the rules.
Note: This game was started on May 24, 202, but had to be shelved due to work commitments. Play picks up again January 9, 2021. The existing text has been augmented in places.
17.1 The Education of Periandrenn
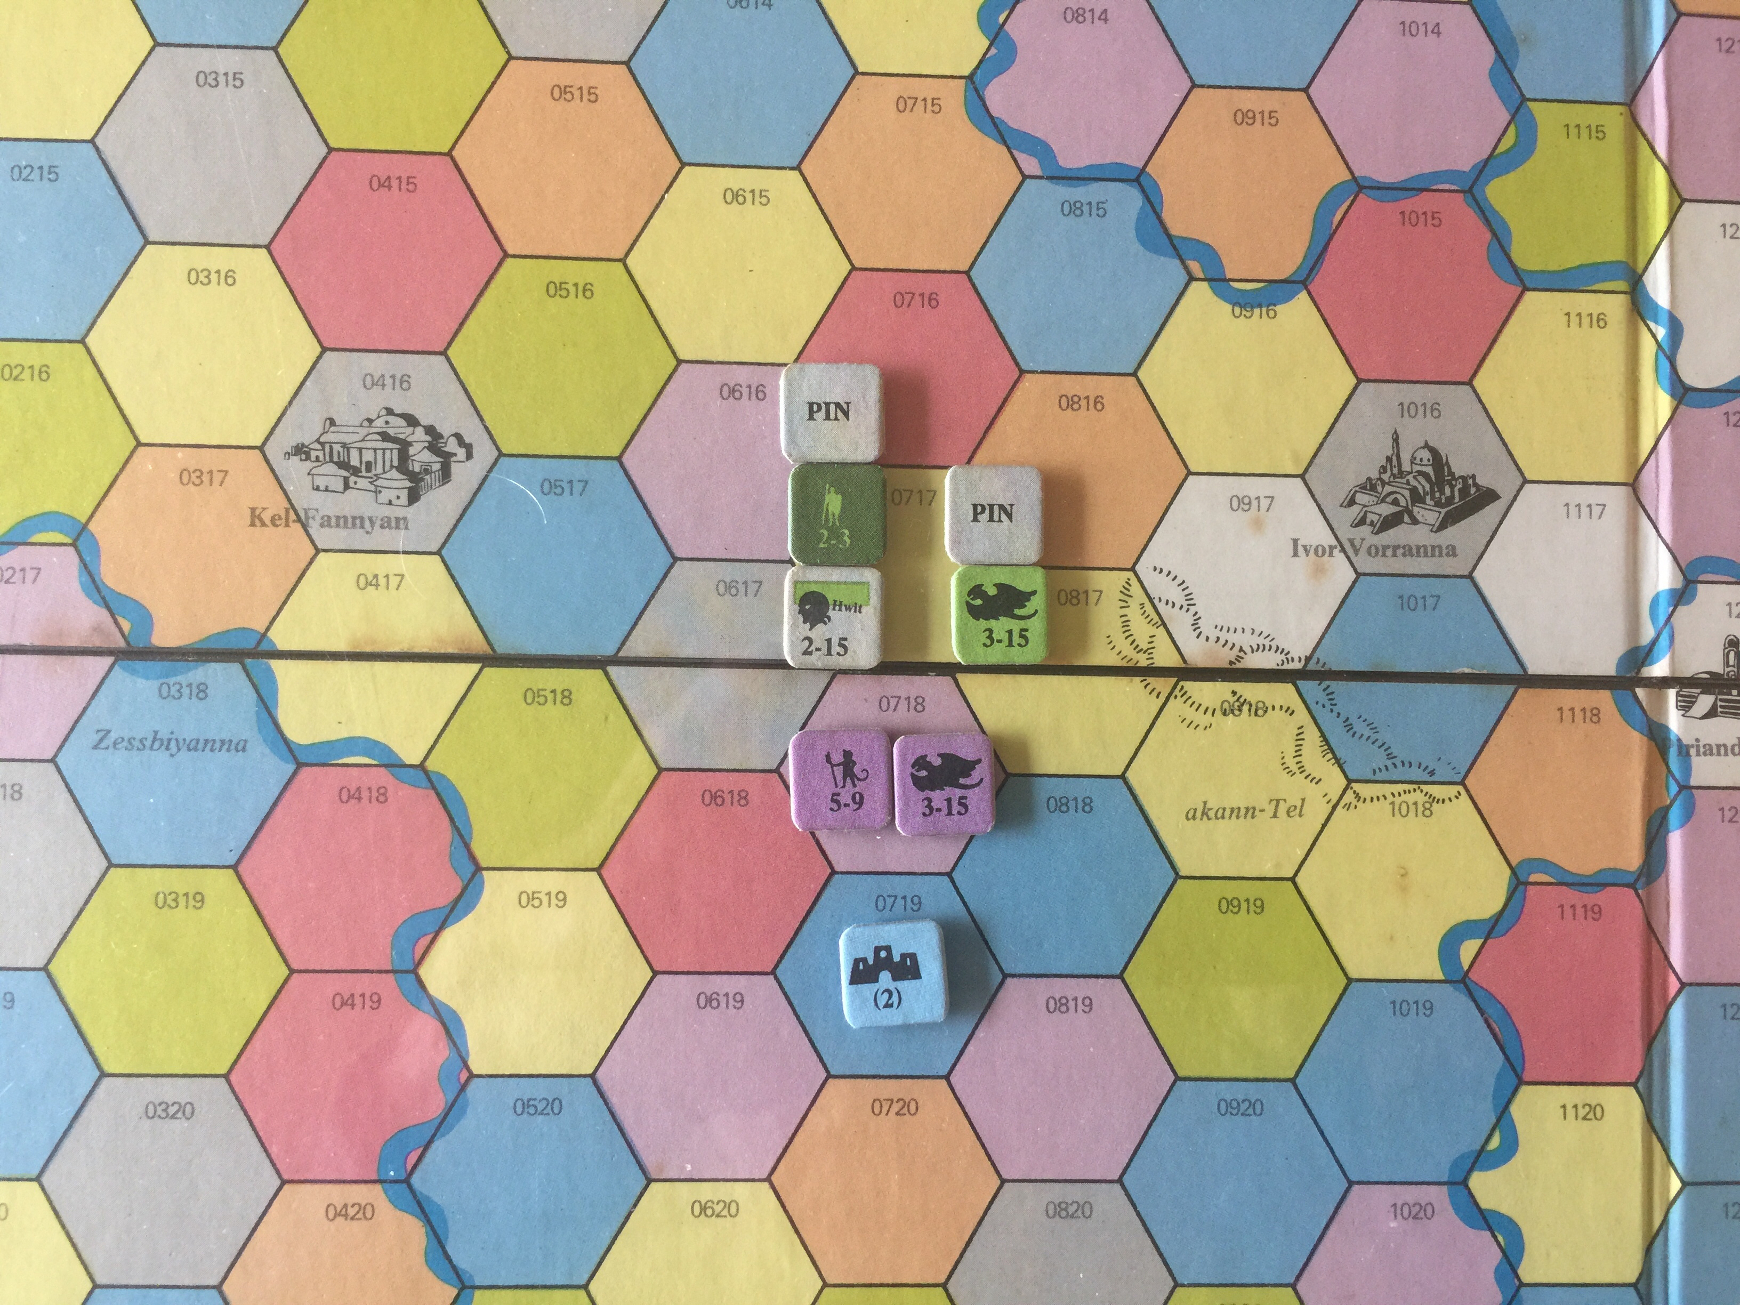
The Education of Periandrenn is the first scenario in the game, and is a solo scenario. The notion is the first sorcerer, a green sorcerer, decides to tour the land after having first come into his power. Hence the scenario starts with a single green sorcerer and a green human infantry, deployed on the map at the city Kel-Fannyan (hex 0416).
Turn 1
The solo scenario consists of a Green Sorcerer and associated Human infantry unit starting in the city of Kel-Fannyan. The goal is to tour all the other cities and return to Kel-Fannyan.
A. First Player Movement and Conjuration Phase
For the solo game, there is an initial “Magic Unit Selection Phase” occurring before movement. For the first turn, Green and Purple Dragons, Purple Infantry, and Blue Fortress drawn randomly. Appearance in the following order:
- Blue Fortress: 0719.
- Green Dragon: 0518.
- Purple Dragon and Infantry. 0716.
Ok, this blows, my Green Sorcerer can’t ditch the Infantry, and can’t teleport, it’s shanks mare at 3 hexes per turn all the way around the map. Bah. I am for sure not going to play this all the way through. So they move to 0717.
B. Joint Attrition Phase
Nothing here for Sorcerer.
C. Joint Combat Phase
N/A. first turn for Sorcerer.
For Green Dragon, time to read the Combat rules.
The way I read the rules, Combat is simultaneous, with results applied after all results are computed. Start with Dragon attacking:
- Green Dragon in Yellow Hex gets +5. Since neither the Green Sorcerer nor the human infantry are traveling alone (they are traveling together), they also get augmented with +5: 8:9 is -1 differential on the Neutral row, roll 3 for a Pin. Turnabout, roll 5 on +1 column which is also a Pin.
This doesn’t make sense, and I’m going to leave it right here for now, pick it up again tomorrow or later in the week. Or maybe later, depending on the load induced from work.
I think that’s enough for Turn 1. Going to declare success and move on to Turn 2.
In fact, a magic cyclone sweeps in from the heavens and removes all the enemy pieces! Wow!
G. Game-Turn Interphase
Advance the game turn marker on the map.
End of Turn 1.
Turn 2
After the smashing success of Turn 1, we attempt Turn 2 in hope for more clear success.
A. Enemy Magic Unit Selection
This is a special phase for the solo scenario. Draw 4 units and arrange in color order as determined by a die roll against the Color Value Chart on the map.
The rules say 4, but I say no no no, I’m only drawing 1, and that turns out to be a green dragon. Roll 6 which is purple. But with only one unit, green is first anyway. Convenient!
B. First Player Movement and Conjuration Phase
Sorcerer moves to Ivor-Vorranna, city number 1 on the tour. Movement is limited to 3 hexes due to rules constraint of not leaving the human behind.
C. Joint Attrition Phase
There are no magic units on the board at this moment due to the previously noted cyclone, hence no attrition.
D. Joint Combat Phase
No combat at the moment.
E.1 First Color Enemy Magic Unit Movement Phase
We have us a green dragon, he’s going to land in…hex 1115, which is two hexes away. The movement is from Green hex to Gray hex. Leaving the Green hex costs 6.
Joint attrition draw purple, blue, no attrition.
Joint combat
-
Dragon first: attack with 3, defenders have 5 for Combat Differential of -2. Reading the Neutral line since non-magical is involved, rolling 6 yields no effect.
-
Sorcerer and human: Combat differential +2, roll 6 for a
P.
And I’m calling Turn 2 here. Very good! We’ll deal with the Pinned dragon in a gray hex next turn.
F. Game-Turn Interphase
Move the turn marker.
End of Turn 2
Let’s get on with it, only a dozen more cities to go.
Turn 3
We’re doing pretty well here, I’m actually enjoying the experience. I think when I started this game last spring, I just didn’t have the patience to work with it. These vintage games have to be taken at their own pace.
A. Enemy Magic Unit Selection
This is a special phase for the solo scenario. Draw 4 units and arrange in color order as determined by a die roll against the Color Value Chart on the map.
Let’s pick another enemy from our grab bag. Just one until we know what happens to green dragon in gray hex. Then we’ll grab two. Pulling… green dragon…no we have one of those, let’s something different…pulling…green dragon, what the hell? Pull another, red dragon, that’s better.
B. First Player Movement and Conjuration Phase
Periandrenn and guard move to hex 1217, which is the city Piriandronna.
C. Joint Attrition Phase
Apparently, units in gray hexes never undergo attrition.
D. Joint Combat Phase
No combat as there is nothing else in the hex.
E.1 First Color Enemy Magic Unit Movement Phase
Didn’t deal with first color as only choosing one with the green dragon pinned, we have the red dragon in hex 1318, one hex away and an easy move to Piriandronna.
Joint attrition red dragon undergoes attrition being in a white space.
Joint combato
-
Dragon: CD -2 roll 4 for no effect.
-
Periandrenn: CD +2 roll 6 for
P.
And that’s it for Turn 3.
F. Game-Turn Interphase
Advance the turn marker on the Turn Track.
End of Turn 3
Turn 4
We’ll pull two enemies this time. The red dragon in Piriandronna will attrit away.
A. Enemy Magic Unit Selection
This is a special phase for the solo scenario. Draw 4 units and arrange in color order as determined by a die roll against the Color Value Chart on the map.
Draw:
- Yellow demon.
- Purple demon.
Rolling 1 for color order, they appear in the order drawn.
B. First Player Movement and Conjuration Phase
Move to purple hex 1519.
C. Joint Attrition Phase
- Red dragon attrits away.
D. Joint Combat Phase
N/A.
E.1 First Color Enemy Magic Unit Movement Phase
Yellow appears in 1520, moves to 1519.
Joint attrition draw blue and green, no yellow attrition.
Joint combat
- Demon: CD 0, roll 1 for 1 step loss. That sucks.
- Periandrenn: roll 5 for no effect, more suck.
E.2 Second Color Enemy Magic Unit Movement Phase
Purple appear in hex 1519.
Joint attrition: draw purple, green. Roll 2, which induces purple attrition.
Joint Combat:
- Demon: CD -2 roll 6 for no effect.
- Periandrenna: CD +2 roll 4 for
1and demon elimination. Bam.
F. Game-Turn Interphase
Advance the turn marker on the Turn Track.
I think I’m getting the hang of it. Seems sort of cool. The full game has got to be borderline chaos. I’m thinking it might be pretty fun.
End of Turn 4
Turn 5
We start the Turn 5 in hex 1519, accompanied by a Yellow Demon at full strength. Let’s see if we can lose this doober.
A. Enemy Magic Unit Selection
This is a special phase for the solo scenario. Draw 4 units and arrange in color order as determined by a die roll against the Color Value Chart on the map.
Once again, only choosing two, which are:
- Green troll.
- Purple demon.
- Yellow
Color order roll 5:
- Purple demon,
- Green troll,
- Yellow Demon.
B. First Player Movement and Conjuration Phase
We’re on the way to Triann-Afretta, and have a choice of landing in an orange hex, or in a red hex. I have no idea which is better, so let’s choose the red hex 1721.
C. Joint Attrition Phase
N/A.
D. Joint Combat Phase
N/A.
E.1 First Color Enemy Magic Unit Movement Phase
Purple lands in 1620, moves to 1721 engage.
Joint Attrition draw purple and red. Roll 6 which is no effect, purple is least subject to attrition in red hexes.
Joint combat
-
Demon: strength 5 + 1 for color value, CD +1. Roll 6 for no effect.
-
Sorcerer: strength 1 + 1 + 3 for CD -1, roll 5 for no effect.
-
Sorcerer: strength 1 + 1 + 3 for color value.
Survived that round.
E.2 Second Color Enemy Magic Unit Movement Phase
This is the green troll, who can’t move away because it costs 6 to leave the hex, and he’s going to attrit anyway. Sucks to be him.
Joint Attrition
Green troll attrits, no red units at this time.
E.3 Third Color Enemy Magic Unit Movement Phase
Yellow moves to 1721.
Joint attrition draw green and red again. What are the odds? Troll is gone.
Joint combat this is not good, a yellow in a red hax is +4.
- Demon is 9 total, CD +4 roll 5 for
2. Really bad result for sorcerer, the human is toast and the sorcerer loses a step. - Sorcerer is 5 total, CD -4, roll 2 for no effect.
Sorcerer needs to get to green hex.
F. Game-Turn Interphase
Advance the turn marker on the Turn Track.
End of Turn 5
Sorcerer in trouble, need to regenerate some hit points or he’s done.
Turn 6
So, Periandrenn is depleted 1 step, and he’s lost his guardian. This is because he has not conjured any hit points back to his depleted guardian. Dolt.
A. Enemy Magic Unit Selection
This is a special phase for the solo scenario. Draw 4 units and arrange in color order as determined by a die roll against the Color Value Chart on the map.
Still only drawing two units, we’ll get up to speed shortly:
- green dragon
- red troll
Color order:
- green
- yellow
- red
- purple
B. First Player Movement and Conjuration Phase
Move through Trianne-Afretta in hex 1722, then to green hex 1820. This is 3 movement points. Spend 2 MP to conjure Periandrenn back to full strength.
C. Joint Attrition Phase
Draw yellow and red, helpful.
- yellow, roll 4, and yellow demon is reduced 1 step.
D. Joint Combat Phase
N/A.
E.1 First Color Enemy Magic Unit Movement Phase
Yellow is first color, demon moves to 1820.
Joint attrition draw two ATTR chits from cup: purple, blue.
Joint combat
- Demon: Green hex, 2 + 1 CD -5 roll 1 no effect.
- Sorcerer: 2 + 6 CD +5 automatic 2 step loss.
E.2 Second Color Enemy Magic Unit Movement Phase
Actually, green was first, but whatever, the green unit is going to attrit anyway. With dragons, that just means they lose movement rather than combat power.
Joint attrition draw two ATTR chits from cup: red, blue.
No effect. I played the troll wrong above. He should still be in this hex. Whatever.
Joint combat
- dragon 3 + 6, CD +2 roll 6 for
P. - Periandrenn 1 + 6, CD -2 roll 5 for no effect.
Bummer.
E.3 Third Color Enemy Magic Unit Movement Phase
Red troll drops into hex 1921. He can’t go anywhere though.
Joint attrition draw two ATTR chits from cup: purple, green.
- green dragon loses a step.
- purple demon roll 1 for a step loss, lucky sorcerer!
Joint combat
N/A.
E.4 Fourth Color Enemy Magic Unit Movement Phase
Purple demon moves to 1820.
Joint attrition draw two ATTR chits from cup: orange, blue.
N/A.
Joint combat
- demon: 2 + 4, CD -1 roll 4 for no effect.
- Periandrenn: pinned, can’t do anything.
F. Game-Turn Interphase
Advance the turn marker on the Turn Track.
End of Turn 6
Our sorcerer needs to get unpinned, then get to a strong hex.
Turn 7
I’m at a bit of a crossroads here. I could wrap the game here with confidance that I have the largest part of the rules working. Or I could continue until a clear sorcerer loss. Or I could do some “magical augmentation” (which is to say add the infantry back in, and a green demon) and continue.
I think what I’ll do is start drawing 4 enemies per turn per the scenario rules, and see how far I get.
A. Enemy Magic Unit Selection
This is a special phase for the solo scenario. Draw 4 units and arrange in color order as determined by a die roll against the Color Value Chart on the map.
Draw:
- red troll
- red fortress
- yellow fortress
- orange demon
Color order roll 5:
- red
- purple
- green
- yellow
- orange
B. First Player Movement and Conjuration Phase
Periandrenn spends:
- 2 MP to unpin
- 8 MP to move to Piriandrenna, the white fortress in 1217.
- 5 MP this is a good place to conjure a green demon.
The human infantry was limited to 3 MP, super slow.
Given I understand how trolls work (they basically don’t move), I think this scenario is definitely winnable, the key is in how few turns can it be done.
C. Joint Attrition Phase
Draw yellow, blue for no effect.
D. Joint Combat Phase
N/A.
E.1 First Color Enemy Magic Unit Movement Phase
Red troll, fortress into hex 1318.
Joint attrition draw two ATTR chits from cup: yellow, orange.
N/A.
Joint combat
N/A.
E.2 Second Color Enemy Magic Unit Movement Phase
Purple demon moves to white space.
Joint attrition draw two ATTR chits from cup: purple, red.
Purple demon attrits out for being on white hex. Troll in hex 1921 loses 1 step.
Joint combat
N/A.
E.3 Third Color Enemy Magic Unit Movement Phase
Green dragon moves to hexes to orange 1619.
Joint attrition draw two ATTR chits from cup: purple, blue.
N/A.
Joint combat
N/A.
E.4 Fourth Color Enemy Magic Unit Movement Phase
Yellow fortress on 1617.
Joint attrition draw two ATTR chits from cup: blue, green.
Joint combat
N/A.
E.5 Fifth Color Enemy Magic Unit Movement Phase
Orange demon lands in 1118 moves to white hex.
Joint attrition draw two ATTR chits from cup: orange, green.
- green dragon in 1619, roll 5, does not attrit!
- Orange demon in white hex, loses a step.
Joint combat
- Demon 2, CD -5 roll 5 no effect.
- Sorcerer 7, CD +5 automatic 2 step loss.
F. Game-Turn Interphase
Advance the turn marker on the Turn Track.
And we’re back in play.
End of Turn 7
Turn 8
A. Enemy Magic Unit Selection
This is a special phase for the solo scenario. Draw 4 units and arrange in color order as determined by a die roll against the Color Value Chart on the map.
Draw:
- Red fortrss
- Vortex
- yellow troll
- yellow dragon
Color order roll 1:
- blue
- green
- yellow
- orange
- red
- purple
B. First Player Movement and Conjuration Phase
Sorcerer moves from Piriandrenna through Cessa-Abirran then backtracks a bit to stop in 1917, yellow which is the 9 MP limit for the attached demon. Yellow is strong for green.
C. Joint Attrition Phase
Draw blue, orange: green dragon rolls 5 and survives another attrition roll.
D. Joint Combat Phase
No combat this phase.
E.1 First Color Enemy Magic Unit Movement Phase
Green dragon moves to 1818.
Joint attrition draw two ATTR chits from cup: yellow, red.
- Trolls both lose one step.
Joint combat
N/A.
E.2 Second Color Enemy Magic Unit Movement Phase
Yellow is second color on the board. Well that was dumb, I moved into yellow for strength, and I alredy knew I had two enemies of that color in flight. Maybe I’ll get lucky for attrition.
Joint attrition draw two ATTR chits from cup: blue, yellow! Both the troll and the dragon lose a step.
Joint combat
- troll and dragon 3 + 3 + 6, roll 1 for one step loss on demon.
- sorcerer 2 + 5 + 5, roll 2 for
P. I’ll take it. That’s almost better than a single step loss in this solo scenario.
E.3 Third Color Enemy Magic Unit Movement Phase
Red is a fortress which is going into 2117.
E.4 Fourth Color Enemy Magic Unit Movement Phase
Lastly we have the vortex which appears in the nearest white hex, which is 1314. Rolling 4, it moves to 1311. Since this moves the vortex the gray hex 1313, the vortex is destroyed.
F. Game-Turn Interphase
Advance the turn marker on the Turn Track.
And that’s a wrap for Turn 8. Going to zoom around the map from here out.
End of Turn 8
Turn 9
A. Enemy Magic Unit Selection
This is a special phase for the solo scenario. Draw 4 units and arrange in color order as determined by a die roll against the Color Value Chart on the map.
Randomly select:
- yellow dragon
- orange dragon
- vortex
- orange demon
Color order:
- blue
- green
- yellow
- orange
- red
- purple
B. First Player Movement and Conjuration Phase
See the tables on p. 16 for movement and conjuration costs for various units.
Periandrenn and demon move to 1313, the city Demma, costs exactly 9 MPs. Spend 3 to undeplete demon.
C. Joint Attrition Phase
Draw green and red. There is nothing in green hexes, and the troll in 1318 is now eliminated.
D. Joint Combat Phase
N/A.
E.1 First Color Enemy Magic Unit Movement Phase
Yellow is first, landing in hex 1013, and moves to Demma to engage the sorcerer.
Joint attrition draw two ATTR chits from cup: red, green
N/A.
Joint combat
This time I’m going to read the rules really carefully to ensure I have the combat system correct.
-
13.3 Terrain effects on combat:
- Gray sorcerers have strength 1 in gray hex.
- Depleted magical units beginning or ending combat in a gray hex are destroyed regardless of presence of friendly sorcerer.
- Full strength magical units have strength 1 in gray hex.
I read this as the following:
- dragon, CD -1 roll 6 for no effect.
- sorcerer, CD +1 roll 6 for no effect.
Looks like the yellow dragon will be following.
E.2 Second Color Enemy Magic Unit Movement Phase
Orange is up next, with a dragon and demonic infantry.
Joint attrition draw two ATTR chits from cup: orange and red. The green dragon in 1818 passes attrition by rolling 5.
Joint combat
This is even up:
- organge rolls 5 for no effect.
- sorcerer rolls 2 for a
P.
E.3 Third Color Enemy Magic Unit Movement Phase
Vortex in 1412, roll direction 1 moves to 1415.
F. Game-Turn Interphase
Advance the turn marker on the Turn Track.
We’re about half way through our tour.
End of Turn 9
Turn 10
A. Enemy Magic Unit Selection
This is a special phase for the solo scenario. Draw 4 units and arrange in color order as determined by a die roll against the Color Value Chart on the map.
- Orange demon
- blue fortress
- purple demon
- yellow dragon
Color order, roll 4:
- orange
- red
- purple
- blue
- green
- yellow
B. First Player Movement and Conjuration Phase
See the tables on p. 16 for movement and conjuration costs for various units.
Sorcerer and demon move to green 1709.
C. Joint Attrition Phase
Draw red and purple for no attrition. Vortex roll 6 move to 1717.
D. Joint Combat Phase
N/A.
E.1 First Color Enemy Magic Unit Movement Phase
Orange moves first, this will be the orange demon coming in to play this turn.
Orange demon:
- Raw: 5
- Augmentation: 2 (yellow on green)
- Total: 7
- CD: -6
- Attack line: Poor.
Combat has no effect.
Sorcerer and demon:
- Raw: 5 + 2
- Augmentation: 6 (green on green)
- Total: 13
- CD: +6
- Attack line: Good.
Combat does 3 steps worst case, demon is lost.
E.2 Second Color Enemy Magic Unit Movement Phase
Purple demon lands in 1809, moves into 1709.
Joint attrition draw two ATTR chits from cup: red, green. Purple demon rolls 3, loses a step.
Vortex rolls 6 move to 2018.
Joint combat
- Units: purple demon
- Raw: 2
- Augmentation: 4
- Total: 6
- CD: -6
- Attack line: Good.
-
Roll/result: roll 6 for no effect.
- Units: sorcerer and demon
- Raw: 5 + 2 = 7
- Augmentation: 6
- Total: 13
- CD: +6
- Attack line: Poor
- Roll/result: 2 for
3purple demon destroyed
E.3 Third Color Enemy Magic Unit Movement Phase
Blue fortress in hex 1708.
Joint attrition draw two ATTR chits from cup: orange, red, no effect, vortex roll 4 moves through gray and is destroyed.
Joint combat
N/A.
E.4 Fourth Color Enemy Magic Unit Movement Phase
Green dragon in 1814 moves to 1812.
FIXME
Joint attrition draw two ATTR chits from cup: green, yellow.
N/A.
Joint combat
N/A.
E.5 Fifth Color Enemy Magic Unit Movement Phase
Yellow dragon in Dremma moves to 1709, new yellow dragon comes in from 1909 and moves to 1709.
Joint attrition draw two ATTR chits from cup: yellow and orange.
The yellow troll and yellow air dragon in yellow hex 1917 attrit away, they were both down one step already.
Joint combat
- Units: two yellow dragons
- Raw: 3 + 3 = 6
- Augmentation: 1
- Total: 7
- Attack line: Worst.
- CD: -6
-
Roll/result: roll 2 for no effect
- Units: sorcerer and demon
- Raw: 7
- Augmentation: 6
- Total: 13
- Attack line: Best
- CD: +6
- Roll/result: roll 6 for
6, all 4 steps lost for yellow dragons.
F. Game-Turn Interphase
Advance the turn marker on the Turn Track.
And that is a wrap for Turn 10.
End of Turn 10
Turn 11
I believe this may be pretty much over, I think I have the hang of it now. Will play it out to see what happens.
A. Enemy Magic Unit Selection
This is a special phase for the solo scenario. Draw 4 units and arrange in color order as determined by a die roll against the Color Value Chart on the map.
Draw:
- red troll
- red troll
- blue troll
- yellow demon
Color order roll 6:
- purple
- blue
- green
- yellow
- orange
- red
B. First Player Movement and Conjuration Phase
See the tables on p. 16 for movement and conjuration costs for various units.
Sorcerer and demon move to 1603, a green hex, clearing Selvass.
C. Joint Attrition Phase
Draw blue, orange. We have green dragon in orange 1812, roll 2 attrits away on last step.
D. Joint Combat Phase
N/A.
E.1 First Color Enemy Magic Unit Movement Phase
Blue troll to 1602.
Joint attrition draw two ATTR chits from cup: blue, red and blue troll loses a step.
Joint combat
N/A.
E.2 Second Color Enemy Magic Unit Movement Phase
Yellow demon enters 1704, moves to 1603.
Joint attrition draw two ATTR chits from cup: green, red. Yellow demon is rolls 5, passes attrition.
Joint combat
- Units: yellow demon
- Raw: 5
- Augmentation: 1
- Total: 6
- Attack line: Worst
- CD: -7
-
Roll/result:
- Units: sorcerer and demon
- Raw: 7
- Augmentation: 6
- Total: 13
- Attack line: Best
- CD: +7
- Roll/result:
This is an autokill.
I’m getting a little suspicious here, too easy, am I missing something?
E.3 Third Color Enemy Magic Unit Movement Phase
Red trolls enter on hex 1404, but they don’t get to move.
Joint attrition draw two ATTR chits from cup: orange, red. The trolls lose a step.
Joint combat
N/A.
F. Game-Turn Interphase
Advance the turn marker on the Turn Track.
Another turn down. If I haven’t messed up something badly, I’m getting the hang of this.
End of Turn 11
Turn 12
A. Enemy Magic Unit Selection
This is a special phase for the solo scenario. Draw 4 units and arrange in color order as determined by a die roll against the Color Value Chart on the map.
Draw:
- Blue demon
- blue demon
- red dragon
- yellow troll
Color order, roll 3:
- yellow,
- orange
- red
- purple
- blue
- green
B. First Player Movement and Conjuration Phase
See the tables on p. 16 for movement and conjuration costs for various units.
Move through Lyann-Dritta to green 1005.
C. Joint Attrition Phase
Draw yellow, orange for no effect.
D. Joint Combat Phase
N/A.
E.1 First Color Enemy Magic Unit Movement Phase
Yellow, troll in hex 1106.
Joint attrition draw two ATTR chits from cup: blue, green. Troll in 1602 attrits away.
Joint combat
N/A.
E.2 Second Color Enemy Magic Unit Movement Phase
Red dragon moves from 1105.
Joint attrition draw two ATTR chits from cup: orange, red, trolls in 1404 attrit.
Joint combat
- Units: red dragon
- Raw: 3
- Augmentation: 3
- Total: 6
- Attack line: Inferior.
- CD: -7
-
Roll/result: roll anything for no effect.
- Units: sorcerer and demon
- Raw: 5 + 2 = 7
- Augmentation: 6
- Total: 13
- Attack line: Inferior
- CD: +7
- Roll/result: roll 6 for
2, dragon is eliminated.
E.3 Third Color Enemy Magic Unit Movement Phase
Blue demans come in from 1006, this is going to be burly.
Joint attrition draw two ATTR chits from cup: blue, red for no effect.
Joint combat
- Units: two blue demons
- Raw: 5 + 5 = 10
- Augmentation: 5
- Total: 15
- Attack line: Best
- CD: +2
-
Roll/result: roll 4 for
3, which is total loss of demon, and a step loss for Periandrenn. - Units: sorcerer and demon
- Raw: 2 + 5 = 7
- Augmentation: 6
- Total: 13
- Attack line: Worst
- CD: -2
- Roll/result: no effect at any roll.
Periandrenn needs to survive 2 more turns for the win.
F. Game-Turn Interphase
Advance the turn marker on the Turn Track.
Can he do it? Or will he get toasted? Hard to say. Need to stay away from those blue demons, or hope they get attrited away some how.
End of Turn 11
Turn 12
A. Enemy Magic Unit Selection
This is a special phase for the solo scenario. Draw 4 units and arrange in color order as determined by a die roll against the Color Value Chart on the map.
Draw:
- green fortress
- yellow dragon
- green dragon
- yellow demon
Color order roll 3:
- yellow
- orange
- red
- purple
- blue
- green
B. First Player Movement and Conjuration Phase
See the tables on p. 16 for movement and conjuration costs for various units.
- Undeplete: 3
- Leave enemy-occupied hex: +2
- Move through Bannorka to Amma-Avattar for 15 total MP.
C. Joint Attrition Phase
Draw yellow, purple, troll in 1106 reduced.
D. Joint Combat Phase
N/A.
E.1 First Color Enemy Magic Unit Movement Phase
Yellow lands on map hex 0710, moves to city.
Joint attrition draw two ATTR chits from cup: blue, green. Blue demons roll 1, reduced; roll 5, reduced. Not that it really matters as being in a gray hex they will only have combat strength of 1.
Joint combat
In a gray hex, this is all going to be on the neutral line with no augmentation:
- dragons CD +1 roll 1 for
1, uh oh. - sorcerer CD -1 roll 2 for
P.
E.2 Second Color Enemy Magic Unit Movement Phase
Blue demons move to engage.
Joint attrition draw two ATTR chits from cup: green, orange. Nothing eligible.
Joint combat
Since the sorcerer cannot attack, demon has CD +2 rolls 2 for 1
and that is the end of the game!
Wow!
End of Turn 12
AAR
I am really glad I played this all the way through to a clear finish. At least, as clear as I understand the rules at the moment.
Questions from playing Scenario 1:
-
Trolls apparently can’t move from their color hex at all unless accompanied by a friendly sorcerer.
-
Combat augementation, add to stack.
-
I read Joint Attrition as pulling a new pair of ATTR markers from the cup and applying it to all units.
I am definitely going to play this scenario again to see if I can beat the odds.
Some examples which I’ll clean up later.
Example 13.74
- Hex: orange.
- Attacker: Blue-Yellow-Red sorcerer with raw strength 6, Yellow demon raw strength 5. These are augmented with a +5 which is 16. But the rules say 15 instead, and I don’t know what the discrepancy is yet.
- Defender: Purple sorcerer, purple air dragon, human infantry for raw strength 7 + 2 augmentation for 9 which matches the rules.
Example 13.75
Turn Sequence
A. Enemy Magic Unit Selection
This is a special phase for the solo scenario. Draw 4 units and arrange in color order as determined by a die roll against the Color Value Chart on the map.
B. First Player Movement and Conjuration Phase
See the tables on p. 16 for movement and conjuration costs for various units.
C. Joint Attrition Phase
D. Joint Combat Phase
E.1 First Color Enemy Magic Unit Movement Phase
Use vim macros @j and @r to autopopulate the sequence here.
E.2 Second Color Enemy Magic Unit Movement Phase
E.3 Third Color Enemy Magic Unit Movement Phase
E.4 Fourth Color Enemy Magic Unit Movement Phase
E.5 Fifth Color Enemy Magic Unit Movement Phase
E.6 Sixth Color Enemy Magic Unit Movement Phase
F. Game-Turn Interphase
Advance the turn marker on the Turn Track.