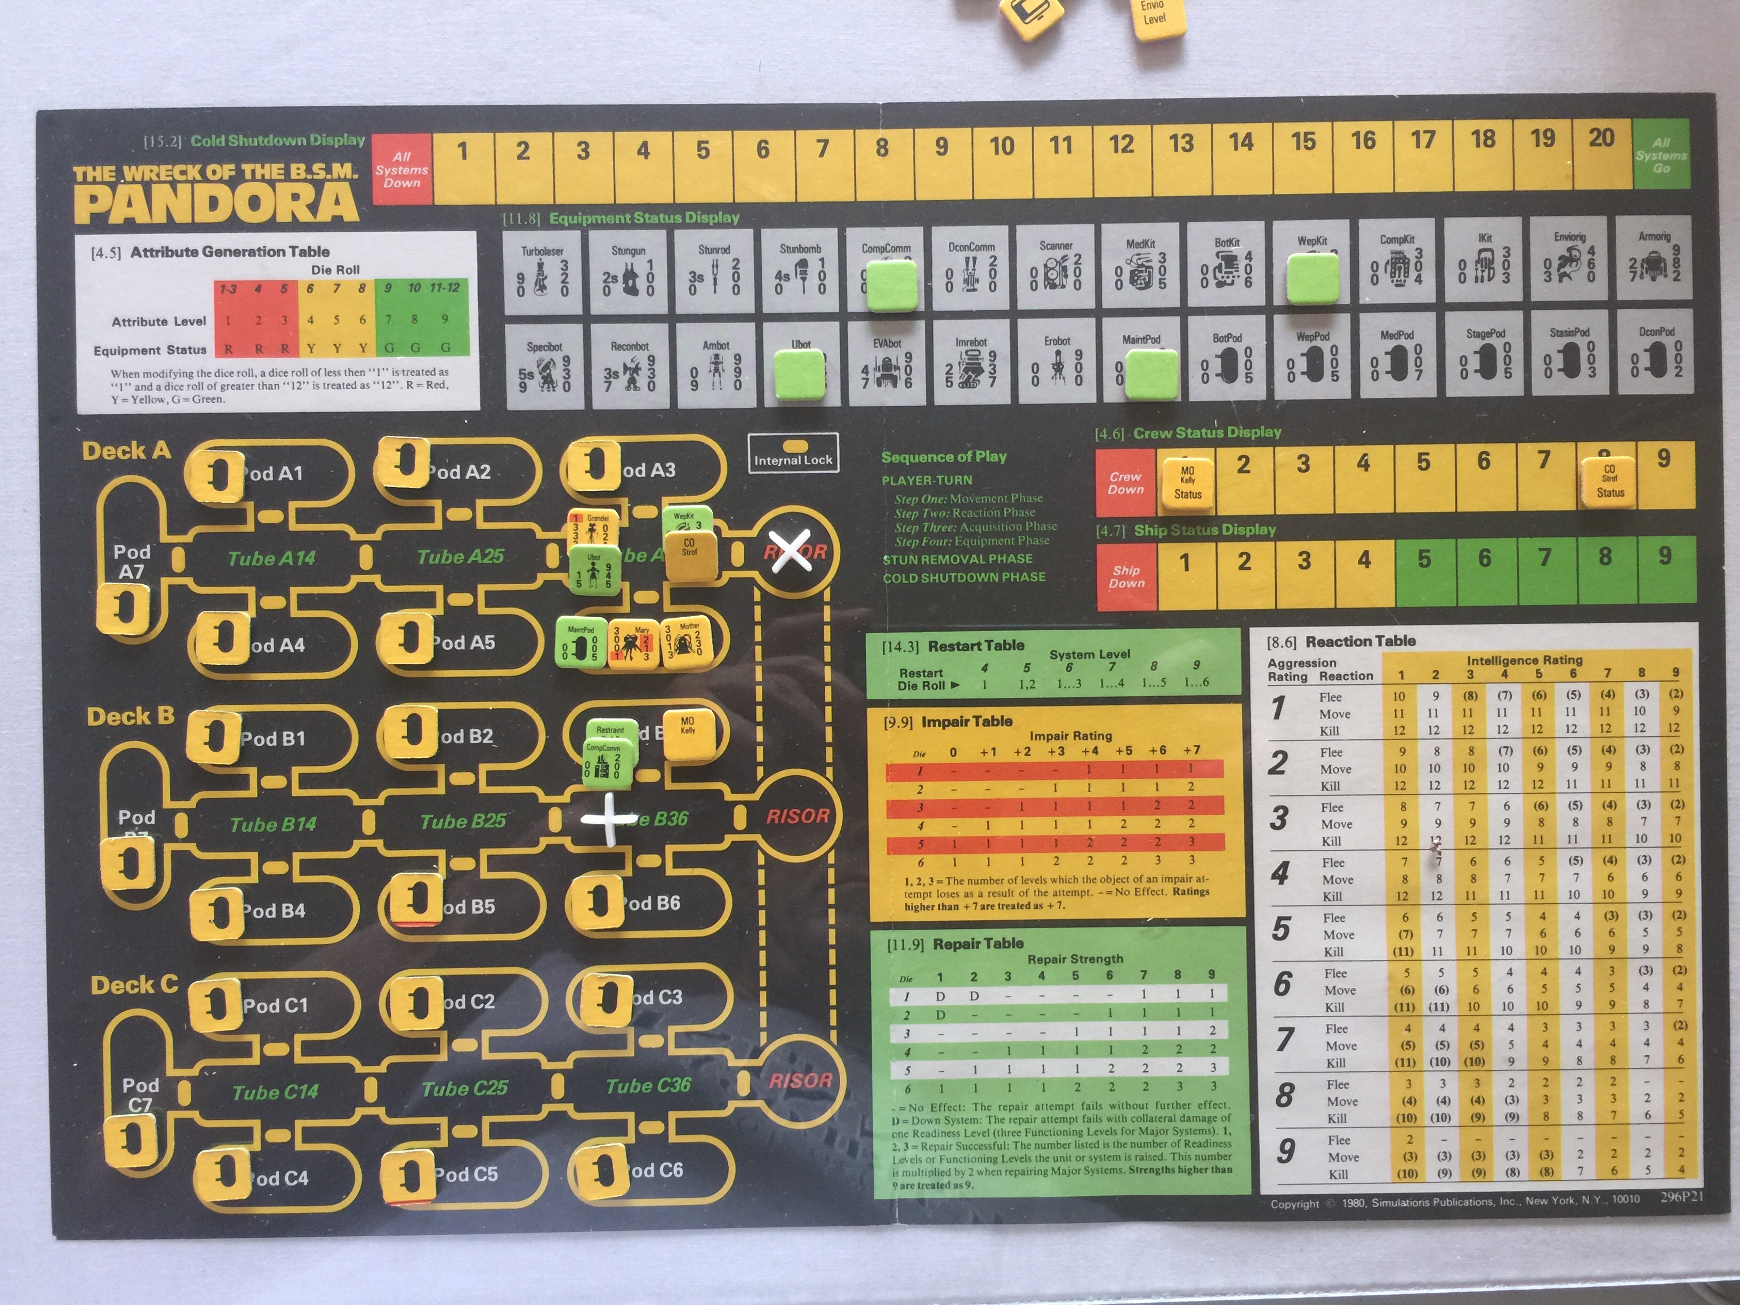
The Wreck of the B.S.M. Pandora
It’s May 3, 2020, and I’ve been meaning to get a new, that is, new to me game going for a couple of weeks, but just haven’t had the energy to learn a new set of rules. While my energy level is still a bit low today, I’m feeling motivated enough to set up an unplayed game and just go for it. The game may well stay on the table for a day or two, or a week or two, but that’s fine. This writeup will publish at some later date.
The Wreck of the B.S.M. Pandora is a vintage SPI title which I picked up last year. It plays 1-5.
(As it turns out, the game stayed up for almost 3 weeks, but that’s ok! I got in a turn or so in the evenings, then wrapped it up on Memorial Day weekend.)
Setting up
Ok I need to print out a worksheet, or take notes into a table here in the article, I could do that using markdown table generator…
Here’s the Attribute Display:
| Crew member | Impair | Shield | Repair | Weight | Port | Speed |
|---|---|---|---|---|---|---|
| Neema Strof | 5 | 8 | 3 | 3 | 6 | 2 |
| L. J. Gepidus | ||||||
| Najeb Kelly | 2 | 8 | 2 | 2 | 2 | 3 |
| Blnt Skraaling | ||||||
| Hesiod Charybdis |
The CO Strof lands in Pod A6 to start.
Let’s kick it off.
Player Turn 1
Step One: Movement Phase
Strof stays where he is to do discovery in Pod A6. The pod is a
Maintpod (Maintenance pod). Roll 3 and draw Mary, Mother, and WepKit.
Let’s put the Specimen Attribute Table here:
| Specimen | Intel | Agress | Impair | Sheild | Weight | Port | Speed |
|---|---|---|---|---|---|---|---|
| Mother | 7 | 6 | 6 | 7-1 | 5 | 6 | 5 |
| Mouse | 6 | 6 | 4 | 4-2 | 1 | 2 | 3 |
| Grendel | 8 | 9 | 4 | 6-6 | 9 | 8 | 6 |
| The Scrod | 4 | 1 | 6 | 8 | 4 | 4 | 9 |
| Typhoo | 7 | 4 | 3 | ||||
| Shazam | 3 | 9 | 6 | 2 | 3 | 6 | 7 |
| Mary | 8 | 8 | 9 | 6 | 7 | 1 | 9 |
| The Blind Pig | 5 | 6 | 9 | 9 | 9 | 4 | 3 |
| Fletcher | 4 | 6 | 8 | 6 | 1 | 7 | 8 |
| The Golem | 8 | 8 | 7 | 7-6 | 5 | 9 | 9 |
We roll for Intel(ligence) and Agress(ion) attributes during Reaction as those are the two which are needed right now.
For Mother, +3 DRM for Intel, roll 6 + 3 for 7 Intel, 7 + 0 for 6 Agress. I fill in the chart above.
For Mary, +3 DRM for Intel, +0 for Agress, roll 7 + 10 for 8 Intel, roll 10 + 0 for 8 Agress.
Step Two: Reaction Phase
Mother reaction, roll 2, no effect.
Mary reaction, roll 6 for Kill attempt.
Roll 7 Mary Impair is 5, roll 9 - 1 Mary Shield is 6.
Since two enemy units are in the same space, need to roll for Mother’s stats as well. Roll 7 + 1 for 6, roll 6 + 3 for 7
Some combat: Mary Impair against Mother Shield is 9 - 7 = +2 roll 3 for one hit on Mother.
Check for damage, roll 3 for no effect.
Step Three: Acquisition Phase
Strof grabs the WepKit. It’s weight 3, Strof can Port 6, good to go.
Step Four: Equipment Phase
Since the WepKit is in Damaged status, a repair attempt is made, roll 5 for 1 level of repair, the WepKit is now in good status.
Strof decides to not engage in combat.
Stun Removal Phase
No stunned units.
Cold Shutdown Phase
Not yet applicable.
And I’m calling it for Turn 1.
This could be a pretty interesting game. I’m going to play several turns this week as part of a first play, should be able to get in a turn in an evening.
Player Turn 2
This is a weekday evening turn, not sure how much of the turn I will get through. Take it one phase at a time.
Step One: Movement Phase
Strof leaves Pod A6 for Tube A36. Exit reaction for Mother: roll 9 which is a kill attempt. No combat, Mother cannot hurt Strof, however, Strof has a chance to damage, roll 3 for no effect.
Mary reacts: roll 6 for kill attempt, Strof loses 1 Shield.
[Note: I did not roll to see which was attacked, Mother or Mary could have attacked each other instead of Strof.]
Discovery in Tube A36, roll 2, reveal Grendel and Ubot. Roll for Grendel stats.
This is going to suck.
Step Two: Reaction Phase
Roll 5 for Grendel, which is a kill attempt. Impair is 9-8, roll 2, no effect, Damage is 5-6, roll 4 for no effect.
Ubot is condition red. I don’t believe I can move it.
Step Three: Acquisition Phase
I don’t see anything to acquire here.
Step Four: Equipment Phase
Repair attempt on Ubot, succeeds to Yellow, check for berserk, roll 4, good to go.
Stun Removal Phase
Nothing stunned.
Cold Shutdown Phase
Nothing to do here.
Player Turn 3
I’m sort of getting the hang of this one, but it’s slow going with a turn (at best) after work.
As it turns out Strof can’t leave the tube with Grendel because he’s slower than Grendel.
Step One: Movement Phase
No movement, Grendel blocks.
Step Two: Reaction Phase
Reaction check for Grendel, roll 8, which is a kill attempt, roll 3 on differential 1 is no effect. Damage to Grendel roll 4 on the zero column for no effect.
Step Three: Acquisition Phase
Pass.
Step Four: Equipment Phase
Pass.
Stun Removal Phase
N/A.
Cold Shutdown Phase
N/A.
Player Turn 4
I’m dialing in the MO now. One character is going to be pretty tough to get to a win. Stats added to table above. MO Kelly lands in Pod B3. MO Kelly has lousy stats overall. Specifically, MO Kelly has Stamina 1, which means 1 hit and the MO is dead.
Step One: Movement Phase
Since this is MO Kelly’s “first turn,” a discovery check must be made. Roll 2 for CompComm and StunBomb, the pod is Restraint 2.
MO Kelly scans Tube B36: Roll 4 nothing in there. [Probably a mistake, turns proceed by phasing player. No worries for now, and that may not apply for solitaire play.]
CO Strof scans Risor: Roll 6, nothing in there.
Step Two: Reaction Phase
Grendel reacts, roll 4 which is move, which is lucky for Strof,
except it’s actually a kill result when specimen is in the same
space. Since Grendel’s Impair is so lame (4) against Strof’s Sheild
(8), no combat occurs.
Step Three: Acquisition Phase
MO Kelly acquired the CompComm, StunBomb and Restraint Pod, with the StunBomb being damaged.
Strof has the WepKit. Should have had MO Kelly bring the StunBomb to Strof for repairs.
Step Four: Equipment Phase
Repair attempt: Kelly rolls 1 for D, StunBomb is red. Bummer,
need to get this thing fixed, but it goes back into the pool.
Strof is going to attack Grendel:
- Damage: 4:8, roll 3 for no effect.
- Combat: 5:4, roll for no effect.
Stun Removal Phase
N/A.
Cold Shutdown Phase
N/A.
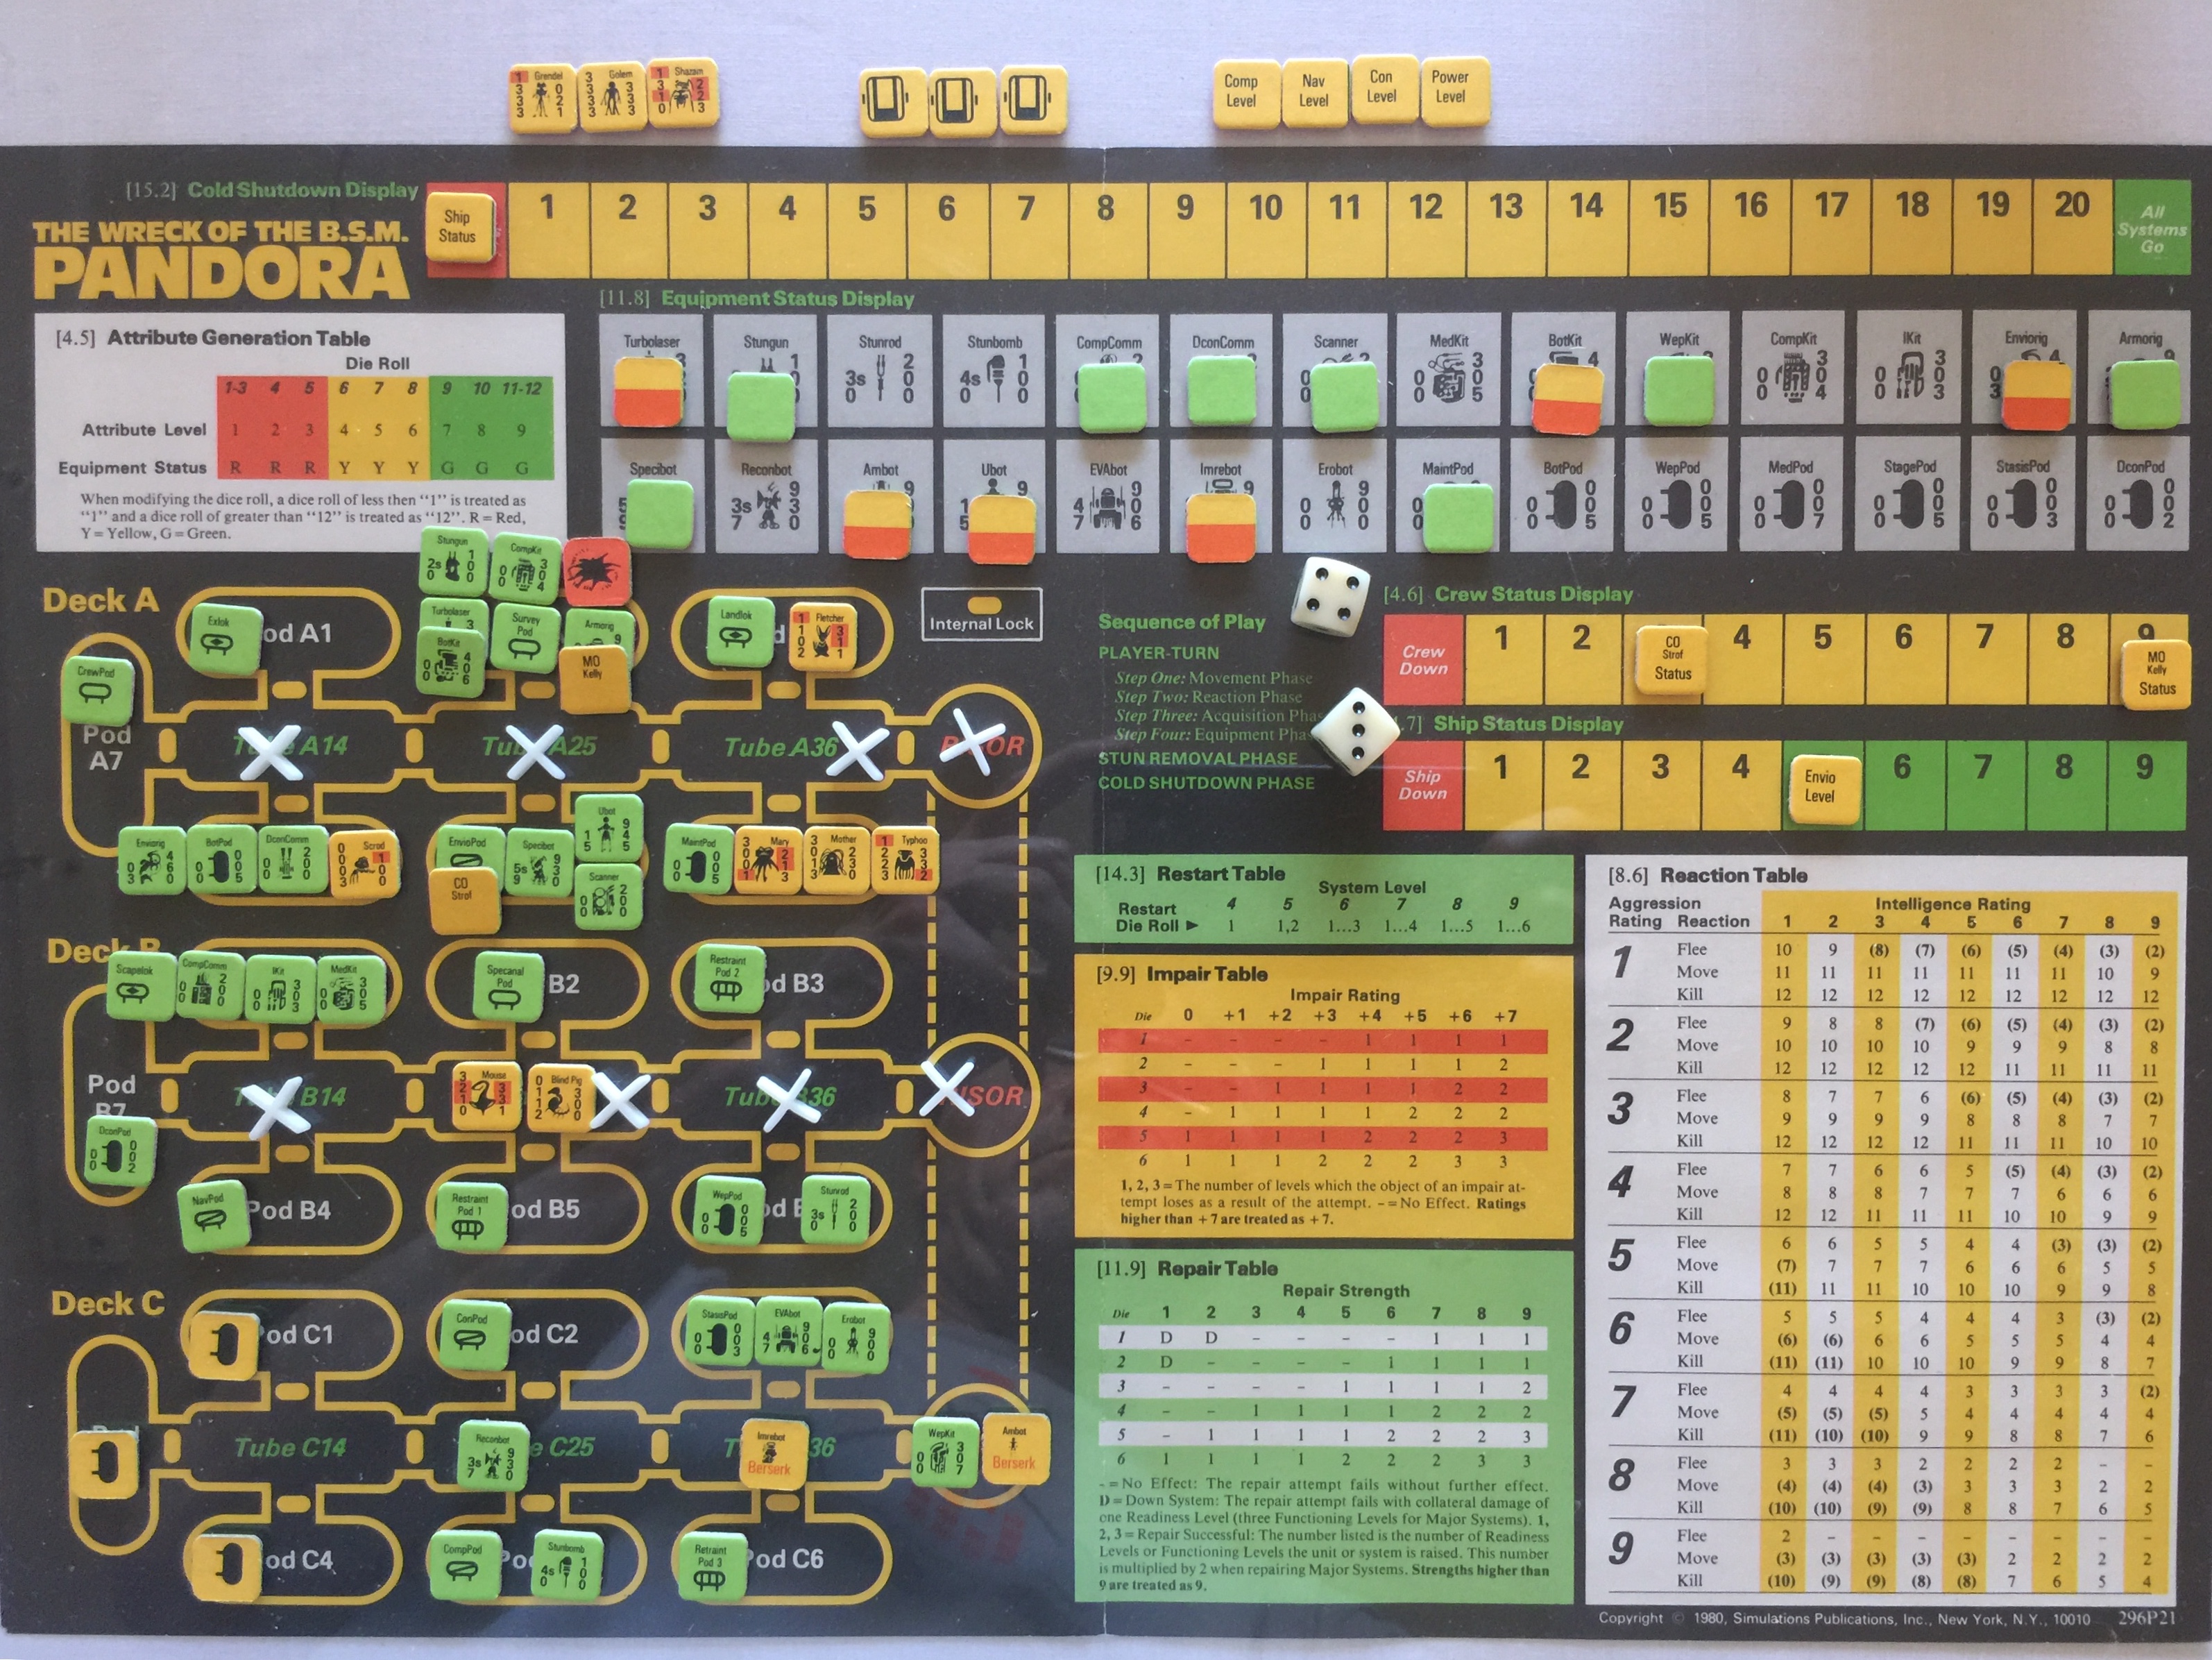
Here’s the situation at the end of Turn 4:
I think I’ll have Strof and Kelly do a lot of scanning the next couple of turns.
Player Turn 5
Now with 2 crew members on the map, let’s do another turn.
Step One: Movement Phase
Strof scans Pod A3, roll 1 to discover Fletcher, in LandLok pod. LandLok is an exterior lock.
MO Kelly moves to the empty Tube B36.
Step Two: Reaction Phase
Roll for Fletcher stats. He’s a burly. Reaction from scan is a kill
move, but no effect as no other unit is in that space.
Step Three: Acquisition Phase
Step Four: Equipment Phase
Strof taking another go at Grendel:
- Damage: 4:8, roll 2 no effect.
- Combat: 5:4, roll 5 for 1 hit on Grendel.
Nothing to repair.
Stun Removal Phase
Nothing stunned.
Cold Shutdown Phase
N/A.
Player Turn 6
I’m jotting down the rules in a mind map to help get the order of execution sorted out. Let us continue.
Step One: Movement Phase
Strof scans Tube A25, roll 4, nothing there.
Kelly scans Pod B6, roll 1 for Stunrod in the WepPod. Convenient.
Step Two: Reaction Phase
Grendel rolls 7, which means kill, roll again to determine
target, roll 5 which is Strof.
- Damage: 5:5 roll for no effect.
- Combat: 4:8 no combat.
Step Three: Acquisition Phase
Nothing to acquire.
Step Four: Equipment Phase
Strof goes after Grendel, let’s get rid of this clown so Strof can move:
- Damage: 4:8, roll 5, 1 hit on Strof, Stamina to 7.
- Combat: 5:5, roll 3 for no effect. I made a mistake on Grendel’s Shield rating, it’s reduced more than it should, going to roll with it as-is.
Stun Removal Phase
Nothing stunned.
Cold Shutdown Phase
N/A.
Player Turn 7
Strof is still stuck with Grendel, it’s an ugly business. Actually, Strof should have been using the Impair stat from Ubot to combine with on attack. That balances out the mistake from above.
Step One: Movement Phase
Strof can’t do squat.
Kelly scans Tube B25, roll 5, nothing in the tube.
Step Two: Reaction Phase
Grendel of course reacts with kill target roll Strof:
- Damage: 5:5, roll 4, 1 hit on Grendel
- Combat: 4:8 no combat.
Step Three: Acquisition Phase
Nothing to acquire.
Step Four: Equipment Phase
Nothing to acquire.
Strof goes another round with Grendel:
- Damage: 4:8, roll 6, Strof takes another hit.
- Combat: 5+1:4, roll 3 for 1 hit on Grendel.
Chewing it down.
Stun Removal Phase
Nothing stunned.
Cold Shutdown Phase
N/A.
Player Turn 8
Strof is still locked in battle with Grendel, but will likely prevail after a number of turns.
Step One: Movement Phase
Strof is stuck.
Kelly moves to Tube B25.
Step Two: Reaction Phase
Grendel, roll 4, which is a move result, which is no effect
as they are in the same space.
Step Three: Acquisition Phase
Nothing to acquire.
Step Four: Equipment Phase
Strof going after Grendel again:
- Damage: 4:8, roll 6, Strof takes another hit. Dang.
- Combat: 6-3, roll 5 for another hit on Grendel.
Stun Removal Phase
N/A.
Cold Shutdown Phase
N/A.
Player Turn 9
Step One: Movement Phase
Strof is still contained.
Kelly scans Pod B2: roll 2, discover Armorig and Blind Pig in Specanal Pod.
Step Two: Reaction Phase
Roll for Intel and Agress for Blind Pig: 6, 5. Reaction roll3 for no effect.
As usual, Grendel decides to attack:
- Damage: 5:2, roll 1 for no effect. Bah.
- Combat: 4:8, no effect.
Strof has a chance at Grendel in Equipment Phase.
Step Three: Acquisition Phase
Kelly might pick up the Armorig in a turn or 2, want to scan neighboring pods first, looking for the med pod.
Step Four: Equipment Phase
Strof goes after Grendel:
- Damage: 4:8, roll 1 for no effect.
- Combat: 6:2, roll 1 for 1 hit. I’ll take it.
Grendel about done.
Stun Removal Phase
N/A.
Cold Shutdown Phase
N/A.
Player Turn 10
Hopefully Strof takes out Grendel this turn so we can get on with the game.
Step One: Movement Phase
Strof stuck.
Kelly scans Pod B5, roll 6, discover Restraint Pod 1. Bummer.
Step Two: Reaction Phase
Grendel, roll 11 for reaction, which is a kill, roll for target: 5, which will be Strof again:
- Damage: 5:1, which is +4 differential, which is an automatic hit on Grendel which means Grendel is gone.
Step Three: Acquisition Phase
N/A.
Step Four: Equipment Phase
N/A.
Stun Removal Phase
N/A.
Cold Shutdown Phase
N/A.
Player Turn 11
Ok, now we can get Strof out of his current tube.
Step One: Movement Phase
Strof takes his WepKit and the Ubot into Tube A25. Ubot follows.
Kelly scans Tube B14, discovers Mouse and Stungun.
Step Two: Reaction Phase
Roll for Mouse stats: Intel 6, Stats 6, roll for Reaction: 8, which is move into same space as Kelly. This could be bad. Maybe Kelly can move into the next space first.
Step Three: Acquisition Phase
Nothing.
Step Four: Equipment Phase
Not doing anything, too risky to lose Kelly.
Stun Removal Phase
N/A.
Cold Shutdown Phase
N/A.
Player Turn 12
I think I’m starting to get the rhythm of the game.
Step One: Movement Phase
Strof scans Pod A2, roll 3 for Turbolaser, Compkit, Botkit, in the Survey Pod.
Kelly wants to leave B25, need to get stats on Mouse. Mouse speed is 3, Kelly can leave and moves to B14.
Step Two: Reaction Phase
N/A.
Step Three: Acquisition Phase
N/A.
Step Four: Equipment Phase
N/A.
Stun Removal Phase
N/A.
Cold Shutdown Phase
N/A.
Player Turn 13
Step One: Movement Phase
Strof scans A5, roll 5 discover EnvioPod, which is a major system pod.
Kelly scans pod B1, roll 2 and discover Ikit and MedKit in ScapeLok. This is a good deal, Kelly needs to go in there and get some stamina built up, all the way if possible.
Step Two: Reaction Phase
N/A.
Step Three: Acquisition Phase
N/A.
Step Four: Equipment Phase
N/A.
Stun Removal Phase
N/A.
Cold Shutdown Phase
N/A.
Player Turn 14
Step One: Movement Phase
Strof scans Tube A14, roll 2 and discover Scrod and DconComm.
Kelly moves into Pod B1.
Step Two: Reaction Phase
Scrod rolls for Intel and Agress: 4, 1. Roll for reaction: 3 which is no effect.
Step Three: Acquisition Phase
N/A, MedKit is too heavy for Kelly.
Step Four: Equipment Phase
MedKit repair on Kelly, roll 4 for +1 Stamina.
Stun Removal Phase
N/A.
Cold Shutdown Phase
N/A.
Player Turn 15
The game is coming together.
Step One: Movement Phase
Kelly isn’t going anywhere until getting stamina back.
Strof moves into Tube A14.
Step Two: Reaction Phase
Scrod reaction roll 7 for Flee, grabs the DconComm
and moves into Pod A4.
Step Three: Acquisition Phase
Nothing to acquire since Scord kyped the DconComm.
Step Four: Equipment Phase
Kelly rolls for repair: 3, which is +1 Stamina.
Stun Removal Phase
N/A.
Cold Shutdown Phase
N/A.
Player Turn 16
A single turn in the evening.
Step One: Movement Phase
Strof scans Pod A1, discovers only ExLok.
Step Two: Reaction Phase
N/A.
Although I really should be having Mother and Mary throwing down. Maybe one of them will get taken out by the other.
Step Three: Acquisition Phase
N/A.
Step Four: Equipment Phase
MedKit repair for Kelly, roll 1 for no effect. Bummer.
Stun Removal Phase
N/A.
Cold Shutdown Phase
N/A.
Player Turn 17
Another turn in the evening.
Step One: Movement Phase
Strof scans Pod A7, roll 4 discover CrewPod.
Step Two: Reaction Phase
N/A.
Step Three: Acquisition Phase
N/A.
Step Four: Equipment Phase
Kelly tries more repair, roll 2 for no effect. Dang.
Stun Removal Phase
N/A.
Cold Shutdown Phase
N/A.
Player Turn 18
Almost finished with Tube A.
Step One: Movement Phase
Strof scans Pod A4, roll 3, in a BotPod, find Enviorig, Shazam, and Typhoo.
Step Two: Reaction Phase
Shazam attribute roll: 3, 9. Reaction: roll 4 which is (3) which means move into Strof’s space with intent to kill. Bummer. Targeting roll 6 which is Strof.
- Damage: 5:2, roll 6 for 2 hits on Shazam which kills Shazam. Which is probably pretty lucky!
Typhoo: 7, 4. Reaction roll 6 for move, which would have to be into the tube with Strof.
Step Three: Acquisition Phase
Nothing to acquire.
Step Four: Equipment Phase
Kelly rolls 5 on Repair, gains +1 Stamina.
Stun Removal Phase
N/A.
Cold Shutdown Phase
N/A.
Player Turn 19
We’re in a pretty good place I think. Kelly is slowly getting fixed, Strof is not doing too badly, the specimens are mostly found, now it’s a matter of finding the ship systems and seeing if we can restart the ship.
Step One: Movement Phase
Strof is going to try to leave A14, roll 5 for Typhoo Speed which is 3, which is faster than Strof. So that’s not going to work. Will have to deal with reaction.
Step Two: Reaction Phase
Typhoo reacts with Move to Tube A25, which is a bummer as Strof wants go there as well, but at least Strof can leave Tube A14.
Step Three: Acquisition Phase
N/A.
Step Four: Equipment Phase
Kelly rolls 3 for +1 Stamina, now at 5 Stamina.
Stun Removal Phase
N/A.
Cold Shutdown Phase
N/A.
Player Turn 20
Step One: Movement Phase
Strof moves into Tube A25.
Kelly stays put to get more stamina.
Step Two: Reaction Phase
Typhoo reaction roll (4) which is a Flee
result, with no tools to pick up, it moves to
Tube A36, which is just super inconvenient for Strof.
Step Three: Acquisition Phase
N/A.
Step Four: Equipment Phase
Kelly rolls 6 for +2 Stamina, now at 7 Stamina. Too bad Kelly can’t port that thing around. That would be super convenient.
Stun Removal Phase
N/A.
Cold Shutdown Phase
N/A.
Player Turn 21
Step One: Movement Phase
Strof moves into Tube A36.
Step Two: Reaction Phase
Typhoo reacts with move to Pod A6, which solves that problem
for Strof.
Here’s the current Specimen situation in Pod A6, in very hi-res closeup:
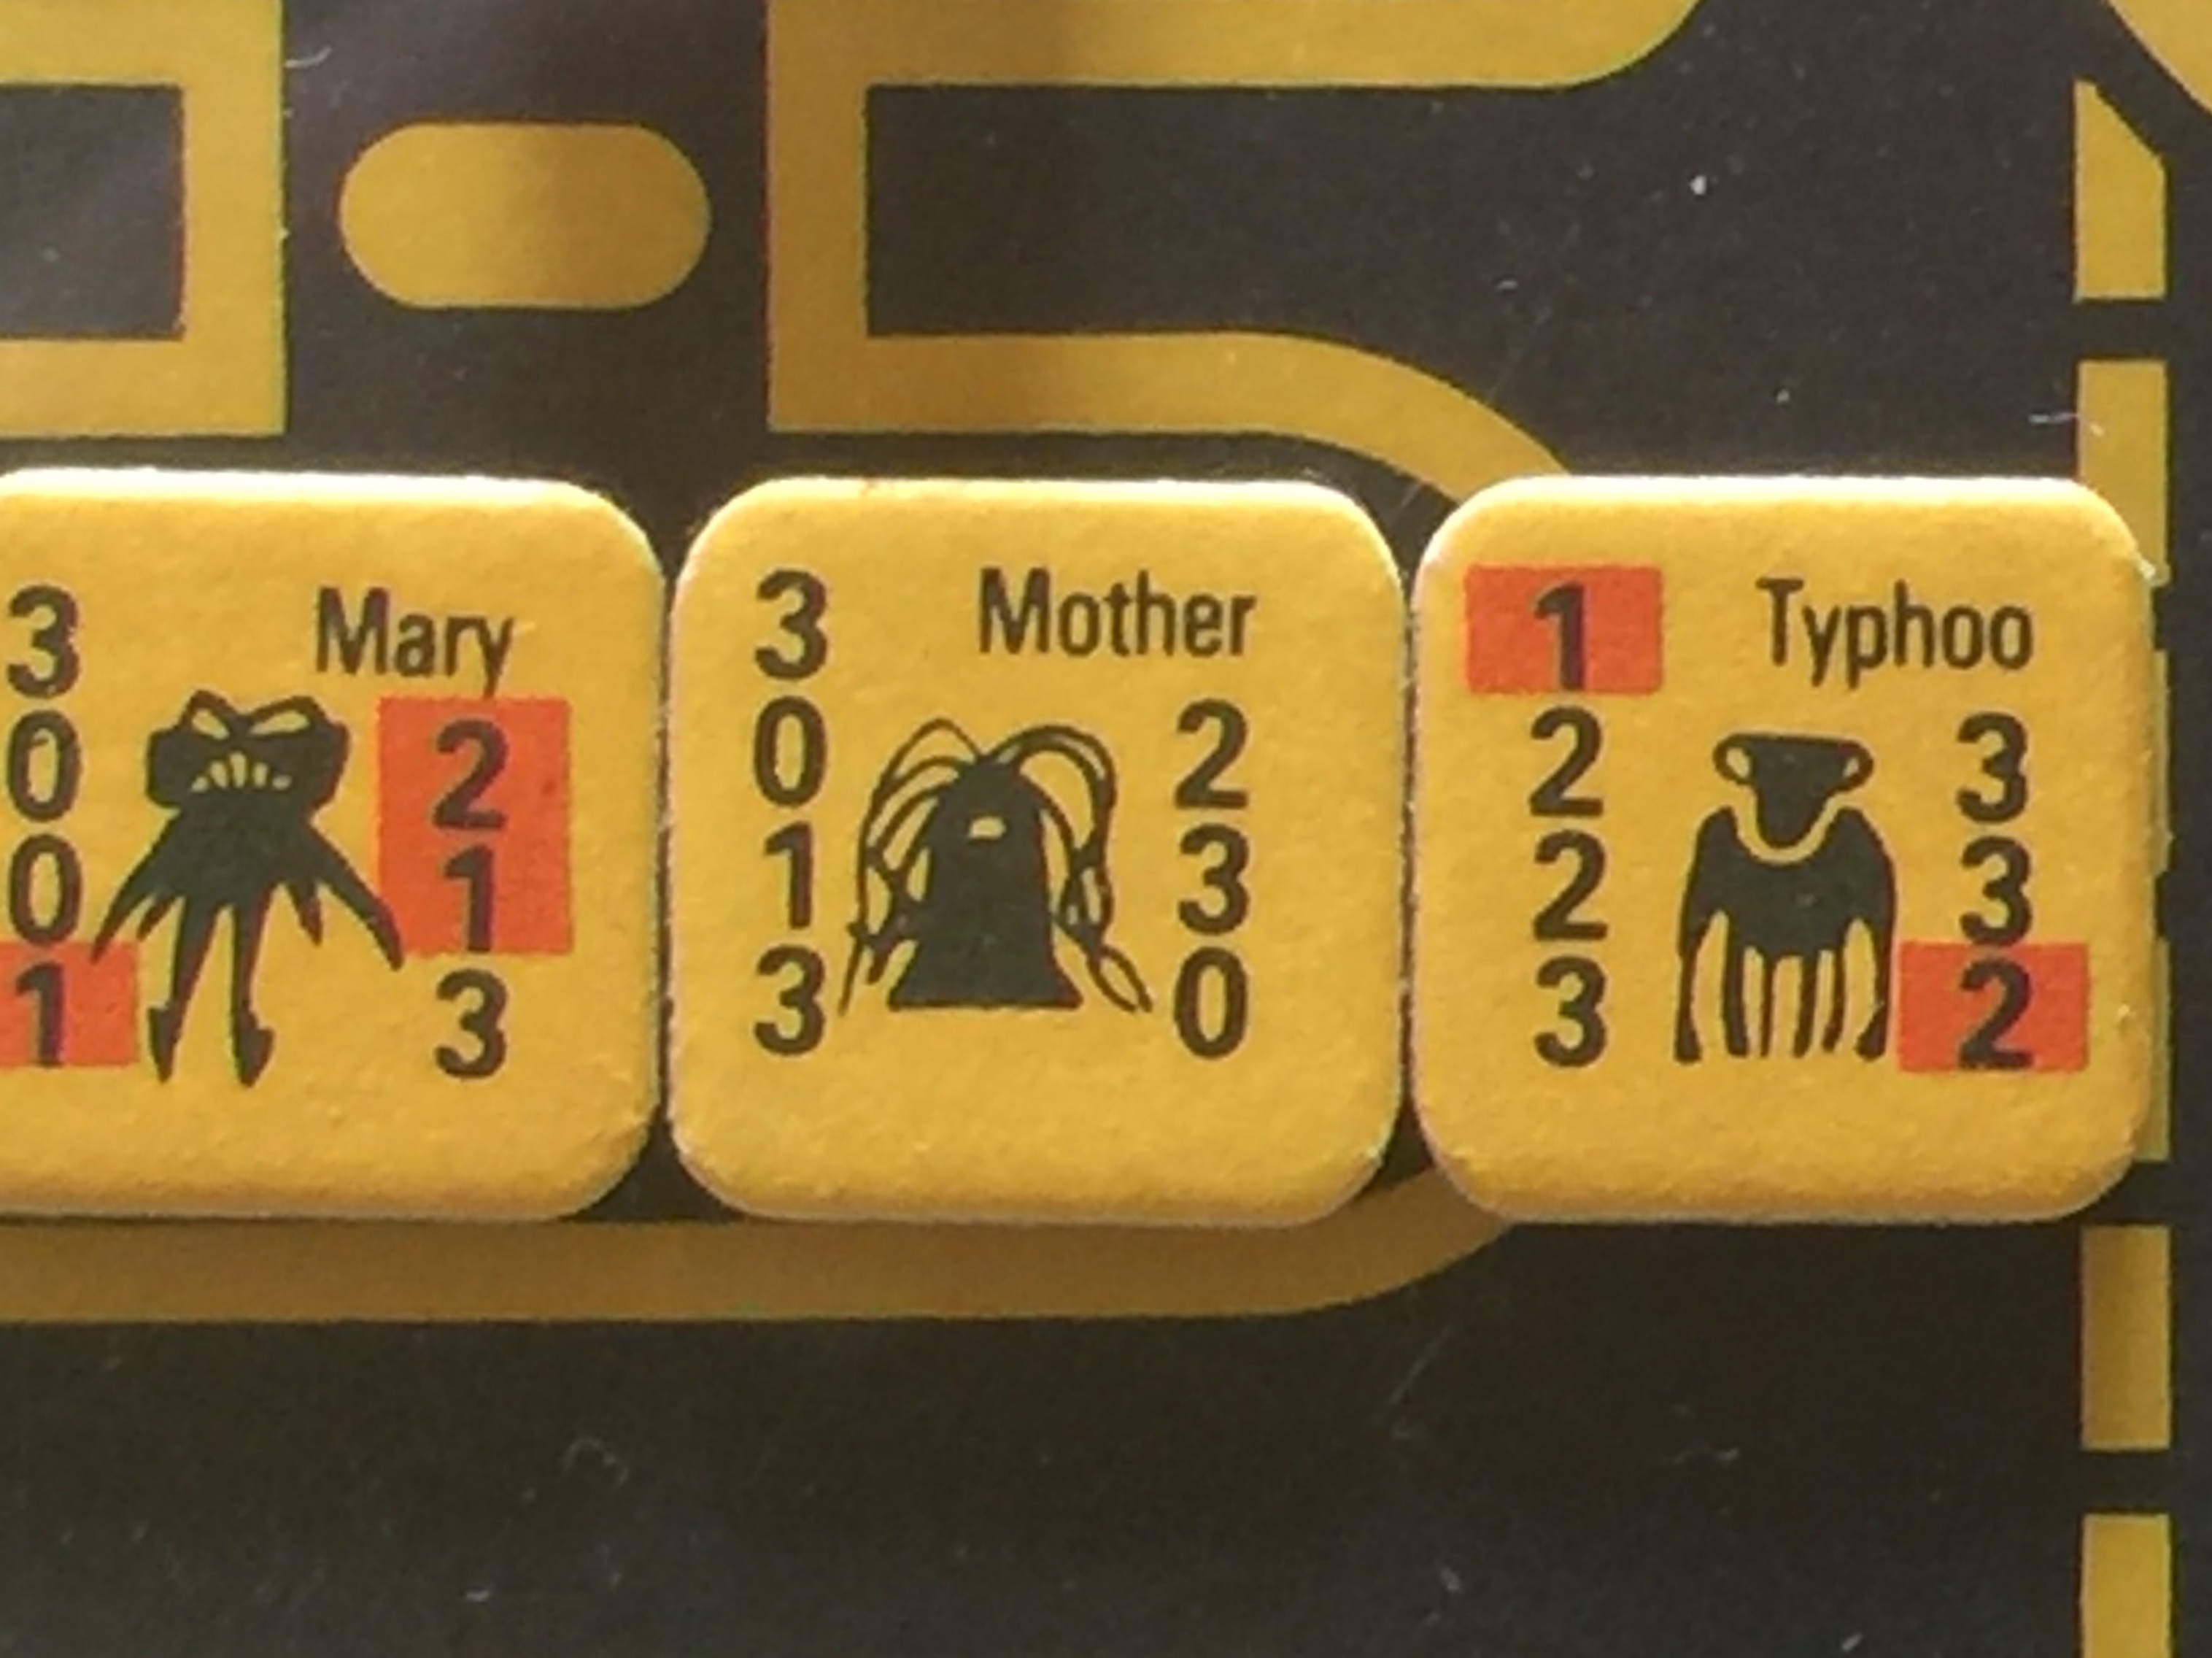
The counter art looks pretty good 40 years on.
Step Three: Acquisition Phase
N/A.
Step Four: Equipment Phase
Kelly rolls 3 for +1 Stamina.
Stun Removal Phase
N/A.
Cold Shutdown Phase
N/A.
At the end of Turn 20, I find myself a bit bored with doing more writing than game playing, so from here until I decide to pack it up, I’m not going to record turn-by-turn details. I will likely record a few impressions or results, and will definitely be adding to the MindMap I’ve started (in the source code repository).
Turn 22
Strof is going to head to Tube C and do some scanning.
Kelly is going to get to 9 Stamina, then see about getting into the Armorrig located in Pod B2. Kelly makes the roll and is now at 9 Stamina, which is good, she will need it for getting past Mouse and Blind Pig.
With the Armorrig, Kelly can more easily defend, and will have Port 9.
Turn 23
Strof scans Risor B, nothing present.
Kelly moves into Tube B14 and acquires the Stungun with Status Yellow. Repair attempt fails. It might be worth hanging out here and getting this repaired before attempting to take on Mouse. Kelly’s stats are weak for fighting.
Turn 24
Strof moves to Risor B.
Kelly makes a repair attempt on Stungun, rolls a 6 which puts it into repair. Now here’s a question, can Kelly rescan Tube B25 to trigger Mouse? It would make sense either way. And the rules do not prohibit rescanning, only stating that Discovery takes place only on the first time a space is scanned or entered.
Turn 25
Here’s the plan: Strof moves to Risor B, Kelly scans Pod B7. Discovery roll 6, reveal DconPod.
Turn 26
Strof scans Risor C, discovers Ambot, Specbot, and Scanner. Kelly scans Pod B4, discovers NavPod.
Turn 27
Strof moves to Risor C. Kelly scans B25 to get reaction from
Mouse, which reacts with 3/6, roll 5 for Flee into B2, which,
sadly, is where Kelly was planning to get to get the Armorrig.
Maybe bypass that for now. We’ll see.
Strof acquires Scanner, status Yellow, let’s repair, roll 5 to get to Green. Strof offloads Wepkit. Strof makes an attempt to control Specbot, status 10, control achieved. Super helpful.
Turn 28
Kelly moves to B25. Strof scans Tube C36 to discover ReconBot,
Golem, and Imrebot. Golem Intel/Agress is 8/8, roll 10 for
reaction which is kill. Target roll is 2, which is an attack
on Imrebot, current status Green.
Damage: 2:8 roll 4 no effect. Impair: 8:5 roll which is 1 hit which moves from Green to Yellow. Roll 6, Imrebot is not beserk.
Turn 29
This is probably the start of the last 1/3 of the game, if not the endgame. Depends on who stays alive.
Kelly moves into Pod B2 carrying the Stungun. There are two specimens currently occupying, let’s find their reactions:
- Blind Pig: 6/5, roll 7 for
Moveresult. - Mouse: 6/6 roll 7 for for
Moveresult.
For both of these, since everyone is in the same space, there is no effect.
Next turn Kelly dons Armorig.
Note: Kelly could have scanned to trigger a reaction which could have a good result if one of the specimens was able to kill the other. On the other hand, if one of the specimens fled into the Tube, Kelly would have a hard because she’s super slow.
Strof is going to attempt control of Ambot before tackling Grendel, roll 8 for Yellow, and 2 for Ambot going Berserk. Crap. That’s going to be tough to deal with as Ambot has Shield 9.
Turn 30
Kelly dons Armorig. Reactions:
- Blind Pig: 6/5 roll 9 for
Move, which is no effect. - Mouse: 6/6 roll 7 for
Movewhich is no effct.
Kelly decides not to do anything in Equipment Phase. Trying to Stun either would require doing a damage check on the Rig, and that would suck if the rig got damaged. She can just leave next turn as the Rig speed is less than or equal to Blind Pig’s and Mouse’s Speeds.
Strof decides to take a powder because Ambot’s speed is the same as Strof’s Speed, 3. So Strof can just leave next turn. And face the Grendel.
This turn took a long time.
Turn 31
Kelly moves into Tube B25.
Reactions:
- Blind Pig: 6/5 roll 9 for
Move, follows Kelly. - Mouse: 6/6 roll 9 for
Move, also follows Kelly.
Dang. At least that’s the end of Reaction for this turn for Kelly.
Strof moves into Tube C36. Reaction:
-
Grendel: 9/8 roll 5 for
Kill, of course. - Damage: 5:7 roll 5 for 1 hit on The Golem.
- Impair: 7:8 no effect. Small favors.
Strof directs Specibot to execute Stun shot to combine with his shot at The Golem.
- Damage: 7:8 roll 2 no effect.
- Impair: 15:6 roll 3 for a stun + 2 hits.
Specibot grabs The Golem.
The Golem rolls for Stun Recovery, 5, not recovered! Cool!
And that’s it for that turn, a burly one, lots of new thinking.
Turn 32
Strof scans Pod C3, discovers EVAbot, Erobot, and StasisPod. Using scanner tool on Pod C6, discovers Restraint Pod 3, handy!
Now just need to keep The Golem stunned to get it moved into Restrain Pod 3.
Kelly Hasty Moves to Pod A1 which has the Scapelock.
Reaction:
- Blind Pig: 6/5 roll 2, no reaction.
- Mouse: 6/6 roll 11,
killattempt on Blind Pig. Heh.- Damage: 9:4 roll 5 which is 2 damage on Mouse.
- Impair: 4:6 is no effect.
Stun check for The Golem, roll 4 stun recovery, bummer. I didn’t roll targeting last time, perhaps The Golem will target a robot instead of Strof next turn. We’ll see.
Turn 33
Kelly EVAs to Exlok, which is Pod A1.
Strof can’t get away from The Golem, but he can scan Tube C25 to discover…nothing.
The Golem Reaction roll 11 which is definitely Kill, target roll 3,
which is “attack the lowest Shield rating” which in this case is Ubot.
- Damage: 1:4 roll 2 no effect.
- Impair: 7:5 roll 1 for no effect.
Strof is going to take another whack at The Golem:
- Damage: 7:5 roll 3 and Strof takes a hit.
- Impair: 15:4 roll 4 for 2 hits on The Golem.
The Golem is not going to make it, unless the dice are super lucky to get a stun result.
Turn 34
The next thing to do here is to figure out how to get the ship status on EnvioPod, and work from there. Kelly will acquire EnvioPod on this turn.
Kelly determines the status of EnvioPod, roll 3 for Level 1 (Red) result. Ok, this blows, need to repair. What to repair it with?
It occurs to me after reading the rules, there is almost two games here. The first is the “Discovery Game,” where the layout of the ship and specimens is figured out, and the “Restart Game” where all the resources have to be arranged to get the systems restarted.
Where it stands right now, Kelly needs to fix the EnvioPod, but the risk is a game ending roll of ‘1’ on the Repair table, which would damage the pod to “Ship Down” and end the game.
The best course of action is getting Strof to move Imrebot to the EnvioPod to do the repair, provided Imrebot is functioning. Strof can get there in 3 moves after defeating The Golem. Ubot might be the key here if Imrebot is attacked and put out of service. Worst would be Imrebot going berserk.
In the mean time, Kelly can do a Hasty to the Survey Pod, A2, and pick up control of the Reconbot and continue scanning Tube C.
Back to Strof then. Strof can’t really move until The Golem is put down,
so let’s do that. Golem reacts with a Kill attempt, targeting either
Ubot (1-3) or Imrebot (4-6). It’s Ubot.
- Damage 1:2 roll 5 for +1 hit on The Golem.
- Impair 7:5 roll 6 for +1 hit on Ubot, roll 4 and Ubot is not berserk.
Strof acquires control of Imrebot, which needs repairing, and is also berserk and targets Strof:
- Damage: 5:5 roll 4 for no effect.
- Impair: 3:5 no effect.
Strof, however, chooses to attack The Golem combining with Specibot’s capabilities:
- Damage: 7:9 roll 6 for +1 hit on Strof, who is starting to feel the pain.
- Impair: 15:1 roll 3 for 2 hits on The Golem, killing it.
Strof attempts to repair Ubot, which is a success. Strof can now attempt to get by the berserk Ambot with a Hasty Move, while Kelly moves the Reconbot into C25. The triggers reactions for both Ambot and Imrebot.
That burned a turn. Ship Status drops to 4.
Turn 35
The story is getting more and more interesting!
Kelly moves Reconbot into Tube C25. Strof does a hasty to Risor B.
Reaction from Imrebot is (rolling 7) Kill, but there isn’t anything
else in the space to attack.
Reaction from Ambot is (roll 8) also Kill, but the only thing in
Risor C is the WepKit, which isn’t an enemy, hence no effect.
This is going to be close…
Another turn burned. Ship Status 3. Kelly may have to move back next turn and attempt repair anyway.
Turn 36
Strof moves to Tube A36. Kelly uses Reconbot to scan Pod C5 discovering Stunbomb and CompPod.
Ship Status 2.
Turn 37
Strof moves to Pod A5, attempts repair (roll 6) which is excellently successful, moving the Envio level to 3 and Ship status to 12.
Kelly scans C2 discovering ConPod. Kelly will stay here a couple more turns finish scanning…or would it be better to head to Tube C and attempt to fix the robots? Kelly decides to acquire Turbolaser (Yellow) and BotKit (Yellow). Repair attempt on Turbolaser roll 4 for no effect. So much for cutting a breach.
Ship Status 11.
Turn 38
Strof repairs again: roll 6 for another 2 levels! Excellent! Ship Status is Go with respect to Enviopod. Still should increase the level more, just to make it easier to get a restart.
Kelly does another repair attempt, because risking a degradation would suck. Roll 2 for no effect. Kelly blows a hole anyway, let’s take a chance! Degradation roll 5, none.
Turn 39
Rereading the Cold Shutdown procedure, I think I’ve already lost this game: Cold Shutdown only proceeds one way.
I’m calling it here as a loss. I could finagle it to get a win, but could not justify the win from the rules as written. It fulfills my intent to play the game all the way through to a clear resolution, in this case, a loss. I’m glad I stuck with it instead of bailing with a “good enough for a first play” several turns ago.
Here’s the situation:
AAR
This is a good game. The rules definitely need better organizing. I suspect a fair bit of the game play could be streamlined at least a bit without losing the essential flavor of the game. But overall, I like it, and it’s going into rotation with my usual opponent.
I’m glad I took the time to really dig into this game. There is a lot more here than meets the eye.
Some questions:
-
Cold Shutdown seemingly proceeds one way, down. Repairing a module to bring it’s status up apparently does not reset the Cold Shutdown status.
-
How is damage applied when crew is in either of the rigs?
-
Suppose the ship is fully explored, everything is discovered, what happens to a tool which is status Red? If it goes back in the cup it’s not coming back out. The rule on this makes no sense. It should either be fully damaged tools leave the game, or they are allowed to be repaired.
Here’s the turn sequence:
Sequence of Play
Player Turn
Step One: Movement Phase
Step Two: Reaction Phase
Step Three: Acquisition Phase
Step Four: Equipment Phase
Stun Removal Phase
Cold Shutdown Phase
Cutting this off for now, as I’m feeling really, really tired for some reason. I haven’t been able to focus at all since around noon.
| Crew member | Impair | Shield | Repair | Weight | Port | Speed |
|---|---|---|---|---|---|---|
| Neema Strof | ||||||
| L. J. Gepidus | ||||||
| Najeb Kelly | ||||||
| Blnt Skraaling | ||||||
| Hesiod Charybdis |
| Specimen | Intel | Agress | Impair | Sheild | Weight | Port | Speed |
|---|---|---|---|---|---|---|---|
| Mother | |||||||
| Mouse | |||||||
| Grendel | |||||||
| The Scrod | |||||||
| Typhoo | |||||||
| Shazam | |||||||
| Mary | |||||||
| The Blind Pig | |||||||
| Fletcher | |||||||
| The Golem |