High Frontier 2, basic game
I’ve got High Frontier laid out on the main table. I’ve decided I want to get a solid grip on the Basic Game rules, and having set up for a while will be helpful. For various reasons such as apartment cleaning, parental visit, plumbing work, and various other “life issue” the table will be coming down after this game.
The main focus of this game will be understanding income and movement, two basic mechanics without which there is just no game play at all. Since I have not yet seen any decent writeups on how this is done, I plan on taking extensive notes. The mission is to replay the H9 example in the rules, Mission to Luna and Back. I tried this once before and some how managed to fail, probably by attempting to acquire my own tech. Let’s see what happens this time using the technology described in the example of play.
Years -7 to 0
I can collect 5 WT every two years using operations, which is super boring. Since this is a solo game, I’m dealing myself 20 WT and calling it good.
See H1, H2, H3 Operations in the Colonization Rules.
Year 1
Operation: Boost H4.
Year 1: Launch of Lunar Mission. After years of research, the PRC pays 4 WT to boost his crew, a mirror steamer (output 3•4), and a cat fusion robonaut (ISRU = 2, mass = 3, assuming basic game masses). He puts a rocket figure in LEO, and a blue dry mass disk with a fuel figure on the number “4” spot. He spends 6 WT to add 6 tanks of fuel, moving the fuel figure to “10”. It is now “Transport Class”, with a net thrust of 2.
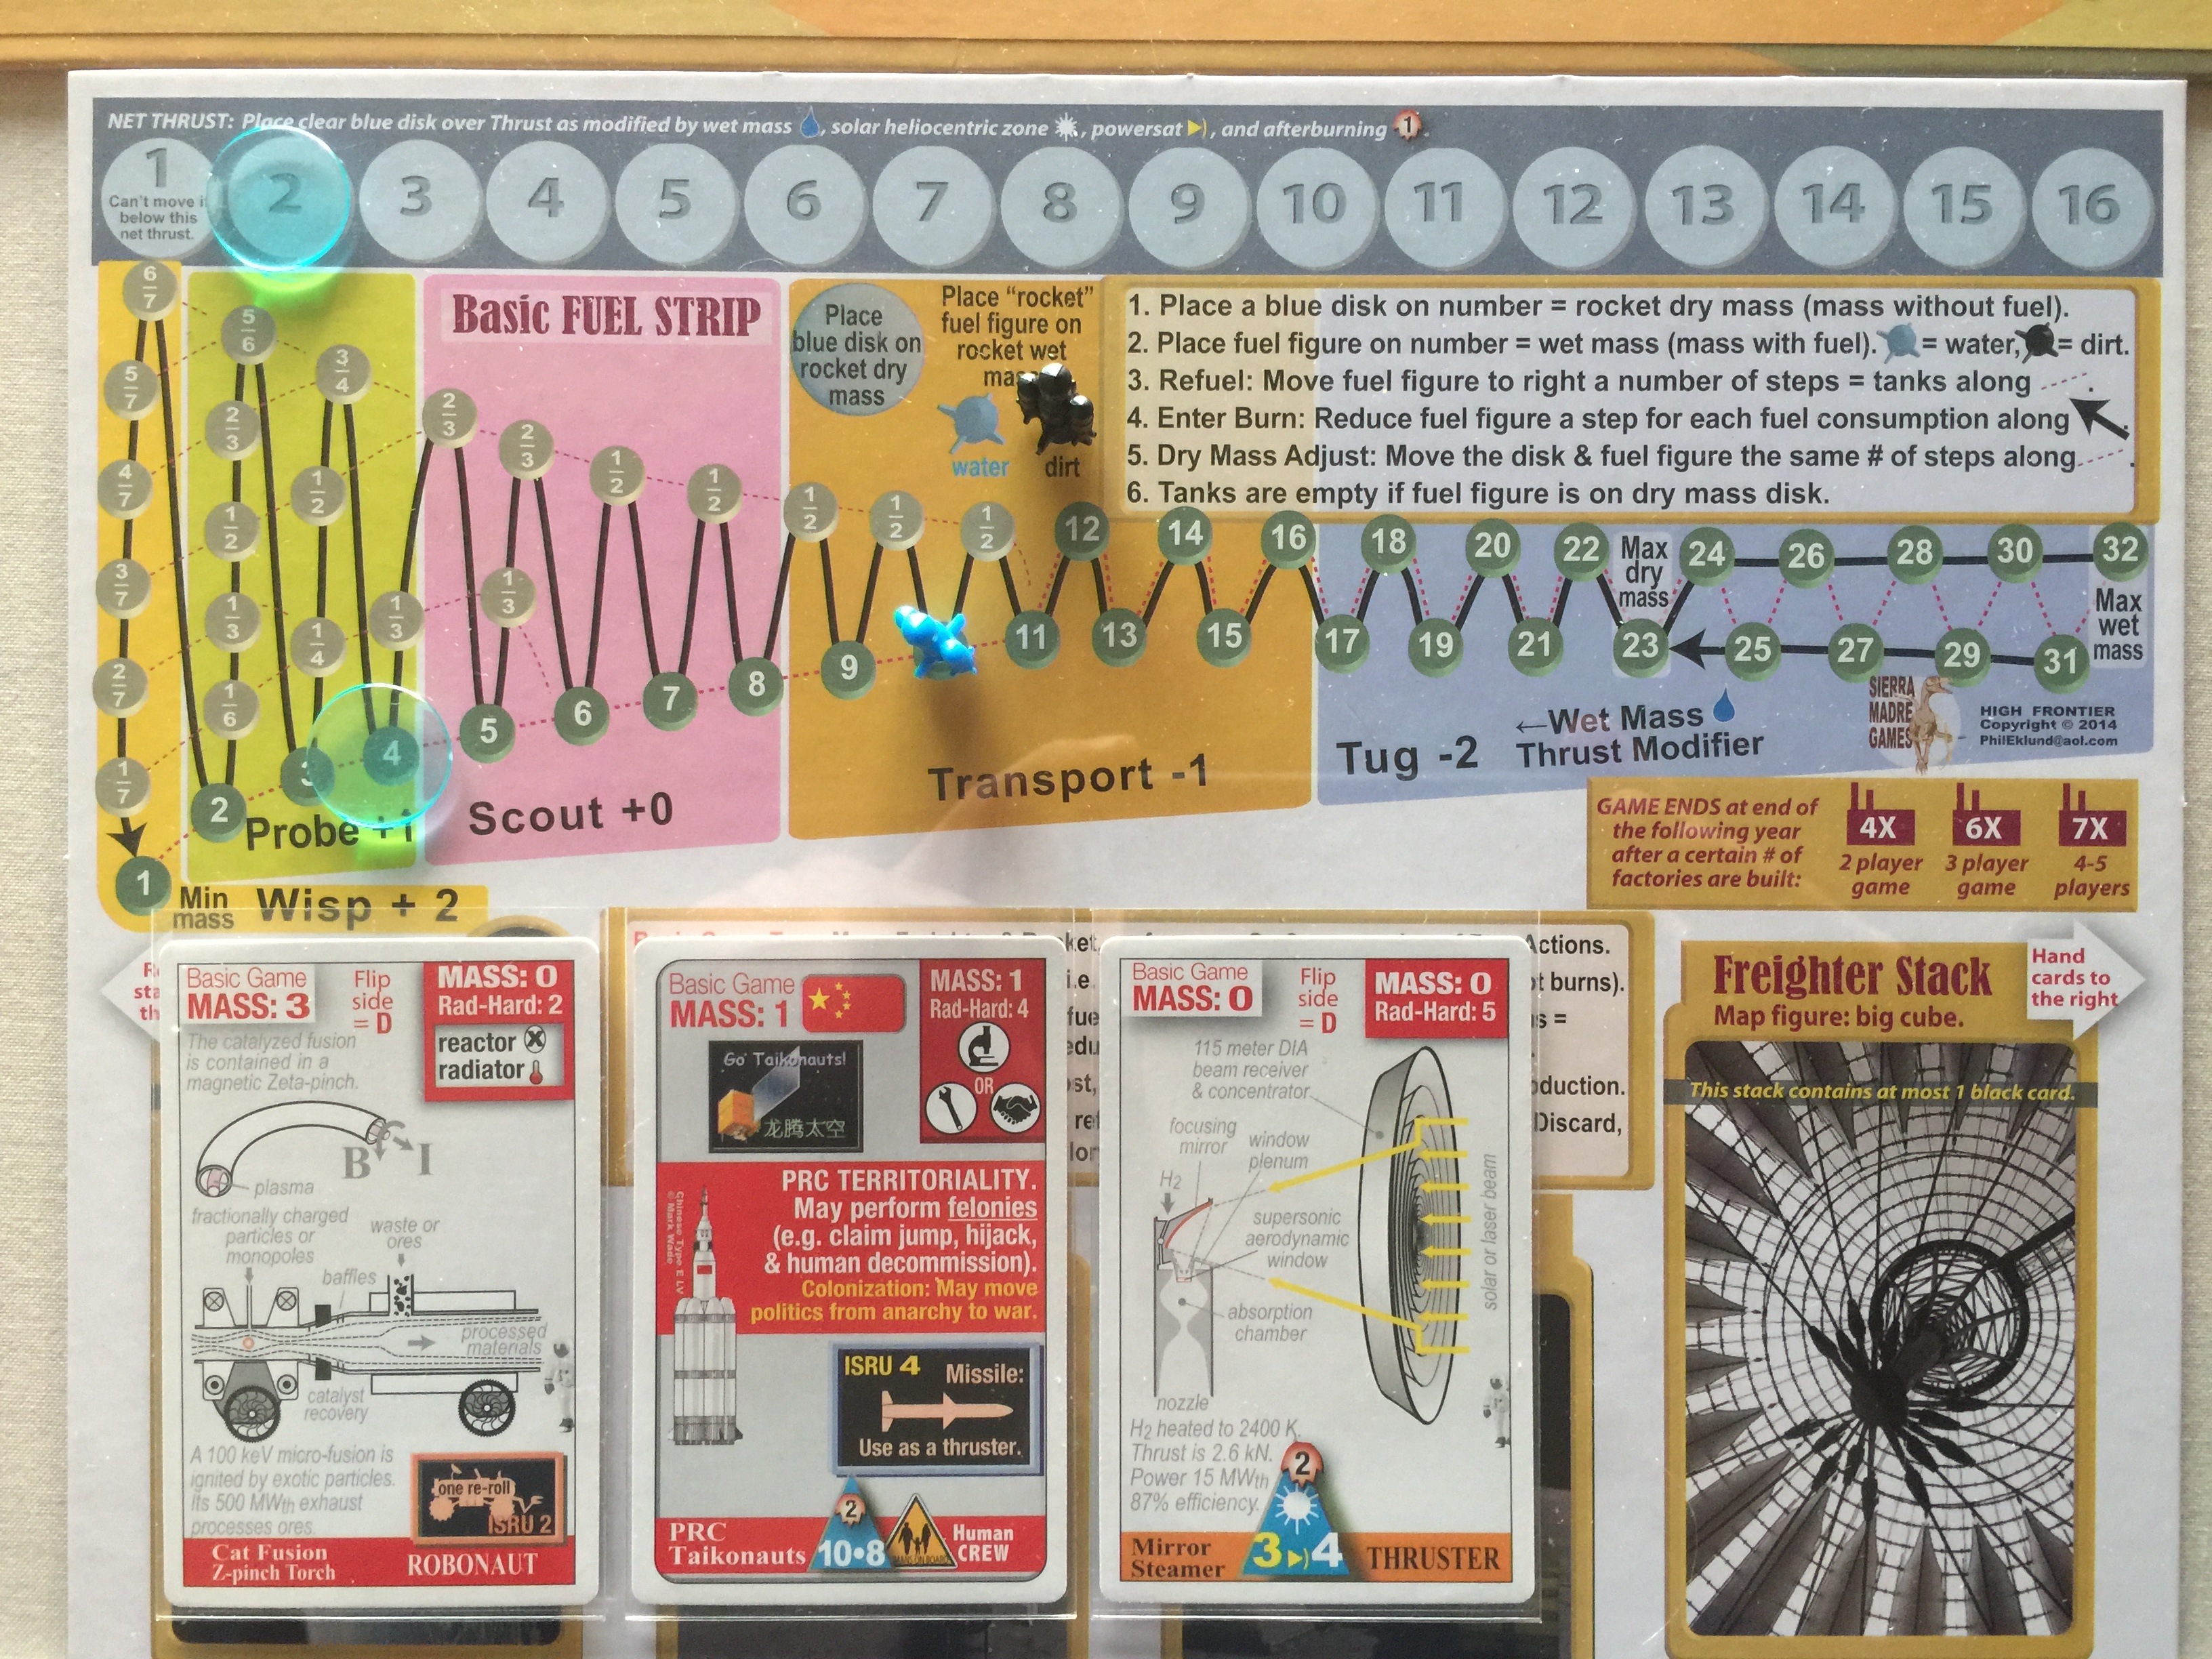
The rocket stack is arranged on the Playmat for photographic convenience.
Year 1 (continued): Cis-Lunar Move. The Rocket Stack burns 4 steps of fuel to enter Earth HEO and coast to the Van Allen Belt (VAB radiation space). It is now wet mass 8.
The VAB space is a circle which is not magenta and is a place where a rocket can end a turn.
There is nothing in the rules I’ve read so far stating what happens if a rocket coasts in a space which has no place to stop, just repeated burns one after another. For now I’ll watch for Hohmann intersections and Lagrange points.
Year 2
Operation: Prospect H6.
Year 2: Lunar Landing. The PRC switches the active thruster to his crew (output 10•8) for the landing. He spends 8 fuel steps to enter the lunar lander burn, leaving him with 2/3 of a tank of fuel. His net thrust of 10 is greater than the size of Luna, so he makes a powered landing.
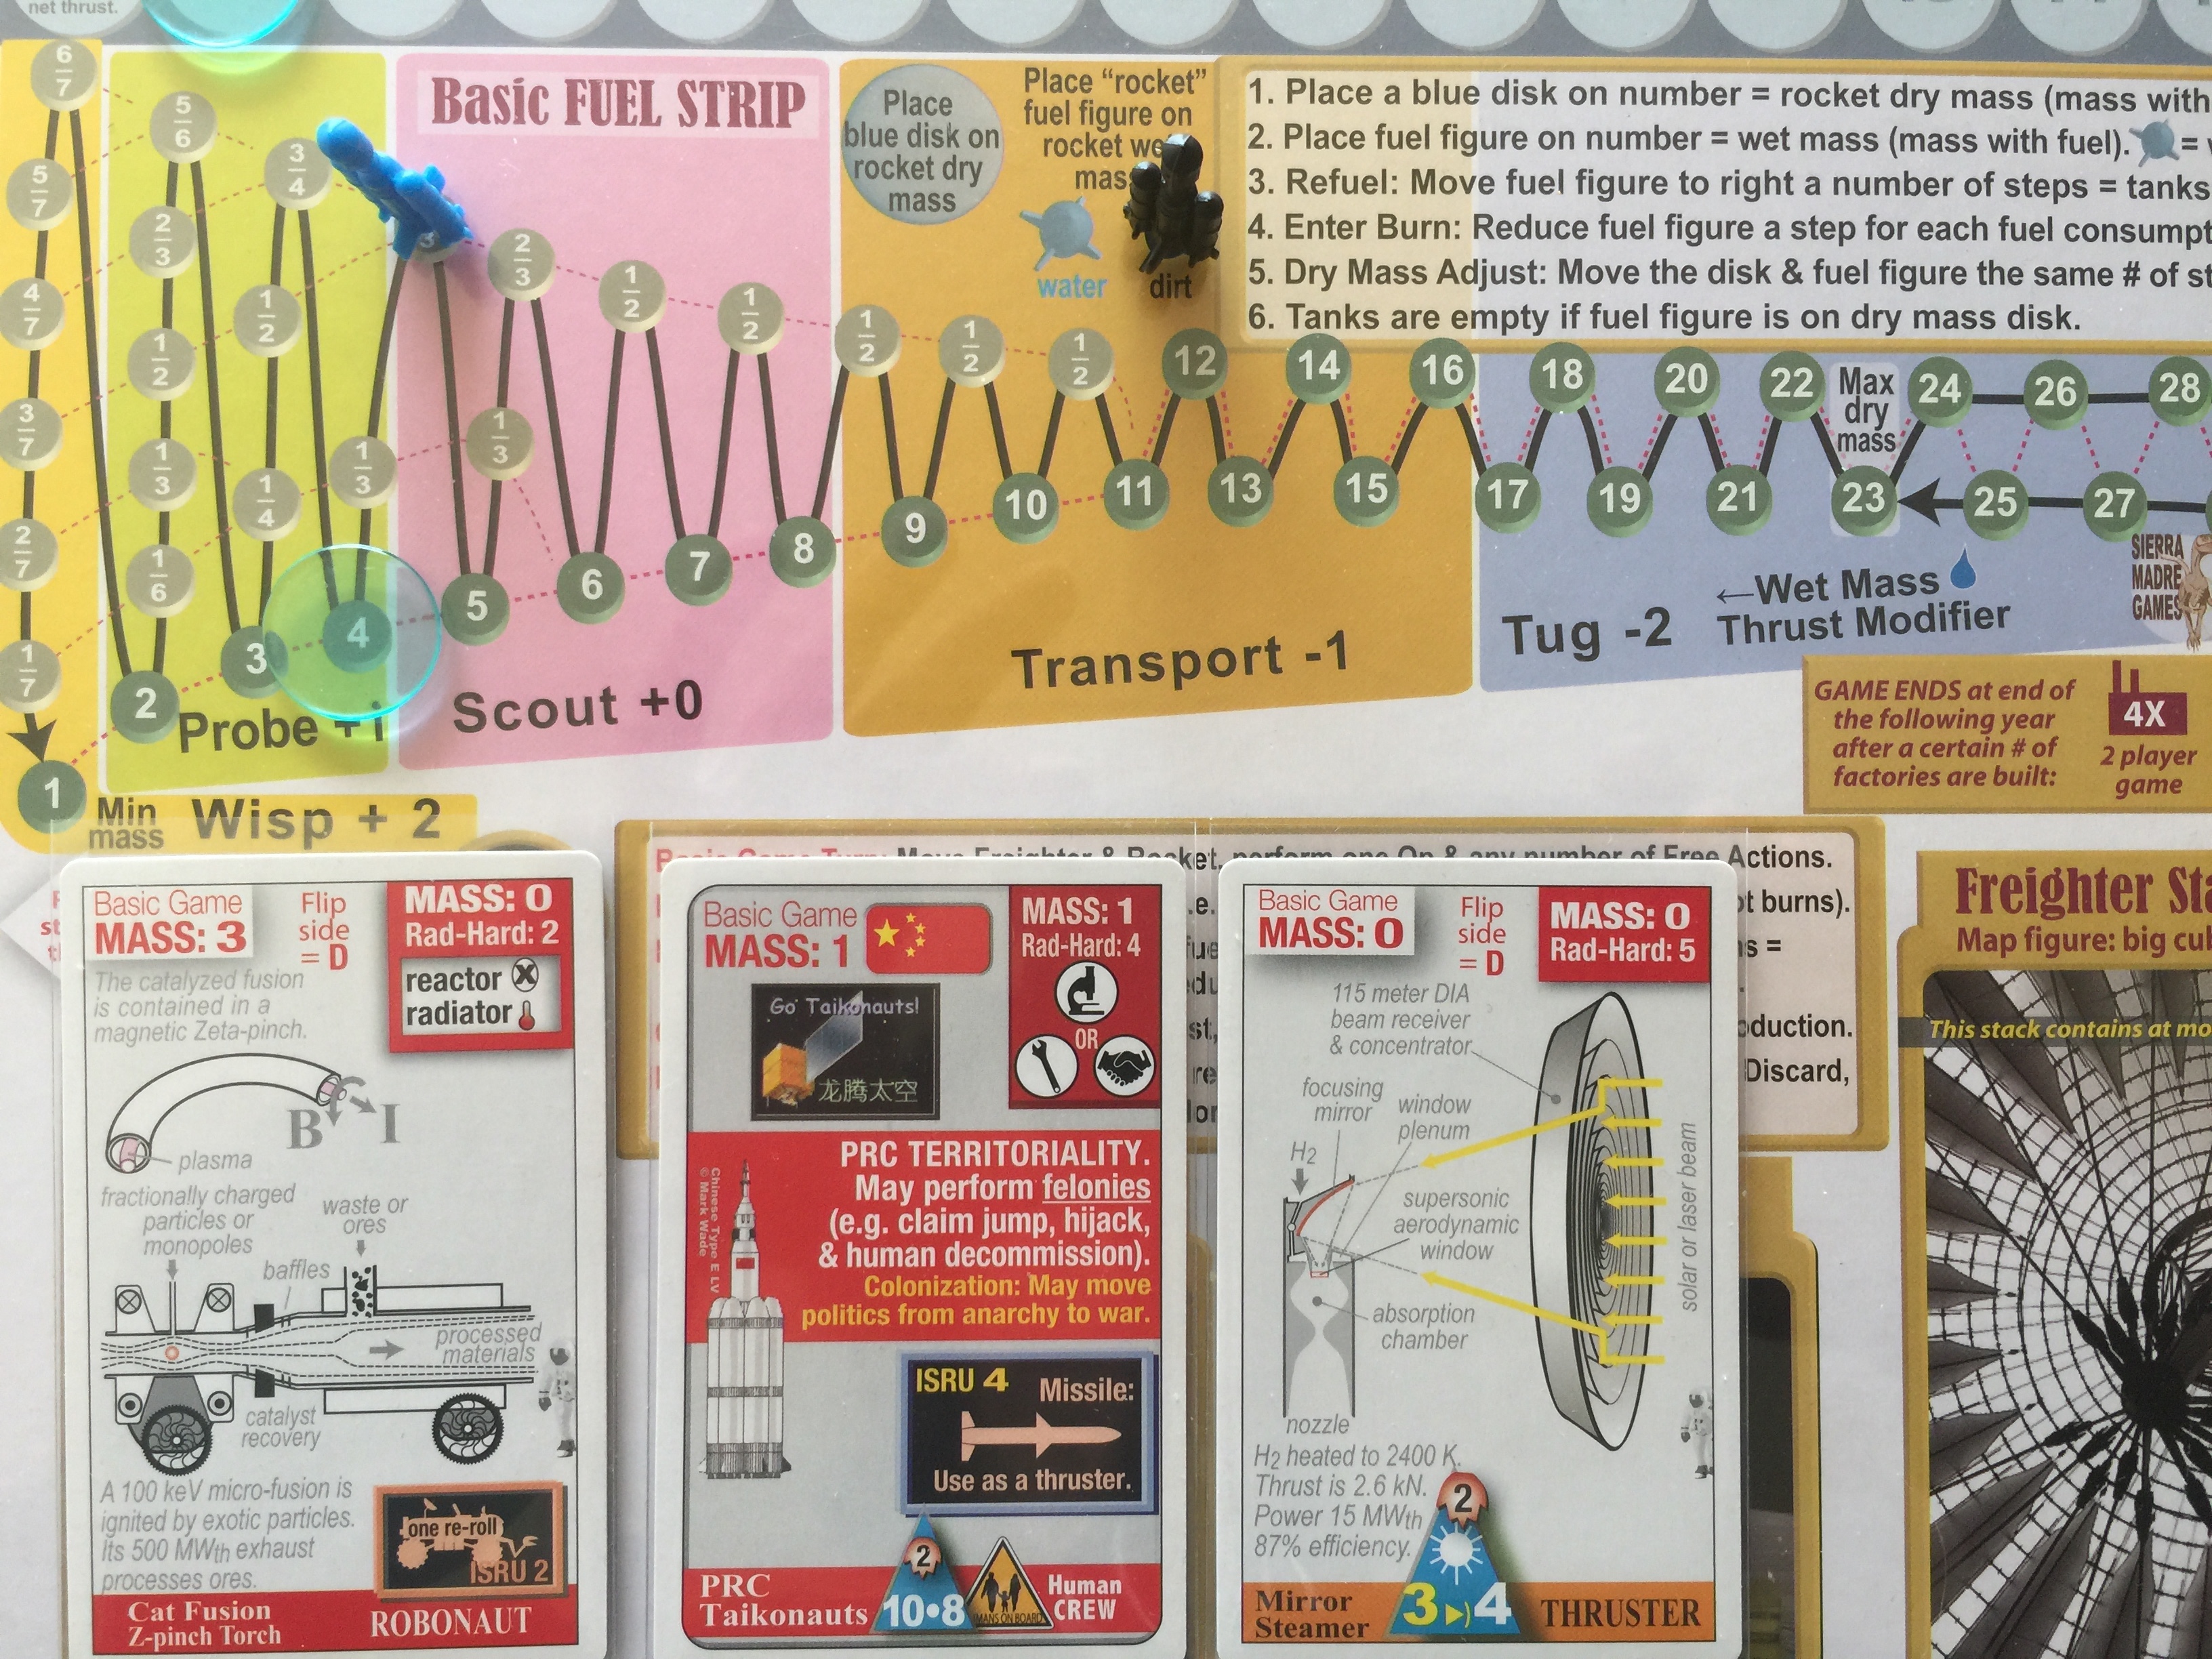
Luna requires at least Thrust 9, we have 10, but need to spend 8 steps of fuel to get that. Moving along the black line on the fuel strip from 8, 8 steps results in 2/3 tank at 4 dry mass.
Note: The TMP should probably have been at 3 for this turn, as the fuel strip indicates the spacecraft is Scout class. As above, the rocket stack is on the Playment for photographic convenience.
During prospecting, the PRC robonaut claims Luna (prospecting is automatically successful since the most you can roll on 1d6 is “6”).
From the rules: H6 - Prospect Operation (Science)
To prospect, choose a card at the site (or ADJACENT to the site, in the case of raygun prospecting) that has an ISRU less than or equal to the site HYDRATION (i.e. number of drops). Then, roll a die. If the result is less than or equal to the site size, then the prospect is successful; place a CLAIM DISK.
Choosing Cat Fusion Z-pinch Torch has a Buggy ISRU of 2, matching the 2 droplets shown at the site and allowing a re-roll.
Since the site size is 9, and the die goes up to 6, this (and all) Luna claims automatically succeed with prospecting, given ISRU values which are allowed.
Whether or not the Claim succeeds, given the ISRU values work, the site is still available for fuel production:
If unsuccessful, place a blue “busted” disk showing no one may prospect there again. (But you can still perform the SITE REFUEL OPERATION (H5) there.)
Year 3
Operation: Refuel H5.
Year 3: ISRU Refueling. The rocket does not have enough fuel for a lift-off. So the robonaut spends a year digging up regolith and squeezing out water drop by drop, moving the fuel figure one step to the right (to 5-2/3). The stack is divided into an Outpost stack with the robonaut and steamer, and the Rocket Stack with just the crew. The dry mass disk and the fuel figure are moved three steps to the left, to “1” and “2-1/2” respectively.
Note that the refueling is being done before the stack is separated to form an outpost. Hence the fuel bump 1 right along the red line, then back 3 left as the mass is reduced to 1 after separation.
From H5.2:
The number of water or isotope tanks obtained by this operation equals one plus the site’s HYDRATION (i.e. number of drops) minus the ISRU rating of the refueling unit.
Year 4
Year 4: Ticker Tape Return. The crew card (dry mass = 1, wet mass = 2-1/2) is a “Probe Class” rocket, with a plus one thrust bonus. This is more than enough for an powered take-off. Eight steps of fuel are expended to enter the lunar burn, leaving 2 steps of fuel remaining. This is insufficient to enter the HEO burn, so the crew takes the aerobraking “shortcut” to LEO. Assuming their parachute opens properly, the crew is decommissioned in LEO.
Decommissioned cards go back to the players hand, see D1.6, page 7.
Year 5
Year 5: The Next Mission. The PRC plans its next mission, flying a refinery to Luna. Together with the robonaut already there, an Industrialize Operation creates an S Factory in Crater Shackleton.
TODO: work through the rules for this.
Year 6
TODO: Industrialize Luna.
Year 7
TODO: Industrialize Luna.
Year 8
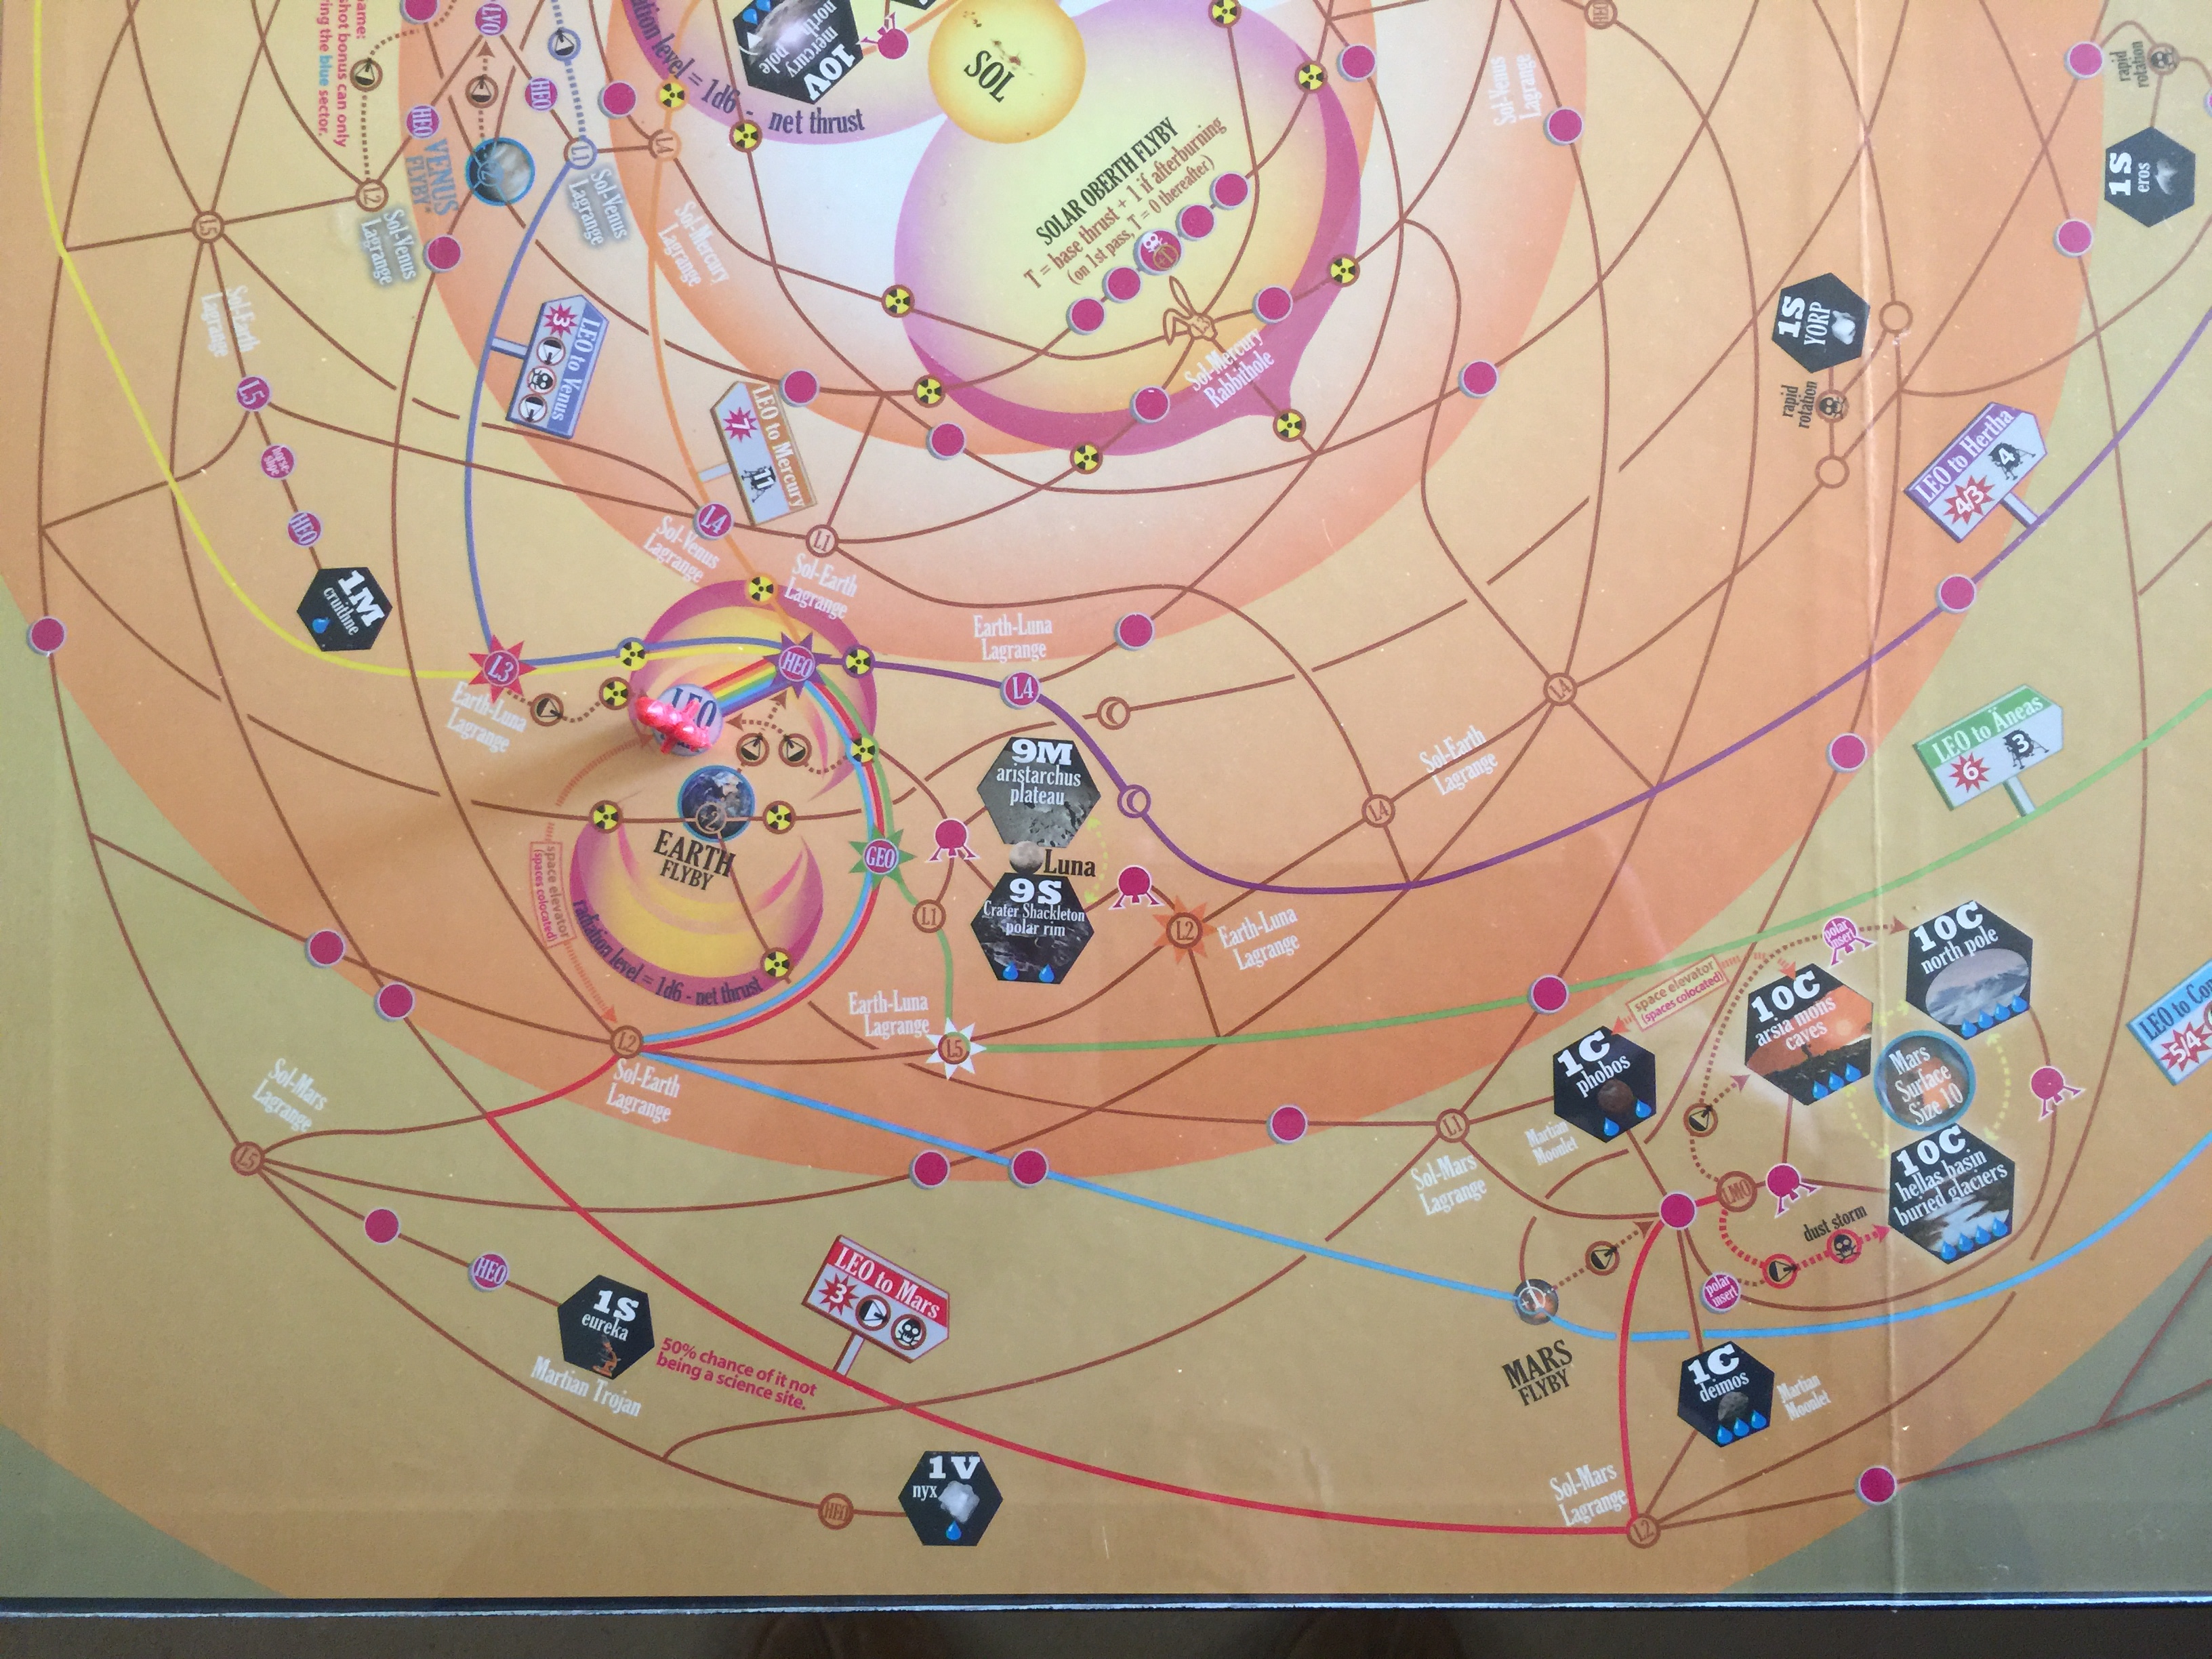
The LEO-to-Mars signpost states 3 burns:
- LEO to HEO
- HEO to GEO
- Stop on Hohmann Transfer
- Coast to burn above Mars, through Sol-Mars Lagrange
- Burn to LMO
- Face Aerobrake and Crash hazards
TODO: Play this out then industrialize Mars.
AAR
The last few games of Leaving Earth have been helpful for understanding the need for mission planning in High Frontier. In Leaving Earth, I have mission planning pretty well figured out, at least as far as the technology stack for accomplishing missions. High Frontier is similar, but not as convenient. There are more choices to be made, and the way movement is conducted has enough superficial differences to require some in-depth study. The notion of having to make burns of different types in different places is the same. With more experience in High Frontier I’m sure I’ll figure it out pretty quickly.
Many, many questions:
-
When do the cards flip from White side to Black side?
-
Suppose I have a factory on (say) Luna which is pumping out fuel. Where do I get to use that fuel?
-
As above, how do I cash out fuel produced from factories elsewhere?
-
How to choose the correct factory?
-
Why leave the Mirror Steamer on Luna? It’s Mass 0 so could easily be flown back to LEO.
Links to good explanations:
-
Here is a great discussion on how TMP works (including fractional fuel costs).
-
Example movement to Mars and back.
-
Example industrialization.
Calling the game here
I was hoping to leave this set up for a while, but at the moment, there is too much going on at work and I’m unable to concentrate on either the game or on work, so the game needs to be put away for now. I may come back later and fill in some of the empty blanks.
This play was a major success in several aspects though. I’m comfortable with how movement works now, the thrust and fuel strips make sense. Various operations now make more sense. While I still have a number of questions, I now understand which questions I need to ask and why, which is a vast improvement. One thing for sure, a good play requires good planning.