DAK-II: Operation Compass Redux
The following posted on BGA, copied here for amusement.
Disclaimer: I still have a solo game of Fire in the Lake going on. I took a stab at automating the US bot with Ruby. So far that effort is 1:0 in the game’s favor. But I’ll finish it ricky tic, only 39 cards to go, lol.
But the pull of hex and counter is mighty. And Jock Campbell is pressing to atone for his previous performance the back side of Halfaya Pass (you ran out of petrol, Jock? Really?)
Hence, we’re back to North Africa for a few weeks to ponder several questions. For example, given 1T of trucking, of what use is 3 SP on a beach surrounded by wadis, in literally, BFE? Should Maletti try to hold Sidi el Barrani, or Buq Buq, or both? Or move LibOp to Halfaya Pass and make a stand there?
More importantly, should the Western Desert command attempt to flank and isolate Halfaya Pass, which requires a really fragile supply line, or just go toe-to-toe with the Italians and retreat them out of Egypt?
Literally, BFE. Whose brilliant idea was that? Is this where the term came from? I wouldn’t be surprised.
The goal for this game is working out the Commonwealth supply situation. Without encircling the Italians lodged into Halfaya Pass, it’s really difficult to dislodge them from Egypt. But it’s also very difficult to get supply all the way around to the back for any forward CW unit (talking to you Jock Stewart). The way the game is going to play out is that the Italians will more or less hunker down to preserve their positions as best they can, while the Brits figure out how to get the supply chain established such that they can threaten Bardia.
A future game may see the Italians attempt a more active role.
While the CW forces are buzzing around, the Italians will be looking for targets of opportunity, more to slow and interfere with the Brits than attempting to destroy them.
Along the way I intend on digging pretty deep into the OCS rule set, with a preliminary intention of memorizing supply rules. Supply is the key to this game (OCS), and the less I have to think about it the better.
I will also be using air power this game. The first Operation Compass game I played I left the airplanes alone.
Some supply counting
Before getting started, it’s worth seeing can be done with supplies.
The first thing is seeing about that dump on the beach, surround by wadis and cliffs. This makes it really difficult to move with a 1T transport. After spending a leisurely evening counting hexes, the best course of action is to use the beach dump for provisioning the organic trucks for 7 Armor and 4 Indian.
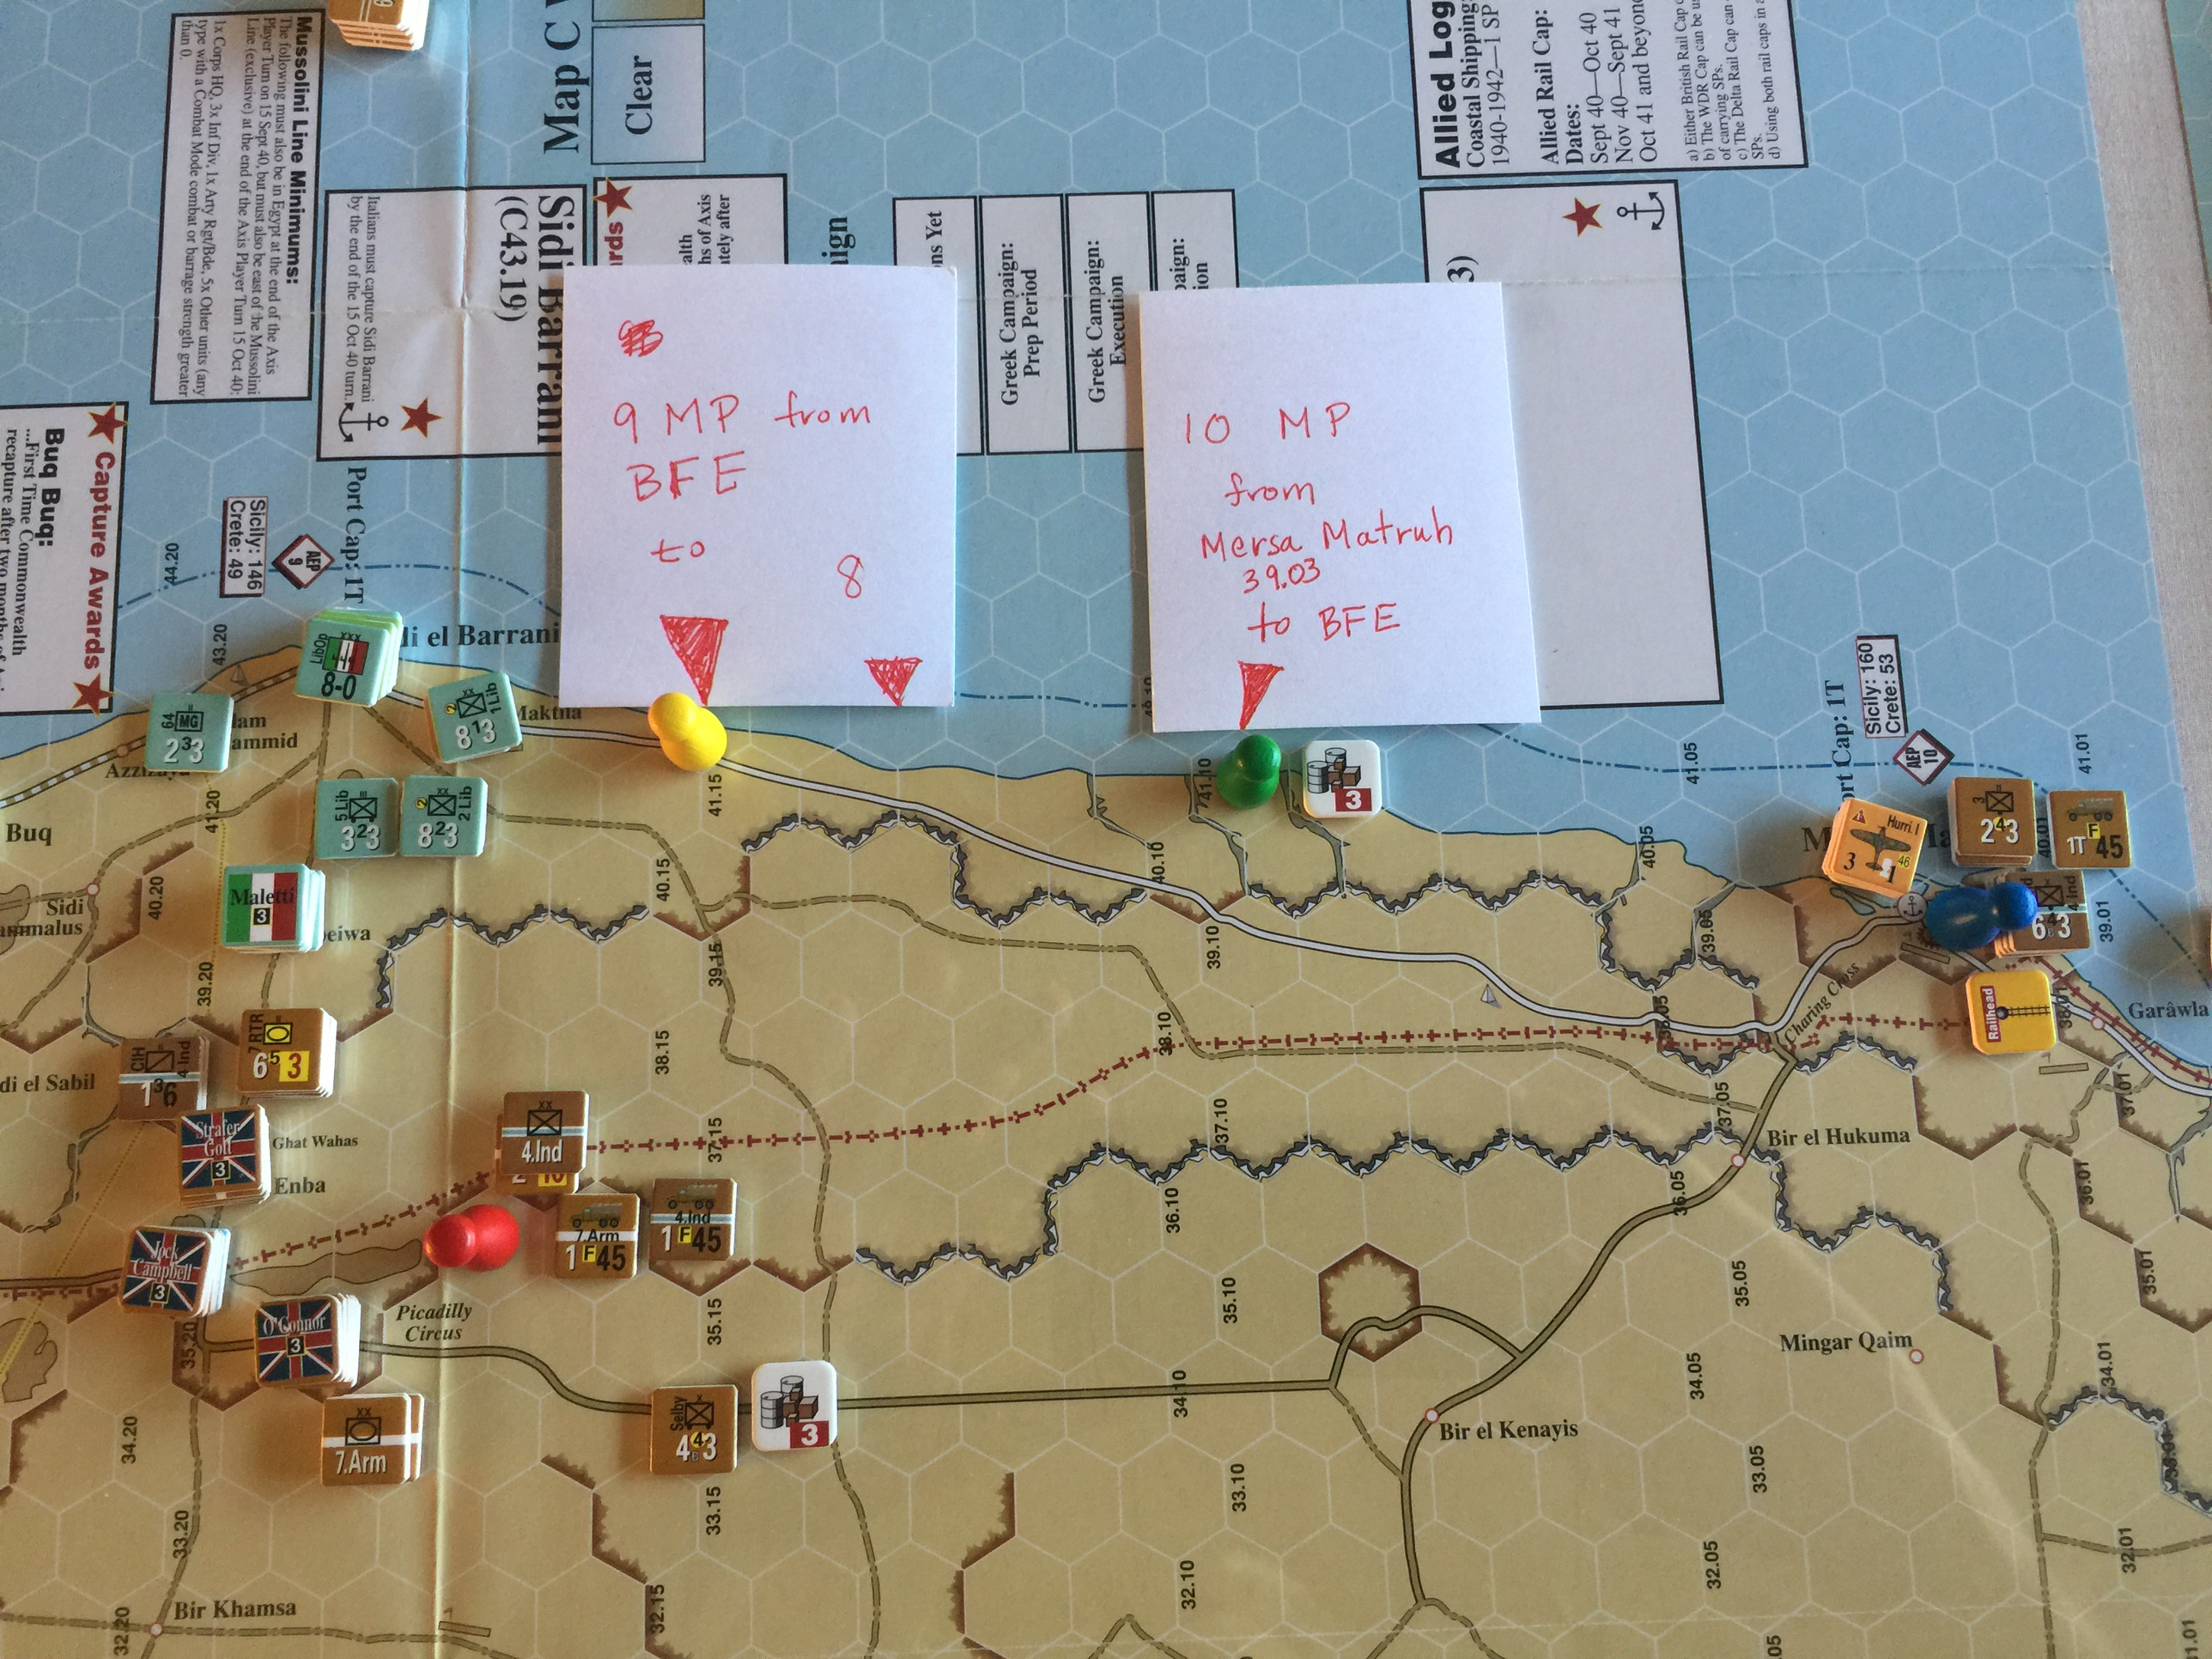
These two divisions can use it up within 2-3 turns, easily. In the meantime, the 1T truck has little choice other than to shuttle as much of the supply at Mersah Matruh as far forward as possible. This can be used to provision the Western Desert HQ.
Game Turn 1
Briefly summarize the upcoming turn for both sides.
The Italians are probably going to sit this turn out to see what the CW forces get up to.
The CW is going to not move too far west on this first turn, in favor of spending a turn getting another SP into throw range of Western Desert. We’ll see how that works out.
Pre-Turn Phase
- Weather determination (2.3, probably on map)
- First player determination, roll d6 highest has initiative, reroll for tie (2.3).
Roll 4-1, clear weather.
Commonwealth Turn
Brief summary of CW goal this turn.
Commonwealth has a couple of goals this turn:
- Get the supply off the beach.
- Move as many T forward as possible given 1T transport.
- Position the WD HQ and supporting units to pester Maletti at Sidi el Barrani.
- Move as much of 7 Armor and 4 Indian as possible to the west, without getting out of supply, and without inviting counter-attack by Italian in hedgehogs. This will be the main positioning.
Aircraft refit
Cost 1T to refit any air base regardless of level or number of aircraft (15.1B)
No aircraft to refit this turn.
Reinforcement
Per scenario specification or reinforcement track.
Bring in 2 SP to Mersah Matruh.
Movement
- Breakout segment (12.8e) Check trace to friendly units in supply.
Nothing to do here.
- Movement segment (6.0): 1/2 for DG (5.10), 1/4 for Reserve (5.7)
Lots going on:
-
7 Armor and 4 Indian fuel up from organic trucks, then the trucks make a round trip to BFE to restock, and can make it all the way back to their starting hex, just barely. This will allow fueling up next turn.
-
2T moved forward. The transport can’t make a full 2T every turn, probably 5T every 3 turns. We’ll see how it works. 6 Aus coming in will help.
-
3 and 8 Hus overrun VEC in hex 36.13. Roll 2 + 6! Snake eyes! And a a boxcar! There is no worse result for overrun! Dang! The odds go to 1:5, roll 7 + 2 for morale, net 9 for
AL1o1Do1. -
Try again with Strafer Gott and 7 & 11 Hus, and 2 & 6 RTR. No surprise either way on this one, but the Brits did manage to get a
DL1but had to retreat rather than carry on through the overrun. Was really hoping to keep going.After this movement, we have a huge, 5 RE stack packed up on the plateau, and vulnerable to air barrage. Accordingly, the Blen IV makes a barrage run on the strip at Amseet, as will be described below.
-
Elements of 4 Indian move west across wadi and halt.
-
Pay 1T to fuel the WD HQ. This will need to move west for at least a couple of turns.
-
Remaining 4 Ind and 7 Armor units moved west.
- Air/Naval Barrage segment (10.2, 10.3)
Blen IV attacks airbase at Amseet, is intercepted by CR.42, who is lame and rolls 3/3 on the Air Combat table. This results in an Abort with No Effect, i.e., no step loss but CR.42 returns to strip as Inactive. Flak fails. Now for the barrage: 4/4, no effect.
Naval barrage is no effect.
Supply
This phase does:
- Determine which units are in or out of Trace Supply (12.6)
- Replenish low or exhausted internal stocks (12.10)
It does not deal with the “On Map” supply provided by “S” and “T” counters.
All CW units in supply.
Reaction phase
- Non-phasing player releases Reserves (5.7), destroy dumps (12.11).
- Non-phasing player barrage (all types, 10.0) and transport.
No Italian units in reaction.
Combat phase
- Artillery barrage (10.1, no Air/Naval)
- Combat segment (9.0, artillery units strength [1] per 13.4b)
No barrage or combat this turn. Poxy overruns.
Exploitation phase
Exploitation mode is defined in Section 5.9, with Exploition Phase details defined in Section 11.0.
- Movement segment (6.0), overruns cost 3 MP (8.1a, 8.1e prohibits Exploitation result).
- Barrage segment
- Combat segment
Nothing to exploit.
Commonwealth clean Up phase
- Remove DG and Exploitation markers.
- Flip or remove Fueled markers.
- Remove train-busting placed by Allied player.
I think is it for the CW this turn. The overrun failures really stung, and that can’t happen again, really need to perform here.
Italian Turn
Brief summary of Italian goal this turn.
Main goal of Italian is disrupting the big 7 Armor concentration. If they can do this, they have essentially bought another turn.
Aircraft refit
Cost 1T to refit any air base regardless of level or number of aircraft (15.1B)
Nothing to refit this turn, the inactive fighter has to wait until next turn I’m pretty sure. Maybe should read up on this point. I think I’m right, otherwise there would be little motivation to barrage.
Reinforcement
Per scenario specification or reinforcement track.
2 SP at Bardia.
Movement
- Breakout segment
- Movement segment
- Air/Naval Barrage segment
Italians reposition a leg unit to block an approach to Sidi el Barrani.
Air barrage on 7 Armor, first roll for flak, fails. Interceptions:
-
Hurr. 1 vs. SM.79: roll (9+3-1)/6, defender (barrager) aborts inactive with step loss.
-
Gladiator vs Ca.309: roll (6 + 2 -0)/1, barrager aborts inactive no step loss.
Very lucky for Brits. This could have been really bad.
Supply
This phase does:
- Determine which units are in or out of Trace Supply (12.6)
- Replenish low or exhausted internal stocks (12.10)
It does not deal with the “On Map” supply provided by “S” and “T” counters.
All in supply.
Reaction phase
- Non-phasing player releases Reserves, etc.
- Non-phasing player barrage
No reaction phase.
Combat phase
- Artillery (no Air/Naval)
- Combat segment (9.0, artillery units strength [1] per 13.4b)
Nothing.
Exploitation phase
- Movement segment
- Barrage segment
- Combat segment
Nothing.
Italian clean Up phase
- Remove DG and Exploitation markers.
- Flip or remove Fueled markers.
- Remove train-busting placed by Italian player.
Nothing.
End of Turn
Briefly recap the turn for both sides.
The CW really got into a bind with the overrun failures. This was just bad luck. The idea here was to clear road to surround the big HQ stack in the hedgehog and run it out of supply.
The Italians, having gotten lucky on the overrun defense, just couldn’t get past the CW interceptors to put the hurting on 7 Armor. And it would have been a hurt.
Let’s see how the next turn goes.
Game Turn 2
Briefly summarize the upcoming turn for both sides.
Italians are likely going to sit tight, as that’s what worked for them on the first game.
The CW is going to attempt to get the HQ moved way up to hopefully get within range of taking Bardia. Should be able to advance it about half the necessary distance this turn.
Pre-Turn Phase
- Weather determination (2.3, probably on map)
- First player determination, roll d6 highest has initiative, reroll for tie (2.3).
Weather: clear.
CW player goes first this turn.
Commonwealth Turn
Brief summary of Commonwealth goal this turn.
Aircraft refit
Cost 1T to refit any air base regardless of level or number of aircraft (15.1B)
Reinforcement
Per scenario specification or reinforcement track.
Movement
- Breakout segment (12.8e) Check trace to friendly units in supply.
Nothing.
- Movement segment (6.0): 1/2 for DG (5.10), 1/4 for Reserve (5.7)
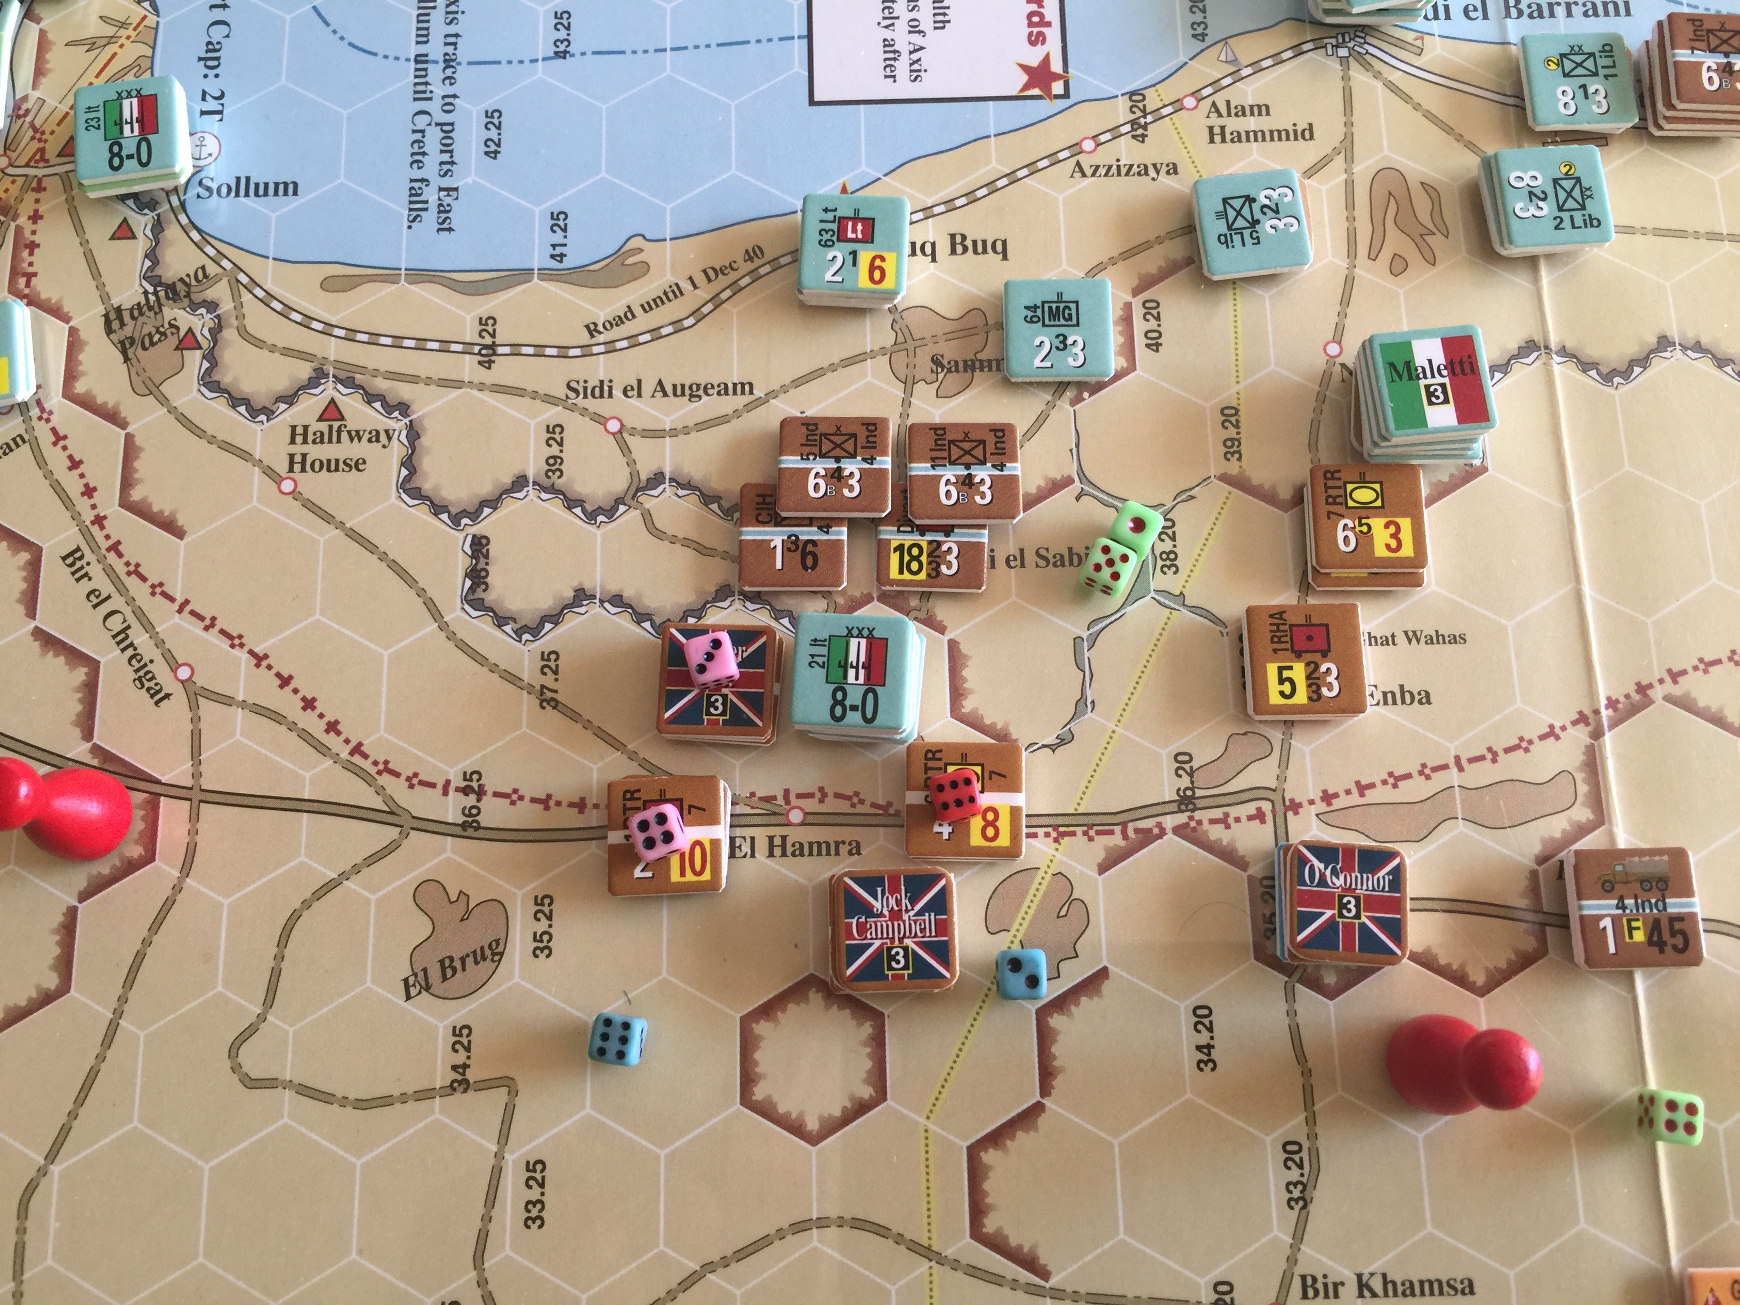
Here’s the plan:
-
7 Armor and 4 Indian organic trucks refuel. The dump at BFE is finished. Both divisions are fueled and the trucks are fueled.
-
1T transport continues to shuttle.
-
7 & 11 Hus try to overrun 63 MG, success! Shift 4 right on 3:1, roll 10 + 3 for 13 on 9:1 for
Ae2DL203DGIOW 63 MG is gone.
At this point I need to get rid of the big stack of 21 It. For me to put it out of supply renders me out of supply, risking a breakout if that unit survives. 7 Armor is going for it for the overrun, there isn’t enough supply to get a full on combat otherwise. It would halt CW next turn.
-
7 Armor overruns 21 It: 5 + 3, no overrun, the odds aren’t as good, but armor, 22:7 as 21 It is out of trace for combat purposes, so 3:1, roll 5 + 3 -1 net 7 on 2:1
Al1Do1. Brits lose 8 Hus, very painful, Italians lose a step, who gives a shit. This is not good for the CW, this is 2 7 Armor units which are eliminated, which means it costs real supply to activate independent units.Basically, this was a total waste. Good to know.
-
Remaining 7 Armor and 4 Indian surrounding 21 It to try and force an attrition from lack of supply.
- Air/Naval Barrage segment (10.2, 10.3)
Blen.IV makes a barrage run on 21 It, flak roll succeeds! Blen loses a step! Dang!
Naval barrage east of Sidi el Barrani is no effect.
Not a great turn for the CW.
Supply
This phase does:
- Determine which units are in or out of Trace Supply (12.6)
- Replenish low or exhausted internal stocks (12.10)
It does not deal with the “On Map” supply provided by “S” and “T” counters.
This is really, really bad. Four units of 4 Indian are out of supply north of the 21 It HQ:
Attrition roll 10 for the east stack, all units lost, roll 5 for the west stack, no losses. Bad, really bad. 21 It can probably escape.
Actually, I think the western stack is in trace as the WD HQ can throw to the adjacant hex which is ZOC-negated. WD cannot throw to an adjacent hex for the eastern stack as 21 It has ZOC on the adjacent hex, and wadis cost too much to cross.
Reaction phase
- Non-phasing player releases Reserves (5.7), destroy dumps (12.11).
- Non-phasing player barrage (all types, 10.0) and transport.
Nothing here.
Combat phase
- Artillery barrage (10.1, no Air/Naval)
- Combat segment (9.0, artillery units strength [1] per 13.4b)
No combat this turn, too many steps lost.
Exploitation phase
Exploitation mode is defined in Section 5.9, with Exploition Phase details defined in Section 11.0.
- Movement segment (6.0), overruns cost 3 MP (8.1a, 8.1e prohibits Exploitation result).
- Barrage segment
- Combat segment
None.
CW clean Up phase
- Remove DG and Exploitation markers.
- Flip or remove Fueled markers.
- Remove train-busting placed by Allied player.
Done.
Italian Turn
Brief summary of Italian goal this turn.
The Italians main goals this turn are:
- Saving 21 It,
- putting pressure on CW rear area supply.
This is going to majorly suck for CW.
Aircraft refit
Cost 1T to refit any air base regardless of level or number of aircraft (15.1B)
Refit all aircraft.
Reinforcement
Per scenario specification or reinforcement track.
2 SP at Bardia.
Movement
- Breakout segment
- Movement segment
- Air/Naval Barrage segment
Here’s where 4 Indian gets destroyed probably.
-
21 It moves to block 4 Indian, while leaving an Lt in the original hex to stymie escape.
-
Move to surround at Maktila. This is where the fight will be.
Supply
This phase does:
- Determine which units are in or out of Trace Supply (12.6)
- Replenish low or exhausted internal stocks (12.10)
It does not deal with the “On Map” supply provided by “S” and “T” counters.
All Italian units are now in supply.
Reaction phase
- Non-phasing player releases Reserves, etc.
- Non-phasing player barrage
None.
Combat phase
- Artillery (no Air/Naval)
- Combat segment (9.0, artillery units strength [1] per 13.4b)
At Maktila, defender surprise with 2 shifts, this sucks for the
Italians, moves it to 1:2, roll 4 - 2 for AL2 which will come from
step losses on the divisional units. Not that big of a deal, really.
That did cost 7T though. Italians need to move some supplies if
possible. This shouldn’t be a problem, they have 2T of transport at
Bardia.
That’s all the Italians need to do this turn.
Exploitation phase
- Movement segment
- Barrage segment
- Combat segment
None.
Italian clean Up phase
- Remove DG and Exploitation markers.
- Flip or remove Fueled markers.
- Remove train-busting placed by Italian player.
Done.
End of Turn 2
Briefly recap the turn for both sides.
This was not a good turn for the Commonwealth! The 4 Indian especially took it on the nose. Had the 4 Indian moved up the organic truck, it would have been able to eat off the map to stay in supply. Something to note for the next game.
Turn 3
Briefly summarize the upcoming turn for both sides.
CW needs to make some motion at Sidi el Barrani, and get the Western Desert HQ moved another increment west. They will need to clear Maletti.
The Italians need do little more than continue to be very unpleasant speed bumps.
Pre-Turn Phase
- Weather determination (2.3, probably on map)
- First player determination, roll d6 highest has initiative, reroll for tie (2.3).
Weather is clear.
The Allies have the initiative yet again. Very lucky for them.
Allied Turn
Brief summary of Allied goal this turn.
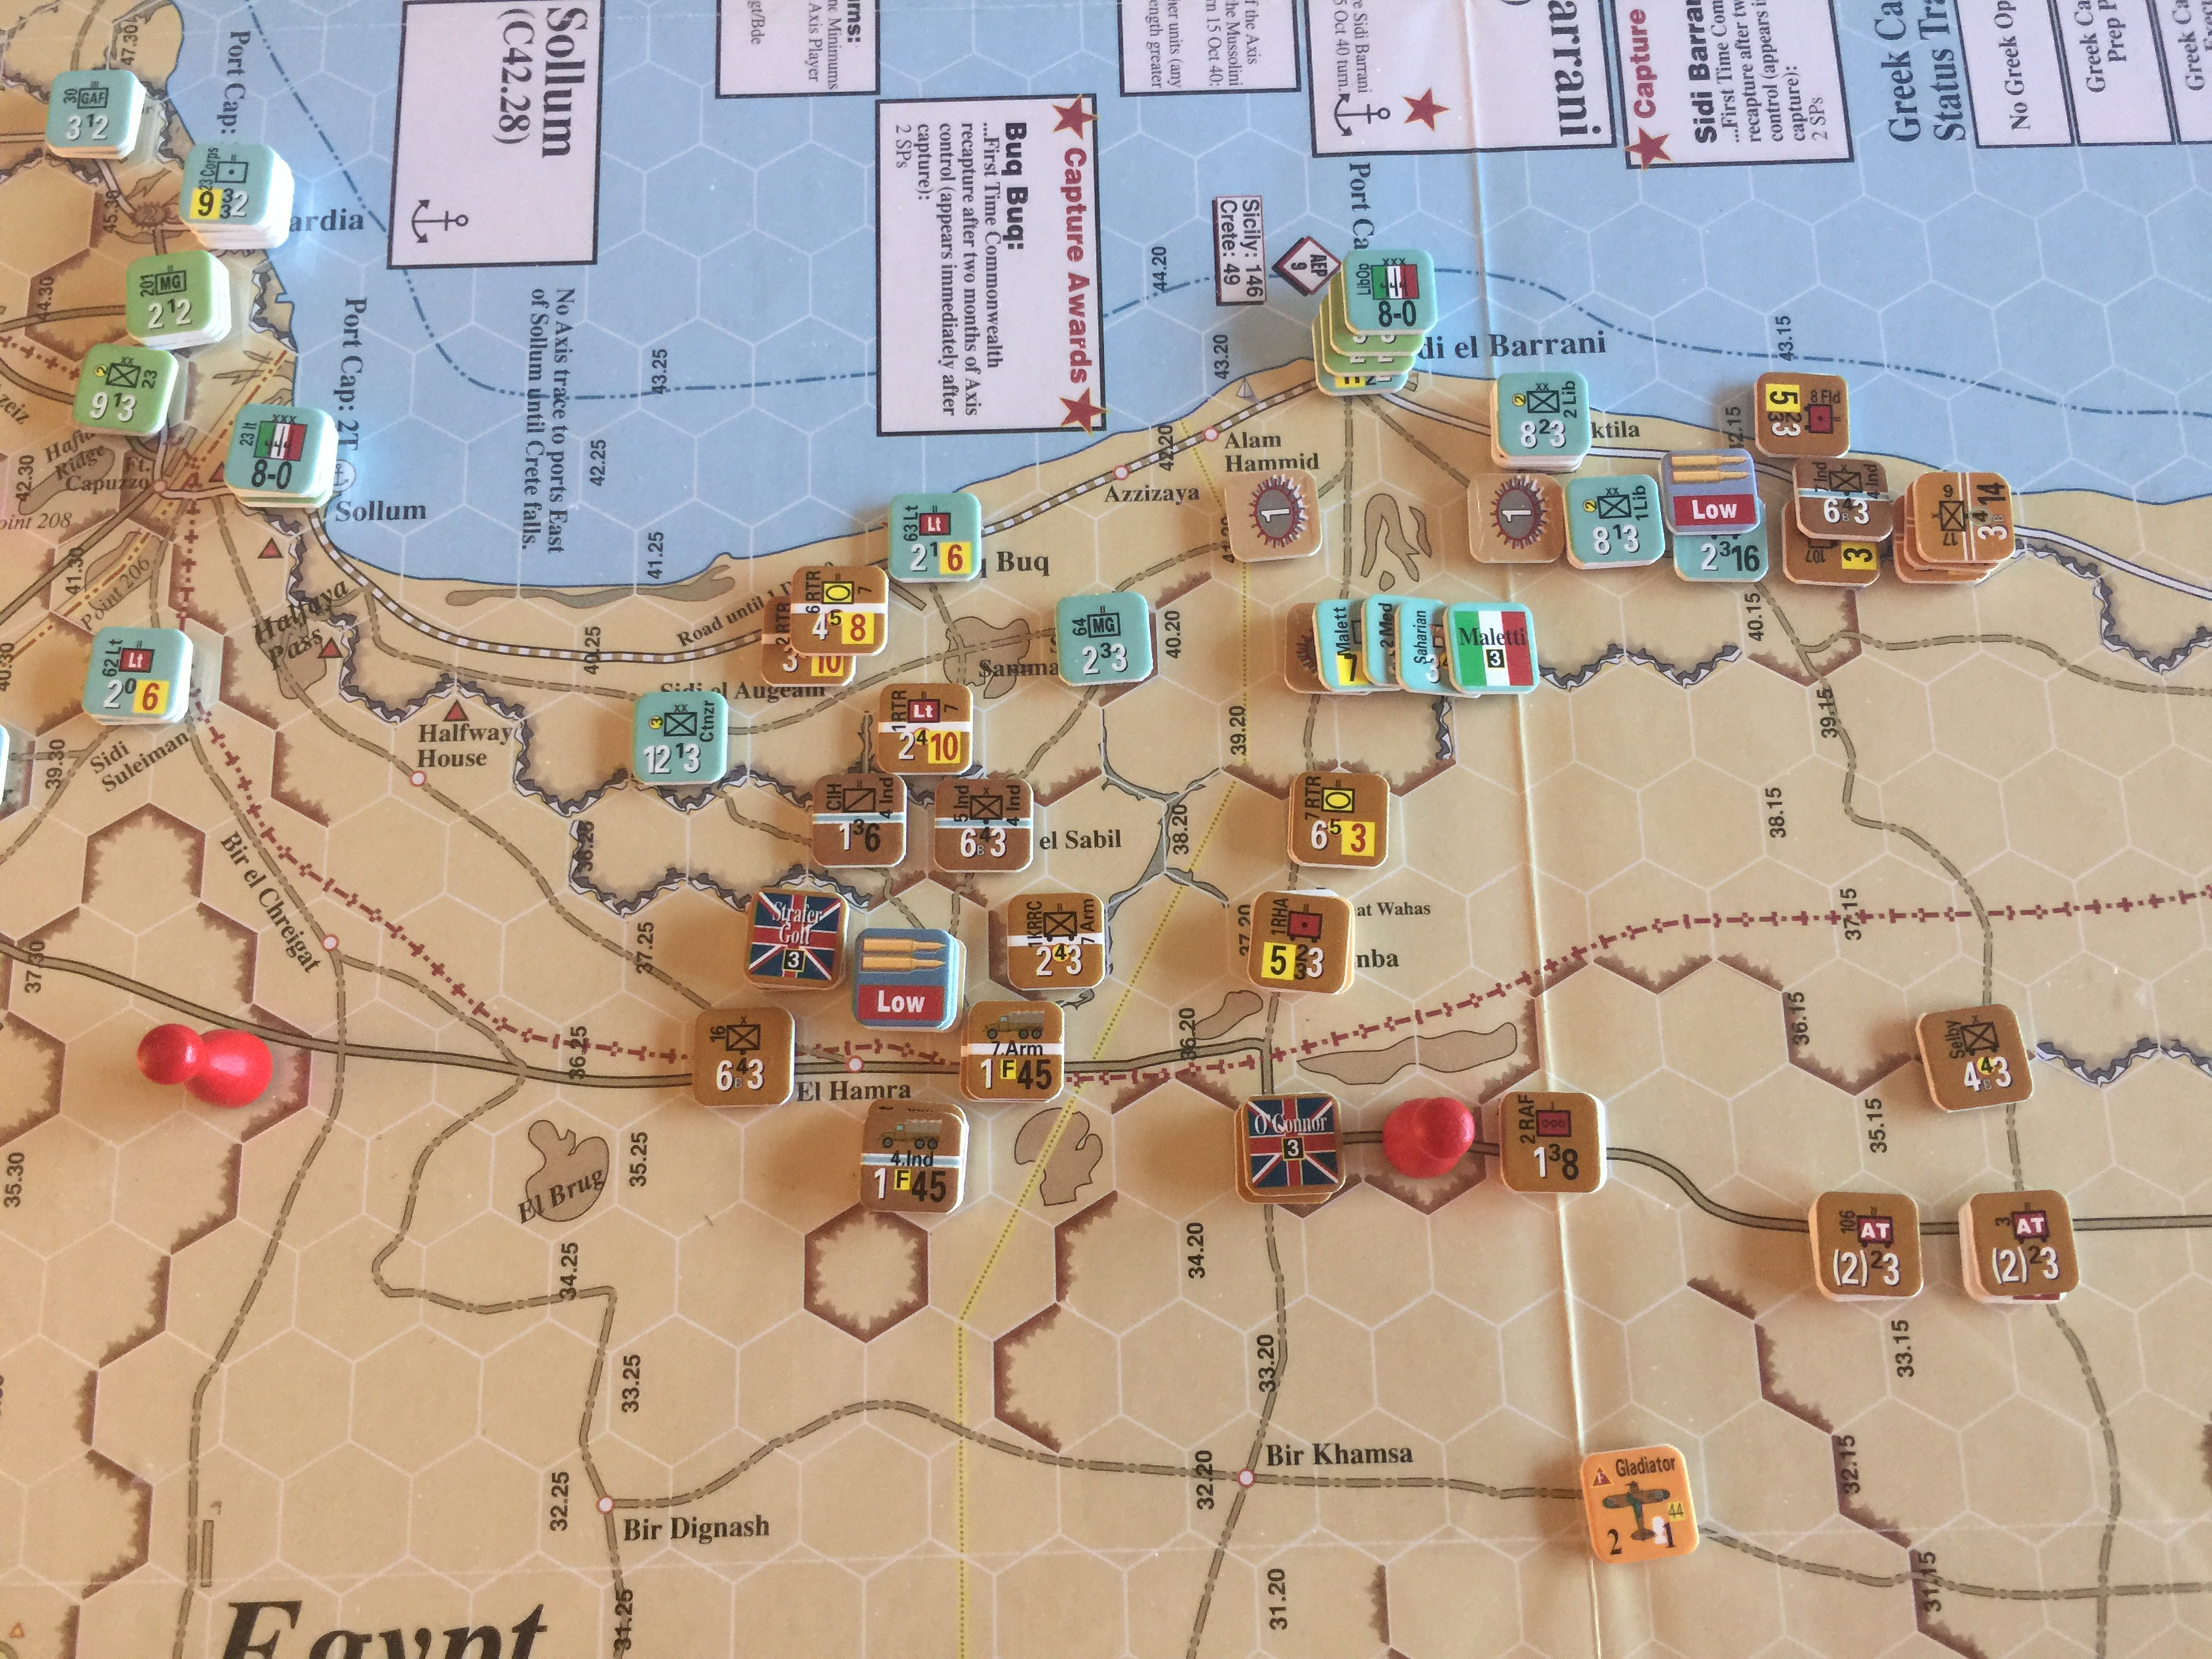
The absolute minimum goal for this turn is using 6 Aus as a relief force to break out the trapped unit on the coast east of Sidi el Barrani. 6 Aus is going in as an overrun. I may hold the armor unit back in reserve in case the overrun fails. After the overrun either succeeds or fails, they are going to bombard and attack. There is plenty of supply.
The Blen is going to start transporting T forward as well. Hopefully 2T per turn, still reading the rules on that. Since there aren’t any airbases (only airstrips), supplies will need to be air dropped, which risks losing supplies. No big deal, that’s how it has to be. The Blen has 146 MF, the distance to the target hex I want to use is 18 hexes. I’m going to combine rules for Air Transport and Air Drop and allow the Blen to make 2 trips for 2T moved, then go inactive at its home base.
Western Desert:
Aircraft refit
Cost 1T to refit any air base regardless of level or number of aircraft (15.1B)
Having to read back through to see which CW aircraft need refitting, if any. Two of them are at airfields which are printed on the map, so it’s not clear, and I don’t have markers for, which are needing refitting. Looks like only the Blen needs refitting. Spend 1T.
Reinforcement
Per scenario specification or reinforcement track.
2 SP at Mersah.
Movement
- Breakout segment (12.8e) Check trace to friendly units in supply.
None.
- Movement segment (6.0): 1/2 for DG (5.10), 1/4 for Reserve (5.7)
Here’s the plan:
-
6 Aus moves from Mersah Matruh to overrun (8.0) ar 42.15. Odds are 22:3, which is 7:1, one shift for AR (Aus is Green). Defenders need 1T from Sidi, 1T from Buq Buq. 6 Aus spends 4T to attack. Roll for surprise 3/4, that’s defender surprise with 4 shifts left. Dang. This is the second or third time (at least) this game where defender has gained huge surprise. This will damage 6 Aus, not good having divisional units eliminated. Roll 8 + 1 net 9
Ao1Do16 Aus has to power on as there are trapped units behind these Italians, eliminate 6 Aus 19 Mech and It 6 Lt. 6 Aus goes again, no choice, roll 7 + 1 no surprise, roll 7 + 1 for 8 yieldsAo e4 1DL1o2. CW takes the option to retreat, the Italians have a mandatory loss. This will let the trapped Brits move 1 hex east into supply. -
Trapped units just east of Maktili move east and southeast to get another crack at the Italians. They’re in throw range of Mersah, no reason not to go for it. They’re also non-divisional units, easier to lose. Since these are all leg units, no supply necessary to move.
-
1T to Bir Emba, other T failed the Air Drop. I replaced those dice, low rolling sons of bitches. Blen inactive at Mersah.
-
7 Arm 2 & 6 RTR move on the Ciran ID. This is an 18:12, but we have surprise for a 2 shift and +3 for morale roll, combat roll 9 + 3 net 12 on 4:1 in the clear for
Ae4DL1o2. This is another step loss for Ciran, and it moves down the escarpment. This also puts Ciran in Exhausted and DG and I don’t think there are any more supplies coming for this unit. 2 & 6 RTR have just enough movement to overrun again. Roll for surprise 6 + 4 (Ciran AR 1 for DG) yields surprise shift 5. Ok, not sure what the odds are… 14:3 which is 5:1, roll 6 + 4/6 for surprise, Ciran is toast. Boxcars on 13:1,DL2with a bunch more stuff which doesn’t matter here. -
A few other units poking around to ensure supply lines are in place at least for this turn. The Its will almost surely bust these up, being trapped in and around Sidi, they have nothing to lose at this point.
- Air/Naval Barrage segment (10.2, 10.3)
None.
Supply
This phase does:
- Determine which units are in or out of Trace Supply (12.6)
- Replenish low or exhausted internal stocks (12.10)
It does not deal with the “On Map” supply provided by “S” and “T” counters.
All CW in trace supply for now.
Reaction phase
- Non-phasing player releases Reserves (5.7), destroy dumps (12.11).
- Non-phasing player barrage (all types, 10.0) and transport.
Combat phase
- Artillery barrage (10.1, no Air/Naval)
- Combat segment (9.0, artillery units strength [1] per 13.4b)
4 Ind and 3 Batt take on 1 Lib, roll surprise 4/6 (!!!!!!!!) 3 Batt
leading, crap, really surprised. Roll combat 7 - 1 for AL1o1. Weep.
Exploitation phase
Exploitation mode is defined in Section 5.9, with Exploition Phase details defined in Section 11.0.
- Movement segment (6.0), overruns cost 3 MP (8.1a, 8.1e prohibits Exploitation result).
- Barrage segment
- Combat segment
No exploitation this turn.
CW clean Up phase
- Remove DG and Exploitation markers.
- Flip or remove Fueled markers.
- Remove train-busting placed by Allied player.
Done.
Italian Turn 3
Brief summary of Allies goal this turn.
If the Italians can stay 2 more turns in the Sidi el Barrani area, there is almost no way the CW can win it. Let’s see if we can make that happen. The big question is how supply is treated at Sidi el Barrani, as 2 & 6 RTR is nearly cutting off trace, which would mean no throw available.
Aircraft refit
Cost 1T to refit any air base regardless of level or number of aircraft (15.1B)
Spend 3T to refit at all airfields.
Reinforcement
Per scenario specification or reinforcement track.
2 SP at Bardia.
Movement
- Breakout segment
- Movement segment
- Air/Naval Barrage segment
This is where the action really is, what the Italians do this turn will matter a lot for the rest of the game. Specifically, whether the Italians can get Sidi AO into supply. It’s doable, and may be able to drive 2 & 6 RTR back a hex or two.
Some of the larger divisions have moved up as well. I don’t think this will be a “last stand” for the Italians, but it will seriously impede CW forces, if not push the back outright. Here’s what it looks like at the end of movement phase.
It was a tough decision to put the 28 ID blocking the trail rather than moving it up to fight with 2 & 6 RTR, but the Italians really, really don’t want the Brits getting a foothold west of Buq Buq. I could have put 30 GAF there, and maybe that would have been better.
Sadly, the Italians neglected to move any T to airfields where they could be airdropped to Sidi el Barrani. This would allow them to fuel up and move west instead of being speed bumps. Will do the fuel movement right now.
Supply
This phase does:
- Determine which units are in or out of Trace Supply (12.6)
- Replenish low or exhausted internal stocks (12.10)
It does not deal with the “On Map” supply provided by “S” and “T” counters.
I think all the units which can trace to Sidi el Barrani are in trace. In fact, I think I have “coastal shipping” which allows me to move 1T per turn from Bardia to Sidi.
But 21 Corps HQ and 20 Lt have to roll for attrition:
- 21 Corps: AR 0, eliminated.
- 20 Lt, roll 6,
-2, eliminated.
This is not a surprise.
Reaction phase
- Non-phasing player releases Reserves, etc.
- Non-phasing player barrage
None.
Combat phase
- Artillery (no Air/Naval)
- Combat segment (9.0, artillery units strength [1] per 13.4b)
Big battle coming at Buq Buq. The Italians have a good shot at putting more hurt on the Brits, who are really strung out in a very narrow salient.
First up is an artillery barrage from 30 GAF which DG the brits, bad
news for them.
The raw odds are 22:7, which is now 22:8, which is 5.5:1 which is 6:1,
roll surprise for even AR, no surprise. Roll 8 which Ao1DL1o1. This
takes out the Italian Sahara but also the 6 RTR. This is a very bad
blow for the CW forces. The Italians advance, preserving the supply line
to Sidi el Barrani.
Exploitation phase
- Movement segment
- Barrage segment
- Combat segment
None.
Italian clean Up phase
- Remove DG and Exploitation markers.
- Flip or remove Fueled markers.
- Remove train-busting placed by Allied player.
End of Turn 3
Briefly recap the turn for both sides.
This was a terrible end of turn for the CW forces, and recaps how lucky the Italians have been with surprise rolls and combat results. I do not see how the CW can achieve push the Italians out of Egypt in 3 turns, but let’s see what happens.
Turn 4
Briefly summarize the upcoming turn for both sides.
Given that the Italians don’t really have to do a whole lot to win, their next move should be to consolidate a defense in depth on the Libyan border. Make the CW come to them, and make them pay to get through. Historically, the CW didn’t get to Bardia until many days after capturing Sollum, so this has some historical justification. The second important thing is to ensure the CW cannot flank around Halfaya Pass to cut off forward units from the supply in Bardia.
The CW is in a major pickle. Historically, some bold moves toppled the Italian defenders quickly. In this universe, the Italians sacced up and punched back pretty hard. The CW has two options: 1. make a run for Halfaya Pass and try to cut off the Italian consolidation, and, or 2. attempt to flank the Italians to cut them off from Bardia.
Game is half over, but the outcome is still uncertain.
Pre-Turn Phase
- Weather determination (2.3, probably on map)
- First player determination, roll d6 highest has initiative, reroll for tie (2.3).
Weather is Rainstorm.
Italians get the initiative for Turn 4.
Italian Turn
Brief summary of Italian goal this turn.
As mentioned above, the Italians will consolidate around Halfaya Pass, while putting out some roadblocks to prevent flanking cut off from Bardia.
Aircraft refit
Cost 1T to refit any air base regardless of level or number of aircraft (15.1B)
Done.
Reinforcement
Per scenario specification or reinforcement track.
2 SP at Bardia.
Movement
- Breakout segment (12.8e) Check trace to friendly units in supply.
- Movement segment (6.0): 1/2 for DG (5.10), 1/4 for Reserve (5.7)
- Air/Naval Barrage segment (10.2, 10.3)
Computing supply needs, looks like the Italians can get what they want with only 4 ticks.
Italians bunch up to protect supply lines, it’s a rain turn, no problem with air barrage.
I forgot to restock 1 Lib last turn, I need to do that now and give it a tick to move it. That cost 3 ticks, but the unit is now lodged in Halfaya pass, and it’s AR 3, which will stiffen the AR 1 division already in place.
Supply
This phase does:
- Determine which units are in or out of Trace Supply (12.6)
- Replenish low or exhausted internal stocks (12.10)
It does not deal with the “On Map” supply provided by “S” and “T” counters.
All Italian units are in supply.
Reaction phase
- Non-phasing player releases Reserves (5.7), destroy dumps (12.11).
- Non-phasing player barrage (all types, 10.0) and transport.
None.
Combat phase
- Artillery barrage (10.1, no Air/Naval)
- Combat segment (9.0, artillery units strength [1] per 13.4b)
The only combat for the Italians this turn is a 3T barrage on Strafer Gott. If this works, it will definitely mess up the CW in a big way. Actually that was a huge waste as it’s a 3 column shift without a spotter. Bummer for the Italians.
Italians don’t have enough supply to do much more without burning supply which may be necessary in the next two turns.
Exploitation phase
Exploitation mode is defined in Section 5.9, with Exploition Phase details defined in Section 11.0.
- Movement segment (6.0), overruns cost 3 MP (8.1a, 8.1e prohibits Exploitation result).
- Barrage segment
- Combat segment
None.
Italian clean Up phase
- Remove DG and Exploitation markers.
- Flip or remove Fueled markers.
- Remove train-busting placed by Allied player.
Nothing to do here.
Allies Turn
Brief summary of Allies goal this turn.
The CW has some very hard choices to make. While Sidi el Barrani has been abandoned, most of the defending units are still in play, and headed to Halfaya Pass. It looks like a Hail Mary is needed. Which sort of makes sense as extreme boldness was what gave the battle to the CW historically. The question is will the dice play ball. Stay tuned and find out.
Aircraft refit
Cost 1T to refit any air base regardless of level or number of aircraft (15.1B)
Not refitting this turn, rain.
Reinforcement
Per scenario specification or reinforcement track.
2 SP at Mersah Matruh.
Movement
- Breakout segment
- Movement segment
- Air/Naval Barrage segment
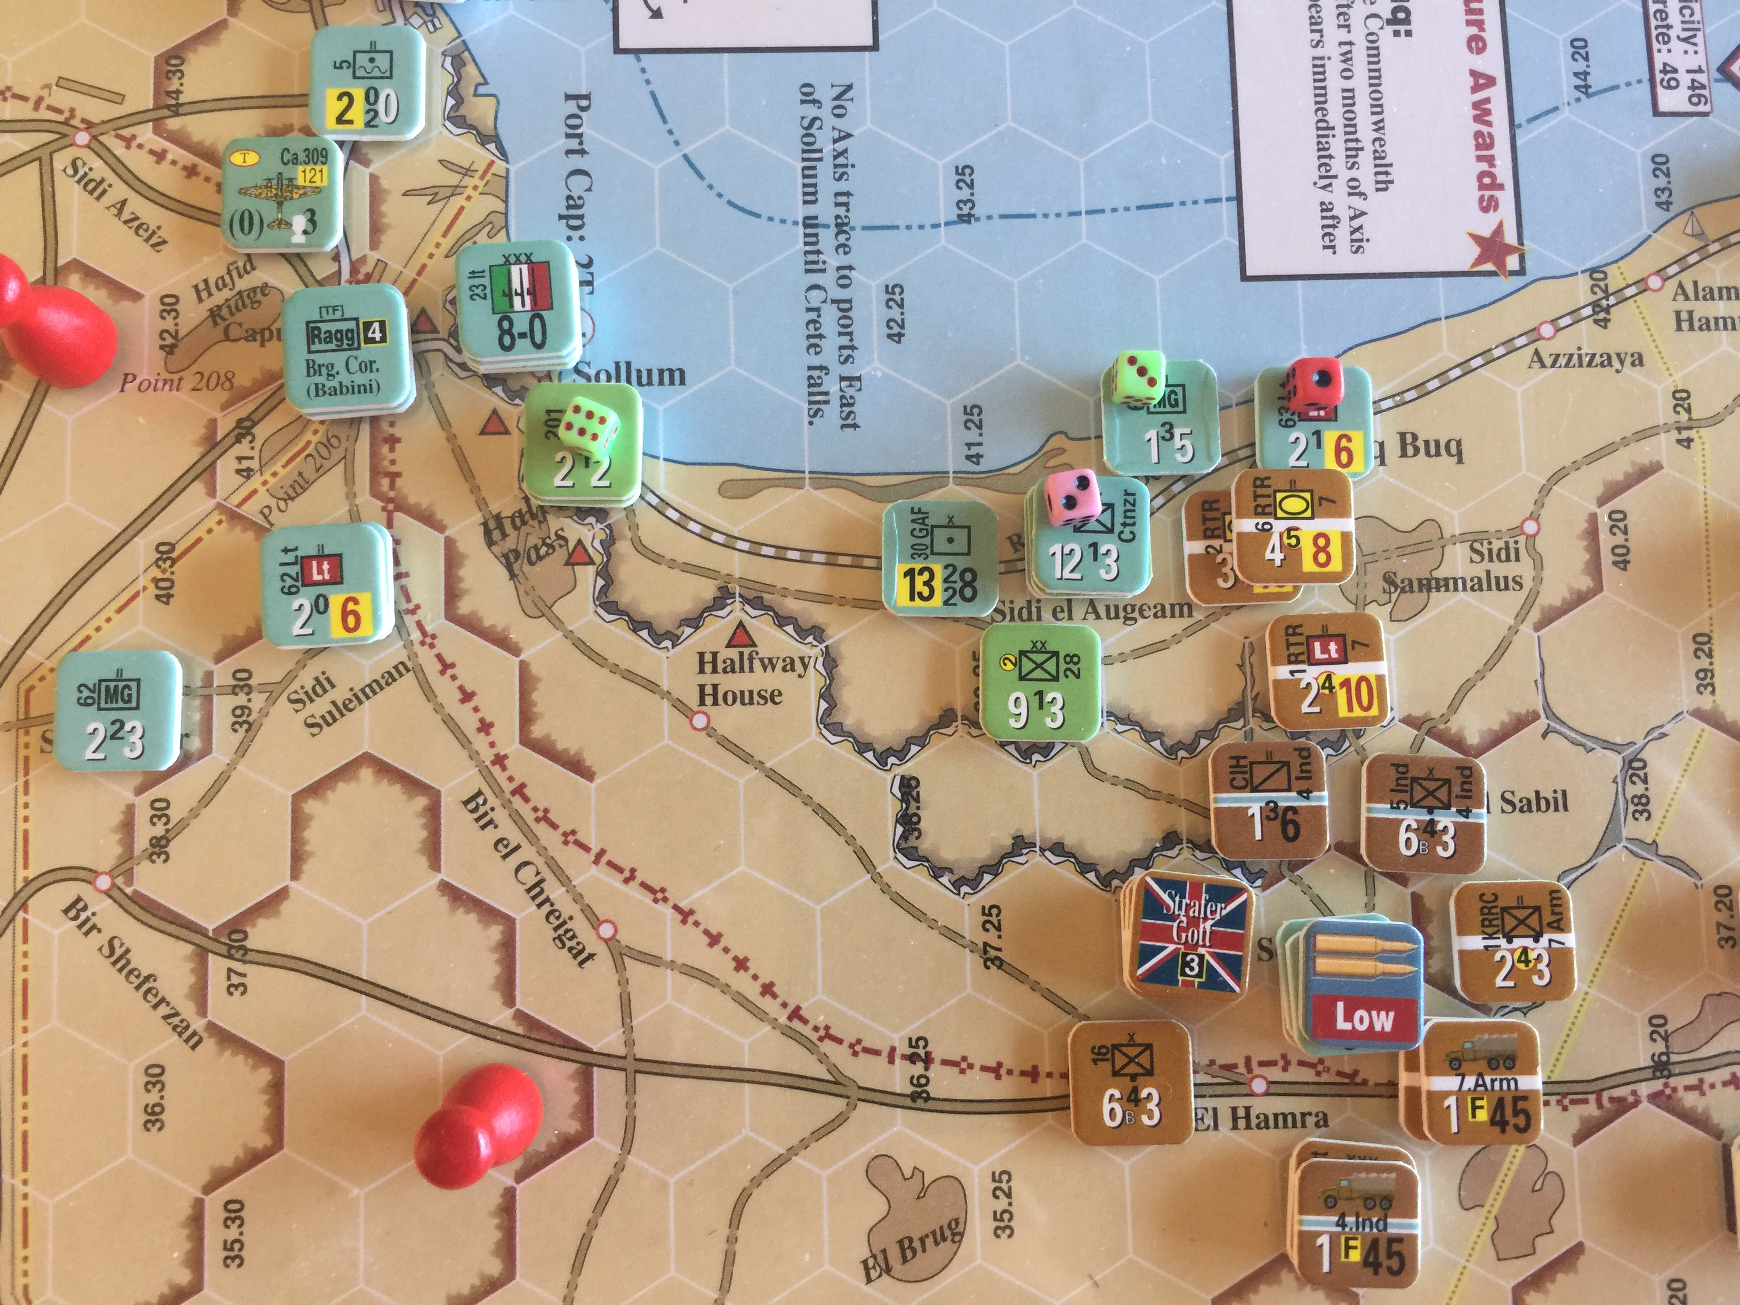
This is a big turn for the CW.
Fuel 7 Armor, 4 Indian and 6 Australian.
7 Armor moves to Halfaya Pass. I don’t have enough units in the same stack to overrun, and wouldn’t have enough supply so to do anyway. It’s going to be a slugfest in close terrain.
Supply
This phase does:
- Determine which units are in or out of Trace Supply (12.6)
- Replenish low or exhausted internal stocks (12.10)
It does not deal with the “On Map” supply provided by “S” and “T” counters.
All CW units in supply.
Reaction phase
- Non-phasing player releases Reserves, etc.
- Non-phasing player barrage
None.
Combat phase
- Artillery (no Air/Naval)
- Combat segment (9.0, artillery units strength [1] per 13.4b)
This could be ugly. It’s a bit less than 1:1 raw, which rounds to 1:1,
but in close terrain. The CW needs surprise here very badly. If they get
a defender surprise, I’m probably going to call the game. Roll 8/4,
using Strafer Gott we get an AR differential of 6 - 3 = +3 for 10,
attacker surprise with 4 right shift. Excellent, CW is still in the
game. Roll 9 + 3 for 12 on Ao1e4DLo2.
Getting the Exploit result might be a game winner for the CW.
The Italians made a mistake by not leaving a unit in 41.28, because they have to retreat…ah, OCS allows defending units to retreat in different directions.
Exploitation phase
- Movement segment
- Barrage segment
- Combat segment
By 5.9, I can move up to half the MF in Exploitation mode.
Strafer Gott is going for broke, taking on the 201 MG south of Sollum. If this works, huge number of Italians will attrit away. If it doesn’t, the CW is toast.
Roll 9/3 which is 9 + 4 attacker surprise with 3 column shift in clear terrain, roll 11 + 4, max damage on defender, no damage on attacker. Strafer Gott is wounded, out until May 1941. If the CW retains intiative it will go well for them. If the Italians get it, won’t go well.
Allies clean Up phase
- Remove DG and Exploitation markers.
- Flip or remove Fueled markers.
- Remove train-busting placed by Italian player.
DG comes off of 2 RTR.
End of Turn 4
Briefly recap the turn for both sides.
The Allies had some major success on this turn. If they get lucky, they won’t get put out of supply and lose all the gains. The Italians may indeed cut them off, but they have to check for supply before going into combat, and will have to do combat on internal stocks, which will eat up their existing supplies pretty badly when they restock.
Turn 5
Briefly summarize the upcoming turn for both sides.
Succinctly, the Allies need to attrit as many Italians around Buq Buq as possible, and the Italians need to 1. break through for supply, and 2. attempt to cut the CW supply lines.
Pre-Turn Phase
- Weather determination (2.3, probably on map)
- First player determination, roll d6 highest has initiative, reroll for tie (2.3).
Weather is clear, Italians get the initiative.
Italian Turn
Brief summary of Italian goal this turn.
Two main efforts this turn:
- Cut off supply line for 7 Armor,
- Break through to Sollum.
Aircraft refit
Cost 1T to refit any air base regardless of level or number of aircraft (15.1B)
Aircraft were refit last turn, all ready to go.
Reinforcement
Per scenario specification or reinforcement track.
2 SP at Bardia.
Movement
- Breakout segment (12.8e) Check trace to friendly units in supply.
Italians at Buq Buq are definitely out of trace supply.
- Movement segment (6.0): 1/2 for DG (5.10), 1/4 for Reserve (5.7)
Leg units move up to Sollum area, everything which doesn’t attrit will attempt to attack on internal stocks. Odds are good, AR differential is crap.
- Air/Naval Barrage segment (10.2, 10.3)
None.
MARK
Supply
This phase does:
- Determine which units are in or out of Trace Supply (12.6)
- Replenish low or exhausted internal stocks (12.10)
It does not deal with the “On Map” supply provided by “S” and “T” counters.
- 28 ID gone.
- 3 Jan ID gone.
- 1 Ctnrz down 2 steps.
- 2 Lib gone.
- 30 Gaf.
- 205 MG
- 1 Lib
- 64 MG
- 63 Lt
Dang. The Italians waited a little too long to make their move. But the CW did get pretty lucky on those surprise rolls.
Reaction phase
- Non-phasing player releases Reserves (5.7), destroy dumps (12.11).
- Non-phasing player barrage (all types, 10.0) and transport.
None.
Combat phase
- Artillery barrage (10.1, no Air/Naval)
- Combat segment (9.0, artillery units strength [1] per 13.4b)
3 combats to handle, and with luck, the Italians can wipe out the CW advance.
First, the Ragg. group attempts an overrun on 7 Hus. No surprise, odds
3:1 in the clear, -1 DRM for AR differential +1 for Ragg. command, roll
5 on 3:1 in the clear, AL1Do1, defender retreats. This is a sad result
for the Italians, as that was their best unit here.
Next, try to take out most of remaining 7 Armor, will be 6:1 roll
surprise 10/6 - 3, actually they have no chance, AR differential too
large. Roll combat 9 - 2 for Ao1DL1o1, 7 Hus is done, 1 RTR retreat
down the escarpment. This is doable for the CW. Maybe not for the win in
6 turns, but the tide has turned I think. Actually, if the CW can clear
Sollum, they may be able to turn the flank and cut the rest of the
Italians off.
Last, 1:1 on remnants of 7 Armor, no surprise, roll 4 for AL2, no big
deal, but this puts 7 Armor in Low supply from having to use internal
stocks. The Italian units here were 202 MG and Ctnzr, 202 leading and
elmininated. This preserves the Italian supply block on 7 Armor.
Exploitation phase
Exploitation mode is defined in Section 5.9, with Exploition Phase details defined in Section 11.0.
- Movement segment (6.0), overruns cost 3 MP (8.1a, 8.1e prohibits Exploitation result).
- Barrage segment
- Combat segment
None.
Italian clean Up phase
- Remove DG and Exploitation markers.
- Flip or remove Fueled markers.
- Remove train-busting placed by Allied player.
All good.
Allies Turn
Brief summary of Allies goal this turn.
First priority is rescuing 7 Armor. It did a great job choking off the Italians, now it’s time to fetch the remnants if possible.
Aircraft refit
Cost 1T to refit any air base regardless of level or number of aircraft (15.1B)
Refit the Blen IV for air dropping.
Reinforcement
Per scenario specification or reinforcement track.
2 SP at Mersah Matruh.
Movement
- Breakout segment
- Movement segment
- Air/Naval Barrage segment
Negate some ZOCs to allow 6 Aus overrun remainder of Ctnzr. Surprise
roll fails, 3:1 roll 7 + 1 for Ao1DL1o1, Ctnzr is gone and the CW has
supply reestablished.
Two units of 6 Aus advance into Sollum, roll surprise fails, roll 9 for
Ao1Do1 Sollum is captured.
That’s all we got.
Supply
This phase does:
- Determine which units are in or out of Trace Supply (12.6)
- Replenish low or exhausted internal stocks (12.10)
It does not deal with the “On Map” supply provided by “S” and “T” counters.
CW is in trace.
Reaction phase
- Non-phasing player releases Reserves, etc.
- Non-phasing player barrage
None.
Combat phase
- Artillery (no Air/Naval)
- Combat segment (9.0, artillery units strength [1] per 13.4b)
None, no supply available for fighting.
Exploitation phase
- Movement segment
- Barrage segment
- Combat segment
None.
Allies clean Up phase
- Remove DG and Exploitation markers.
- Flip or remove Fueled markers.
- Remove train-busting placed by Italian player.
Good to go.
End of Turn 5
Briefly recap the turn for both sides.
I’m calling it here, as the CW just won’t have enough supply to even move to flank, despite taking Sollum. If there was even one more turn, CW would have it. But going into Low and Exhausted precludes getting enough supply forward to finishing next turn, even if the CW got the initiative.
Pretty good game overall. I need to play this opposed some time.
AAR
Questions:
-
What’s the difference between motorized and mechanized?
-
Can I move 1T from Bardia to Sidi el Barrani per turn via sea shipping?
-
SP for refits I’m taking from within draw range, that is, 5 truck MF. For airdrops, I’m requiring the T for dropping need to be on the airfield when the turn of the airdrop kicks off.
-
Not clear on drawing from organic trucks to mitigate being out of throw. The rules seem to either be contradictory or the case is irrelevant. The idea is one can use Internal Stock if out of trace, unless an organic truck is within throw, in which case (I read) one can use Internal Stocks from the trucks, which still leaves a Low marker. That makes no sense. Better to leave the SP on the trucks for the following turn.
Various rules of interest
-
13.6c Transport points enter the board loaded if entering colocated with a dump. I’m taking that to mean in this game that the 1T transport at Mersah Matruh comes in loaded. It doesn’t matter a lot, but mattering a little might matter a lot in the long run.
-
Would be good to get clarity on the supply situation in Turn 2 for 4 Indian. I think I played it correctly.
Questions
- The Sea Cap at Bardia is 2T, but the Italian gets 2 SP per turn at Bardia for reinforcements. This implies that Sea Cap at Bardia is irrelevant for this scenario, and that interdiction or Sea Cap destruction is irrelevant. Is this in fact true?