Alexander 1 Erigon Valley: Philip II visits the Illyrians
My first ancients game. In fact, this may be my first pre-20th Century game.
The turn sequence is unlike any other game I’ve played, but probably closest to Vietnam 1965-1975 with regard to cycling through actions from each side within the turn, rather than strict IGOUGO. This is going to take a while to digest.
Turn Sequence
Outline the general plan for each faction here.
A. Leader Activation Phase
Leader with lowest initiative rating is activated (5.1).
B. Orders Phase
Section 5.2 defines the Orders Phase. Each Leader is allowed the number of orders corresponding to his Initiative Rating, or may issue Line Command if capable.
1. Movement/Missile Segment
- Perform one function with one unit (5.22)
- Line commanders (4.3) may issue Move or Missile Fire.
- Issue individual orders to activate an MCC (5.63).
Opposing units may use Orderly Withdraw (4.3), Reaction Facing (7.16-17) and/or Reaction Fire (8.2).
2. Shock Combat Segment
- Shock designation---place Shock No TQ markers (7.33); attacking player designates units.
- The Charge [Ephodos] (Pre-Shock TQ check, 9.13).
- Resolution of Leader Combat [Charismos] (9.14, 9.21).
- Clash of Spears [Doratismos] (9.15).
- Resolve Shock Combat [En Chersi] (9.16).
- Push of Shields---Check for Breakthrough [Othismos Aspidon] (9.17).
- Check for Collapse and Rout [Trope] (9.18).
C. Momentum Phase (or Return to A)
The player with the currently activated leader may attempt a momentum roll (5.3), which may be trumped by the opposing player (5.42[2])
D. Rout and Reload Phase
- Remove Rallied markers.
- Routed units undergo rout movement (10.22).
- Reload eligible missile units (8.18).
- Flip all “moved” and “finished” counters to front side.
E. Withdrawal Phase
Total rout points for each side. If one side routs, they withdraw as the loser, otherwise proceed to the next turn.
Setup
Here’s what it looks like, with the Illyrian forces to the northwest (tan counters), and the Macedonians to the southeast (red counters).
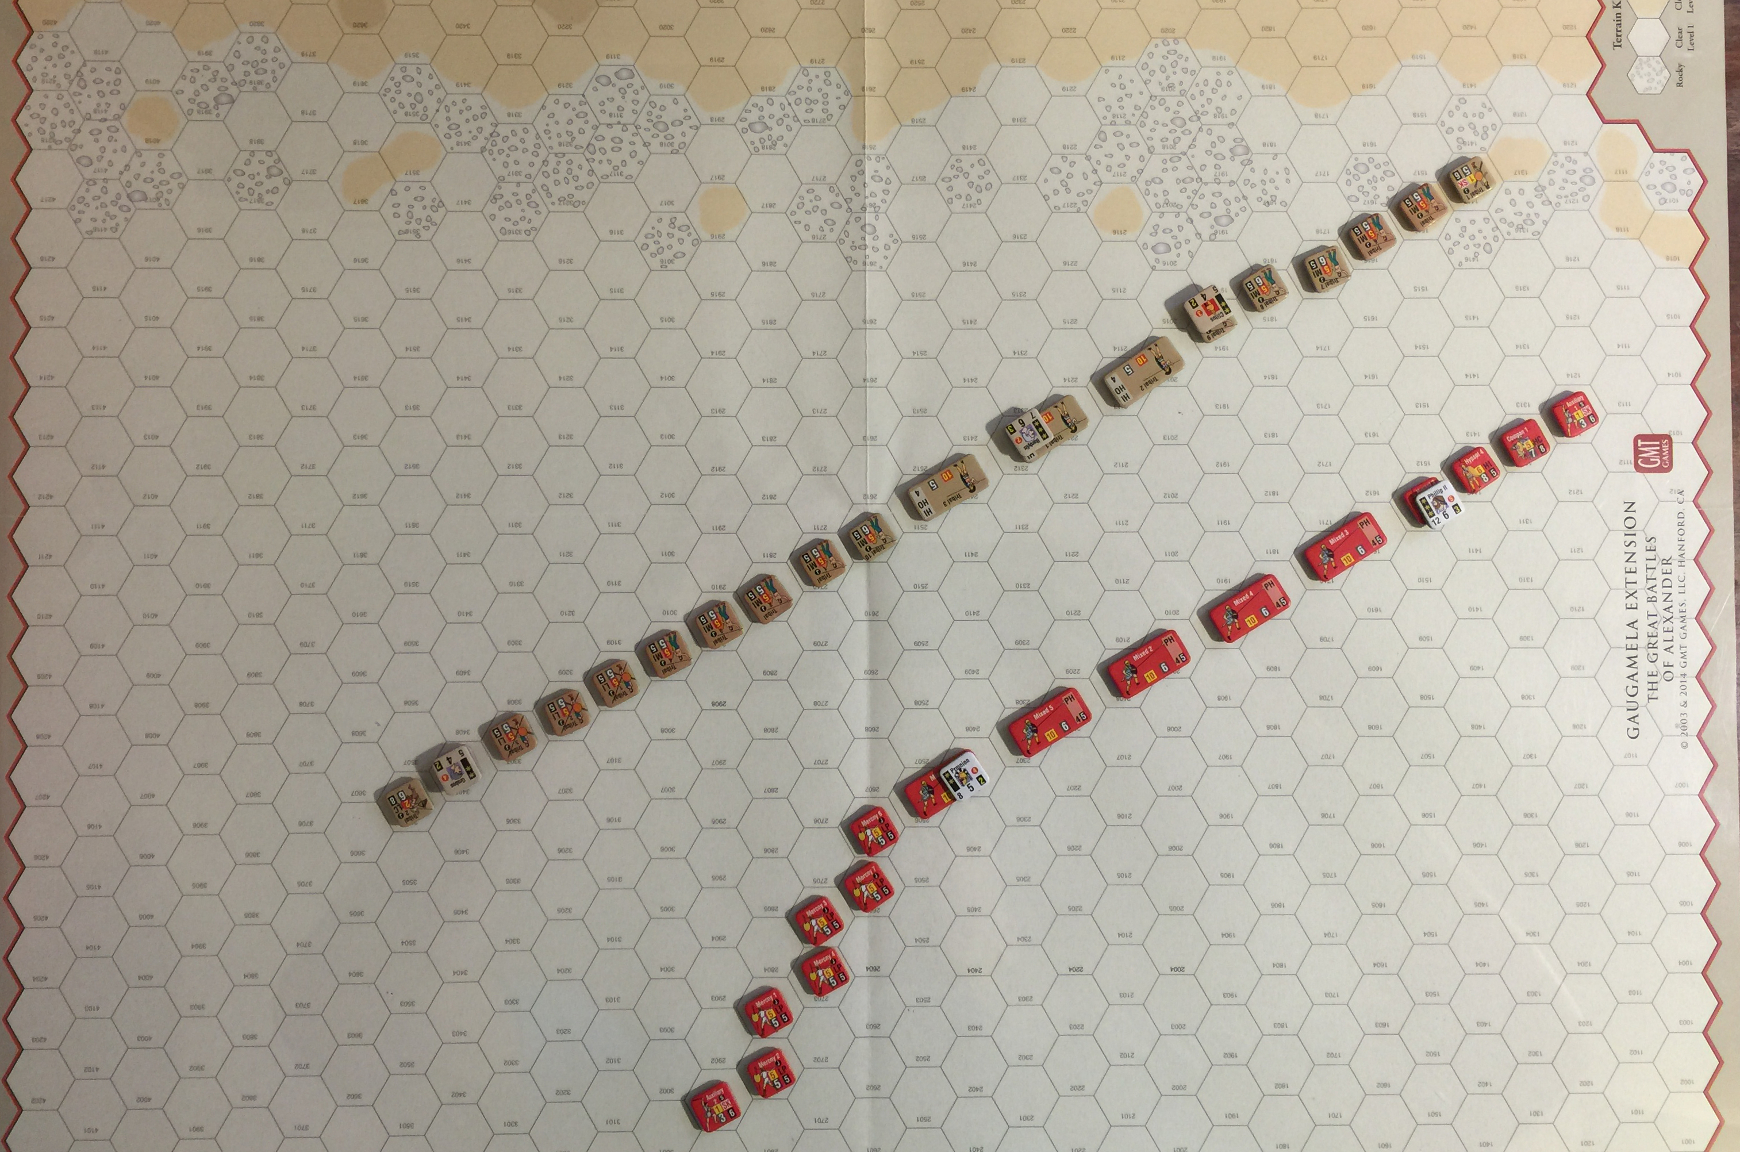
I’m very much past my current experience in wargaming here. Battle lines!
Turn 1
Outline the general plan for each faction here.
A. Leader Activation Phase: Clitus
Leader with lowest initiative rating is activated.
The lowest leader initiative is either Grabos or Clitus with 4, we’ll have Clitus go first.
B. Orders Phase
Section 5.2 defines the Orders Phase. Each Leader is allowed the number of orders corresponding to his Initiative Rating, or may issue Line Command if capable.
1. Movement/Missile Segment
- Perform one function with one unit (5.22)
- Line commanders (4.3) may issue Move or Missile Fire.
- Issue individual orders to activate an MCC (5.63).
Opposing units may use Orderly Withdraw (4.3), Reaction Facing (7.16-17) and/or Reaction Fire (8.2).
With 4 initiative, Clitus is activating everything to his left and closing with the Macedonians. This will put these units into Shock Combat (7.3).
2. Shock Combat Segment
- Shock designation---place Shock No TQ markers (7.33); attacking player designates units.
- The Charge (Pre-Shock TQ check, 9.13).
- Resolution of Leader Combat (9.14, 9.21).
- Clash of Spears (9.15).
- Resolve Shock Combat (9.16).
- check for Breakthrough (9.17).
- Check for Collapse and Rout (9.18).
-
TQ check (9.13), all Illyrian pass, Hypastis 4 and Companion 1 each take 1 hit of cohesion.
-
Personal Combat, Clitus 3 rolls 7 for 10, Philip II 5 rolls 9 for 14, differential 4, this is a Leader Wounded -1 result for Clitus.
- Clash of Spears and Shock combat resolution (9.15, 9.16):
- MI to HI, column 6 roll 7 yeilds
2(2) - MI to HI, column 6 roll 0 yeilds
3(2) - MI to HC, column 7 roll 5 yields
2(2) - SK to SK, column 7 roll 9 yields 2(4), which will rout the Macedonian slingers.
- MI to HI, column 6 roll 7 yeilds
-
No breakthrough.
- Collapse and Rout (9.18, 10.15): the Macedonian SK Axiliary 1 is routing. Since this is a skirmisher, it is eliminated. The opposing Tribal 1 SK (J) advances into vacated hex and changes facing to acquire the flank of Macedonian HC Companian 1. This will be interesting.
C. Momentum Phase (or Return to A)
The player with the currently activated leader may attempt a momentum roll (5.3), which may be trumped by the opposing player (5.42[2])
- No momentum allowed for Clitus as 1. he is Philip II’s ZOC and 2. he was in personal combat last turn (with Philip II). Return to A.
A. Leader Activation Phase: Grabos
Leader with lowest initiative rating is activated (5.1).
B. Orders Phase
Section 5.2 defines the Orders Phase. Each Leader is allowed the number of orders corresponding to his Initiative Rating, or may issue Line Command if capable.
1. Movement/Missile Segment
- Perform one function with one unit (5.22)
- Line commanders (4.3) may issue Move or Missile Fire.
- Issue individual orders to activate an MCC (5.63).
Opposing units may use Orderly Withdraw (4.3), Reaction Facing (7.16-17) and/or Reaction Fire (8.2).
Grabos moves his line up to face the Macedonians; no combat.
A. Leader Activation Phase: Premnion
Leader with lowest initiative rating is activated (5.1).
Premnion is next, and he needs to move off the phalanx he’s sitting on right now and handle Grabos who is attempting to flank. Not sure how the leaders are allowed to move.
B. Orders Phase
Section 5.2 defines the Orders Phase. Each Leader is allowed the number of orders corresponding to his Initiative Rating, or may issue Line Command if capable.
Premnion gets to issue 5 orders. One for himself to move off the phalanx, then 4 more to move some mercenaries into shock with Grabos advancing force. The auxiliary unit on the far west will not yet move.
1. Movement/Missile Segment
- Perform one function with one unit (5.22)
- Line commanders (4.3) may issue Move or Missile Fire.
- Issue individual orders to activate an MCC (5.63).
Opposing units may use Orderly Withdraw (4.3), Reaction Facing (7.16-17) and/or Reaction Fire (8.2).
As noted above, Premnion moves to Merc 4 and moves 4 of the peltast (LP) ranks forward. These are now closed with the Tribal LI ranks.
The question now is “Shock, or no Shock?”
We’ll choose Shock according to Section 7.3.
2. Shock Combat Segment
- Shock designation---place Shock No TQ markers (7.33); attacking player designates units.
- The Charge (Pre-Shock TQ check, 9.13).
- Resolution of Leader Combat (9.14, 9.21).
- Clash of Spears (9.15).
- Resolve Shock Combat (9.16).
- Push of Shields---Check for Breakthrough (9.17).
- Check for Collapse and Rout (9.18).
-
The charge: units attacking and the defenders must undergo Shock TQ check. Shocks rolls really good for both sides, only one tribal unit accrued a single cohesion hit.
-
Resolution of leader combat: Grabos and Premnion are not adjacent in shock combat.
- Clash of Spears:
- 3 LP to LI, use Column 7.
- 1 LP to LC, use Column 8.
- Shock combat resolution (9.16):
- LP to LI: roll 9, 2(3).
- LP to LI, Premnion attacking: roll 2 + 2 charisma for 4, 2(2).
- Merc 1 takes on an LI with Grabos defending, roll 5 - 2 for 3, 2(2).
- Merc 2 LI to Tribal LC, roll 9 on col. 8 for 2(4).
-
Push of sheilds, 9.17: Tribal 2 has 6 cohesion hits, which is 3 times the 2 cohesion hits of its opponent, so it gets another 2 hits for a total of 8.
- The collapse [trope]. Tribal 2 has to rout, see 10.2. It’s probably heading off the map, not sure it’s worth Grabos trying to Rally it.
C. Momentum Phase (or Return to A)
The player with the currently activated leader may attempt a momentum roll (5.3), which may be trumped by the opposing player (5.42[2])
No momentum as Premion is in an EZOC.
A. Leader Activation Phase: Bardylis
Leader with lowest initiative rating is activated (5.1).
Bardylis’ initiayive is tied at 6 with Philip II, as the non-Macedonian, he gets the initiative, and he’s going to charge with the hoplites.
B. Orders Phase
Section 5.2 defines the Orders Phase. Each Leader is allowed the number of orders corresponding to his Initiative Rating, or may issue Line Command if capable.
Bardylis moves himself for 1, 3 hoplites for 4, and two MI for 6, straight into the Macedonian phalanxes. Can anything good come of this? Will the dice love Bardylis? Let’s roll and find out.
1. Movement/Missile Segment
- Perform one function with one unit (5.22)
- Line commanders (4.3) may issue Move or Missile Fire.
- Issue individual orders to activate an MCC (5.63).
Opposing units may use Orderly Withdraw (4.3), Reaction Facing (7.16-17) and/or Reaction Fire (8.2).
2. Shock Combat Segment
- Shock designation---place Shock No TQ markers (7.33); attacking player designates units.
- The Charge (Pre-Shock TQ check, 9.13).
- Resolution of Leader Combat (9.14, 9.21).
- Clash of Spears (9.15).
- Resolve Shock Combat (9.16).
- Push of Shields---Check for Breakthrough (9.17).
- Check for Collapse and Rout (9.18).
-
All ranks subject to TQ check on shock.
-
The charge: All but one of the Macedonians passed shock, however, the one resulted in 3 cohesion hits. Bummer. On the other hand, the Tribal side got loads of cohesion hits, this risks some serious routing.
-
Leader resolution: no leaders adjacent.
- Clash of spears:
- HI/HI is col. 7.
- HI/PH col. 6.
- MI/PH col. 5.
- Shock resolution:
- Tribal 2 to Hypast 3 (with Philip II), col. 7 roll 4 - 3 for 1 yields 3(2).
- Tribal 1 to Mixed 3, col. 6 roll 4 yields 2(2)
- Tribal 3 to Mixed 4, col. 6 roll 7 yields 2(2)
- Tribal 3 to Mixed 2, col. 6 roll 8 yields 2(3)
- Tribal 10 to Mixed 5, col. 5 roll 4, 3(2)
- Tribal 1 to Mixed 5, col. 5 roll 8, 2(2)
Note: for combats 5 & 6, these should have been on col. 4 to account for unit size difference, as the tribal units are attacking at essentially 1-2 odds. This produces a 1L on the columns table. In this case, the results are the same for these rolls for columns 4 and 5.
- Push of shields: doesn’t apply here, the only unit it would matter for (Tribal 3) is already going to rout. Apply Section 10.2 to Tribal 1 HI, Tribal 3 HI and Tribal 1 MI. Per 9.13, Tribal 1 HI rolls a 0 on the d10, hence, stands in place with cohesion hits at 4.
C. Momentum Phase (or Return to A)
The player with the currently activated leader may attempt a momentum roll (5.3), which may be trumped by the opposing player (5.42[2])
No momentum roll for Bardylis.
A. Leader Activation Phase: Philip II
Leader with lowest initiative rating is activated (5.1).
This will be last leader activation for Turn 1.
B. Orders Phase
Section 5.2 defines the Orders Phase. Each Leader is allowed the number of orders corresponding to his Initiative Rating, or may issue Line Command if capable.
Philip issues 2 move orders, 1 for himself to move to Mixe 2 PH, the other to move Auxiliary 2 up to the line. He then issues 4 fire orders, 3 for attacking the HI hoplites, the remaining to attack Tribal 10.
1. Movement/Missile Segment
- Perform one function with one unit (5.22)
- Line commanders (4.3) may issue Move or Missile Fire.
- Issue individual orders to activate an MCC (5.63).
Opposing units may use Orderly Withdraw (4.3), Reaction Facing (7.16-17) and/or Reaction Fire (8.2).
2. Shock Combat Segment
- Shock designation---place Shock No TQ markers (7.33); attacking player designates units.
- The Charge [Ephodos] (Pre-Shock TQ check, 9.13).
- Resolution of Leader Combat [Charismos] (9.14, 9.21).
- Clash of Spears [Doratismos] (9.15).
- Resolve Shock Combat [En Chersi] (9.16).
- Push of Shields---Check for Breakthrough [Othismos Aspidon] (9.17).
- Check for Collapse and Rout [Trope] (9.18).
-
Shock designation: all units are already in combat (EZOCs), no need for TQ check.
-
The charge: none this round.
-
No leader combat.
- Clash of spears:
- PH to HI is col. 8
- PH to MI is col. 9.
- Shock resolution:
- Hypastus 3 and Mixed 3 against Tribal 2, this is going to be a 1R for attacker at 1.6:1 for size differential. Roll 3 yields 2(2), which will put the defender into route.
- Mixed PH 4 against Tribal hoplite 1, roll 6 on col. 9 yeilds 2(3), defender into rout condition.
- Mixed PH 2 against Tribal 10 MI, 2:1 for size shifts 1R, so, col. 11, roll 0 + 3 for Philip in the battle yields 2(3), which puts both units into a rout condition.
-
Push of shields: N/A.
-
Collapse and rout, check for two hex unit behavior:
- Mixed PH 2 rolls 0 + 0 for excess cohesion over TQ + 3 equals 3, less than 6, stands with cohesion 5.
- Tribal 1 rolls 2 + 3 + 2 cohesion over TQ equals 7, routs.
C. Momentum Phase (or Return to A)
The player with the currently activated leader may attempt a momentum roll (5.3), which may be trumped by the opposing player (5.42[2])
Philip II passes on Momentum.
D. Rout and Reload Phase
- Remove Rallied markers.
- Routed units undergo rout movement (10.22).
- Reload eligible missile units (8.18).
- Flip all “moved” and “finished” counters to front side.
E. Withdrawal Phase
Total rout points for each side. If one side routs, they withdraw as the loser, otherwise proceed to the next turn.
End of Turn 1
Here’s what it looks like:
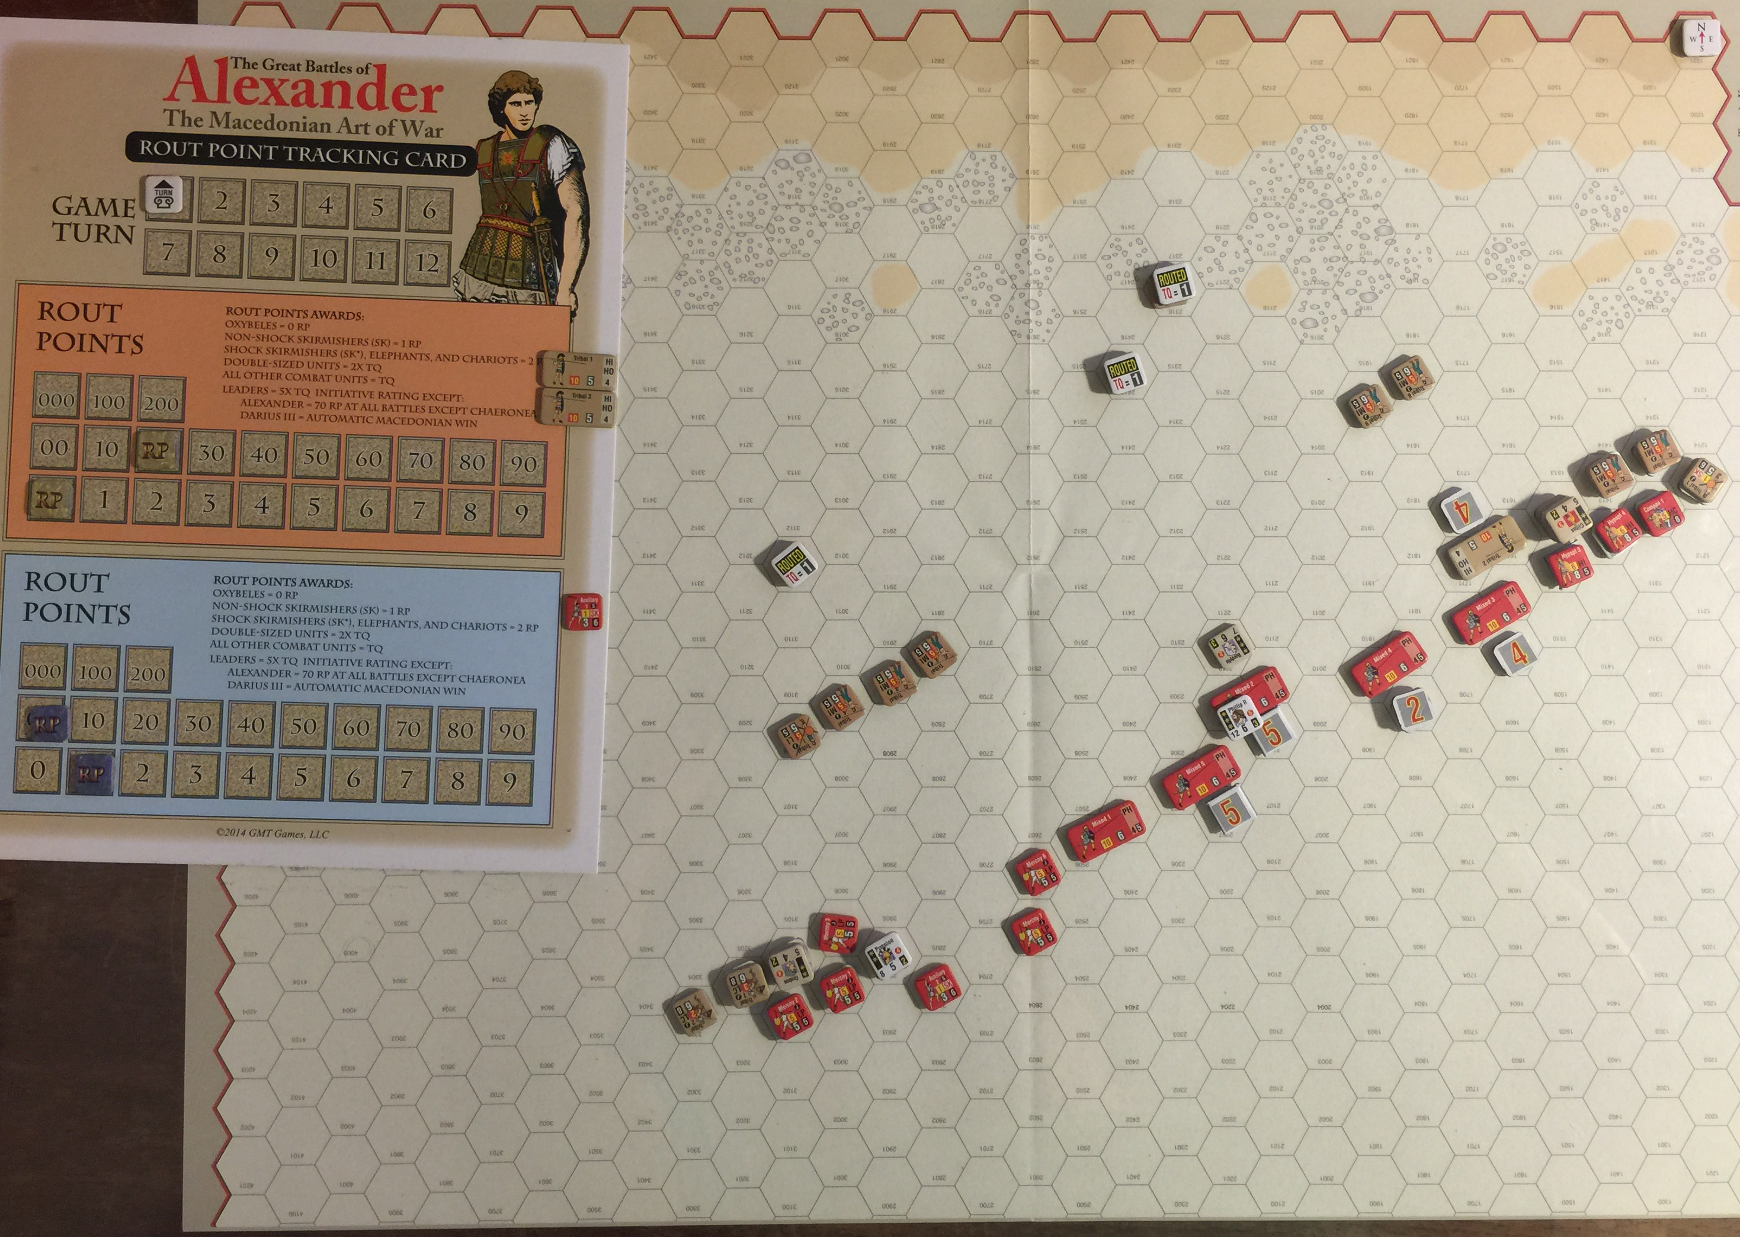
Score: Macedonians 1, Illyrians 20.
Turn 2
Outline the general plan for each faction here.
The Illyrians get the first initiative, but it’s not very clear what they need to do. Hopefully they can find a way to hurt a couple of the Macedonian units so they aren’t completely skunked.
A. Leader Activation Phase: Grabos
Leader with lowest initiative rating is activated (5.1).
Grabos stands and fights!
B. Orders Phase
Section 5.2 defines the Orders Phase. Each Leader is allowed the number of orders corresponding to his Initiative Rating, or may issue Line Command if capable.
Four orders split between fire and move.
1. Movement/Missile Segment
- Perform one function with one unit (5.22)
- Line commanders (4.3) may issue Move or Missile Fire.
- Issue individual orders to activate an MCC (5.63).
Opposing units may use Orderly Withdraw (4.3), Reaction Facing (7.16-17) and/or Reaction Fire (8.2).
- Tribal 2 LC moves and refaces to take Merc 2 LP on the flank.
- Tribal 1 LI moves up from the rear to take Merc 3 LP on the flank.
- Tribal 3 LI fights in place, attacked DRM bonus with Grabos in the fight.
- Tribal 4 MI moves to take on Tribal 3, combined attack.
2. Shock Combat Segment
- Shock designation---place Shock No TQ markers (7.33); attacking player designates units.
- The Charge [Ephodos] (Pre-Shock TQ check, 9.13).
- Resolution of Leader Combat [Charismos] (9.14, 9.21).
- Clash of Spears [Doratismos] (9.15).
- Resolve Shock Combat [En Chersi] (9.16).
- Push of Shields---Check for Breakthrough [Othismos Aspidon] (9.17).
- Check for Collapse and Rout [Trope] (9.18).
-
The Illyrian fighting in place are Shock No TQ, the other three are Shock TQ check. This induces TQ check on the defender in place.
-
The charge: Tribal 4 rolls a 9 on TQ, massive cohesion hit! All others pass TQ with no cohesion hits. Bad luck for the Illyrians.
-
Resolution of leader combat: no leaders involved in this fight.
- Clash of spears:
- Tribal 2 LC flanking Merc 2 LP, col. 6, LI to LP frontal col. 7, we’ll use that. Size ratio is 7:10, since Illyrians moved, odds rounding favors at 1:1.
- MI to LP from the rear, col. with 2:1 for size superiority, col. 11.
- Resolve shock combat:
- col. 7, roll 6 + 2 for
2(3). Not quite enough to get a rout on the Macedonian. - col. 11, roll 7 for
2(4). Good result, still not enough to rout the Macedonian.
- col. 7, roll 6 + 2 for
C. Momentum Phase (or Return to A)
The player with the currently activated leader may attempt a momentum roll (5.3), which may be trumped by the opposing player (5.42[2])
No momentum, Grabos fought.
A. Leader Activation Phase: Clitus
Leader with lowest initiative rating is activated (5.1).
Another Illyrian with low initiative, but might have enough mojo to get a rout from the Macedonians.
B. Orders Phase
Section 5.2 defines the Orders Phase. Each Leader is allowed the number of orders corresponding to his Initiative Rating, or may issue Line Command if capable.
Clitus is going to bring up some of the “reserve” to pound on a phalanx, and fight in place on another.
1. Movement/Missile Segment
- Perform one function with one unit (5.22)
- Line commanders (4.3) may issue Move or Missile Fire.
- Issue individual orders to activate an MCC (5.63).
Opposing units may use Orderly Withdraw (4.3), Reaction Facing (7.16-17) and/or Reaction Fire (8.2).
- Tribal 8 and 9 move to confront Mixed 4 PH. This is almost surely going to rout the Macedonian, will be curious whether Philip will attempt to rally it.
- Clitus is wounded -1, hence takes the third order to move to join the shock attack on the PH.
2. Shock Combat Segment
- Shock designation---place Shock No TQ markers (7.33); attacking player designates units.
- The Charge [Ephodos] (Pre-Shock TQ check, 9.13).
- Resolution of Leader Combat [Charismos] (9.14, 9.21).
- Clash of Spears [Doratismos] (9.15).
- Resolve Shock Combat [En Chersi] (9.16).
- Push of Shields---Check for Breakthrough [Othismos Aspidon] (9.17).
- Check for Collapse and Rout [Trope] (9.18).
-
All must check TQ.
-
The charge: Illyrians pass TQ, the PH does not, adding 3 cohesion hits for 7 total. This induces an immediate rout check: roll 4 + 1 for excess + 3 is 8, they rout, and the Illyrians advance.
As it turns out, after advancing, there is no more for Clitus to do this turn.
C. Momentum Phase (or Return to A)
The player with the currently activated leader may attempt a momentum roll (5.3), which may be trumped by the opposing player (5.42[2])
No momentum for Clitus.
A. Leader Activation Phase: Premenion
Leader with lowest initiative rating is activated (5.1).
Premenion is in a bit of a pickle. He’s about to lose several units unless he rallies or recovers them, but that means he loses the shock value of the attack for the rest of the turn. But that’s probably better than losing the units.
B. Orders Phase
Section 5.2 defines the Orders Phase. Each Leader is allowed the number of orders corresponding to his Initiative Rating, or may issue Line Command if capable.
Premenion move to get into rally range of routing PH, and will attempt to rally Merc 2, roll 5 less than 5 + 1, PH rallies with 2 cohesion hits. Merc 2 fails rally with roll 9. These dudes are lost, they’ll be off the map next turn. That’s 3 orders for Premenion.
1. Movement/Missile Segment
- Perform one function with one unit (5.22)
- Line commanders (4.3) may issue Move or Missile Fire.
- Issue individual orders to activate an MCC (5.63).
Opposing units may use Orderly Withdraw (4.3), Reaction Facing (7.16-17) and/or Reaction Fire (8.2).
With 2 orders left, Premenion takes Merc 7 into the flank of Tribal 4, which will induce TQ shock. Merc 4 joins the fight as the final order.
2. Shock Combat Segment
- Shock designation---place Shock No TQ markers (7.33); attacking player designates units.
- The Charge [Ephodos] (Pre-Shock TQ check, 9.13).
- Resolution of Leader Combat [Charismos] (9.14, 9.21).
- Clash of Spears [Doratismos] (9.15).
- Resolve Shock Combat [En Chersi] (9.16).
- Push of Shields---Check for Breakthrough [Othismos Aspidon] (9.17).
- Check for Collapse and Rout [Trope] (9.18).
Shock markers down…
-
The charge: Merc 7 rolls 0, Tribal 4 roll 2, both pass.
-
No leader combat.
-
Clash of spears: LP to MI, flanking is col. 9 with 2:1 for size.
-
Resolution: roll 1 for
2(2)which puts the Illyrian into rout.
And that’s it for Premenion this turn.
C. Momentum Phase (or Return to A)
The player with the currently activated leader may attempt a momentum roll (5.3), which may be trumped by the opposing player (5.42[2])
Premenion issued all his orders (Finished), not eligible for momentum.
A. Leader Activation Phase: Bardylis
Leader with lowest initiative rating is activated (5.1).
Bardylis has no choice other than to be as aggressive as possible. Although it probably won’t matter as Philip will be able to rally (77% chance) any routed phalanxes.
B. Orders Phase
Section 5.2 defines the Orders Phase. Each Leader is allowed the number of orders corresponding to his Initiative Rating, or may issue Line Command if capable.
First, move remaining tribal to flank Macedonian Merc, then move himself to get out of the way of Philip, and move Clitus and another unit up to the turned around phalanx. This was a blunder on Premenion’s part: this phalanx could have been reversed for 3 MP, then closed for shock with the units it’s suffering from right now.
1. Movement/Missile Segment
- Perform one function with one unit (5.22)
- Line commanders (4.3) may issue Move or Missile Fire.
- Issue individual orders to activate an MCC (5.63).
Opposing units may use Orderly Withdraw (4.3), Reaction Facing (7.16-17) and/or Reaction Fire (8.2).
See movement in Orders phase.
2. Shock Combat Segment
- Shock designation---place Shock No TQ markers (7.33); attacking player designates units.
- The Charge [Ephodos] (Pre-Shock TQ check, 9.13).
- Resolution of Leader Combat [Charismos] (9.14, 9.21).
- Clash of Spears [Doratismos] (9.15).
- Resolve Shock Combat [En Chersi] (9.16).
- Push of Shields---Check for Breakthrough [Othismos Aspidon] (9.17).
- Check for Collapse and Rout [Trope] (9.18).
All units have TQ check.
-
Starting from the east with the units attacking the phalanx, all pass TQ check. Western units, Merc 5 rolls a 0 (dang), the Illyrians pass one, and roll an 8 on another.
-
No leader combat.
- Clash of spears:
- MI to LP, col. 10 + 1R for size so col. 11, AS for position.
- MI to PH from behind is AS for position, col. 12.
- Resolve shock:
- Clitus with MI, roll 0 (!) on CRT + 2 is
2(6). - Against Merc, roll 7 which is
2(8).
- Clitus with MI, roll 0 (!) on CRT + 2 is
C. Momentum Phase (or Return to A)
The player with the currently activated leader may attempt a momentum roll (5.3), which may be trumped by the opposing player (5.42[2])
Bardylis will attempt a momentum roll…rolls 8, loses momentum! The Illyrians have had really crappy die rolls this game.
A. Leader Activation Phase: Philip II
Leader with lowest initiative rating is activated (5.1).
Philip can turn the game into a real bore for the Illyrians by simply rallying every unit which currently routing, and recovering all the other units which are in contact and subject to shock combat. He and Premenion can do this more or less indefinitely.
B. Orders Phase
Section 5.2 defines the Orders Phase. Each Leader is allowed the number of orders corresponding to his Initiative Rating, or may issue Line Command if capable.
First order, rally Mixed 4 PH, which succeeds.
1. Movement/Missile Segment
- Perform one function with one unit (5.22)
- Line commanders (4.3) may issue Move or Missile Fire.
- Issue individual orders to activate an MCC (5.63).
Opposing units may use Orderly Withdraw (4.3), Reaction Facing (7.16-17) and/or Reaction Fire (8.2).
After the rally, which can be done without Philip moving, it’s time to move him and attempt rally on a couple of other units:
- Merc 4: roll 2, rallied with 1 cohesion hit.
- Merc 2: roll 4, rallied with 1 cohesion hit.
That’s 4, recover Merc 1 & 3, and the Macedonians have basically suffered no casualties to speak of, while the Illyrians are just hammered.
2. Shock Combat Segment
- Shock designation---place Shock No TQ markers (7.33); attacking player designates units.
- The Charge [Ephodos] (Pre-Shock TQ check, 9.13).
- Resolution of Leader Combat [Charismos] (9.14, 9.21).
- Clash of Spears [Doratismos] (9.15).
- Resolve Shock Combat [En Chersi] (9.16).
- Push of Shields---Check for Breakthrough [Othismos Aspidon] (9.17).
- Check for Collapse and Rout [Trope] (9.18).
No shock combat from Philip II this turn.
C. Momentum Phase (or Return to A)
The player with the currently activated leader may attempt a momentum roll (5.3), which may be trumped by the opposing player (5.42[2])
Philip is finished, no momentum.
D. Rout and Reload Phase
- Remove Rallied markers.
- Routed units undergo rout movement (10.22).
- Reload eligible missile units (8.18).
- Flip all “moved” and “finished” counters to front side.
E. Withdrawal Phase
Total rout points for each side. If one side routs, they withdraw as the loser, otherwise proceed to the next turn.
The Illyrians are going to concede. They’ve learned a bit more about how to fight the Macedonians, and will retire now to fight again another day.
End of Turn 2
Here’s the situation at the end of Turn 2:
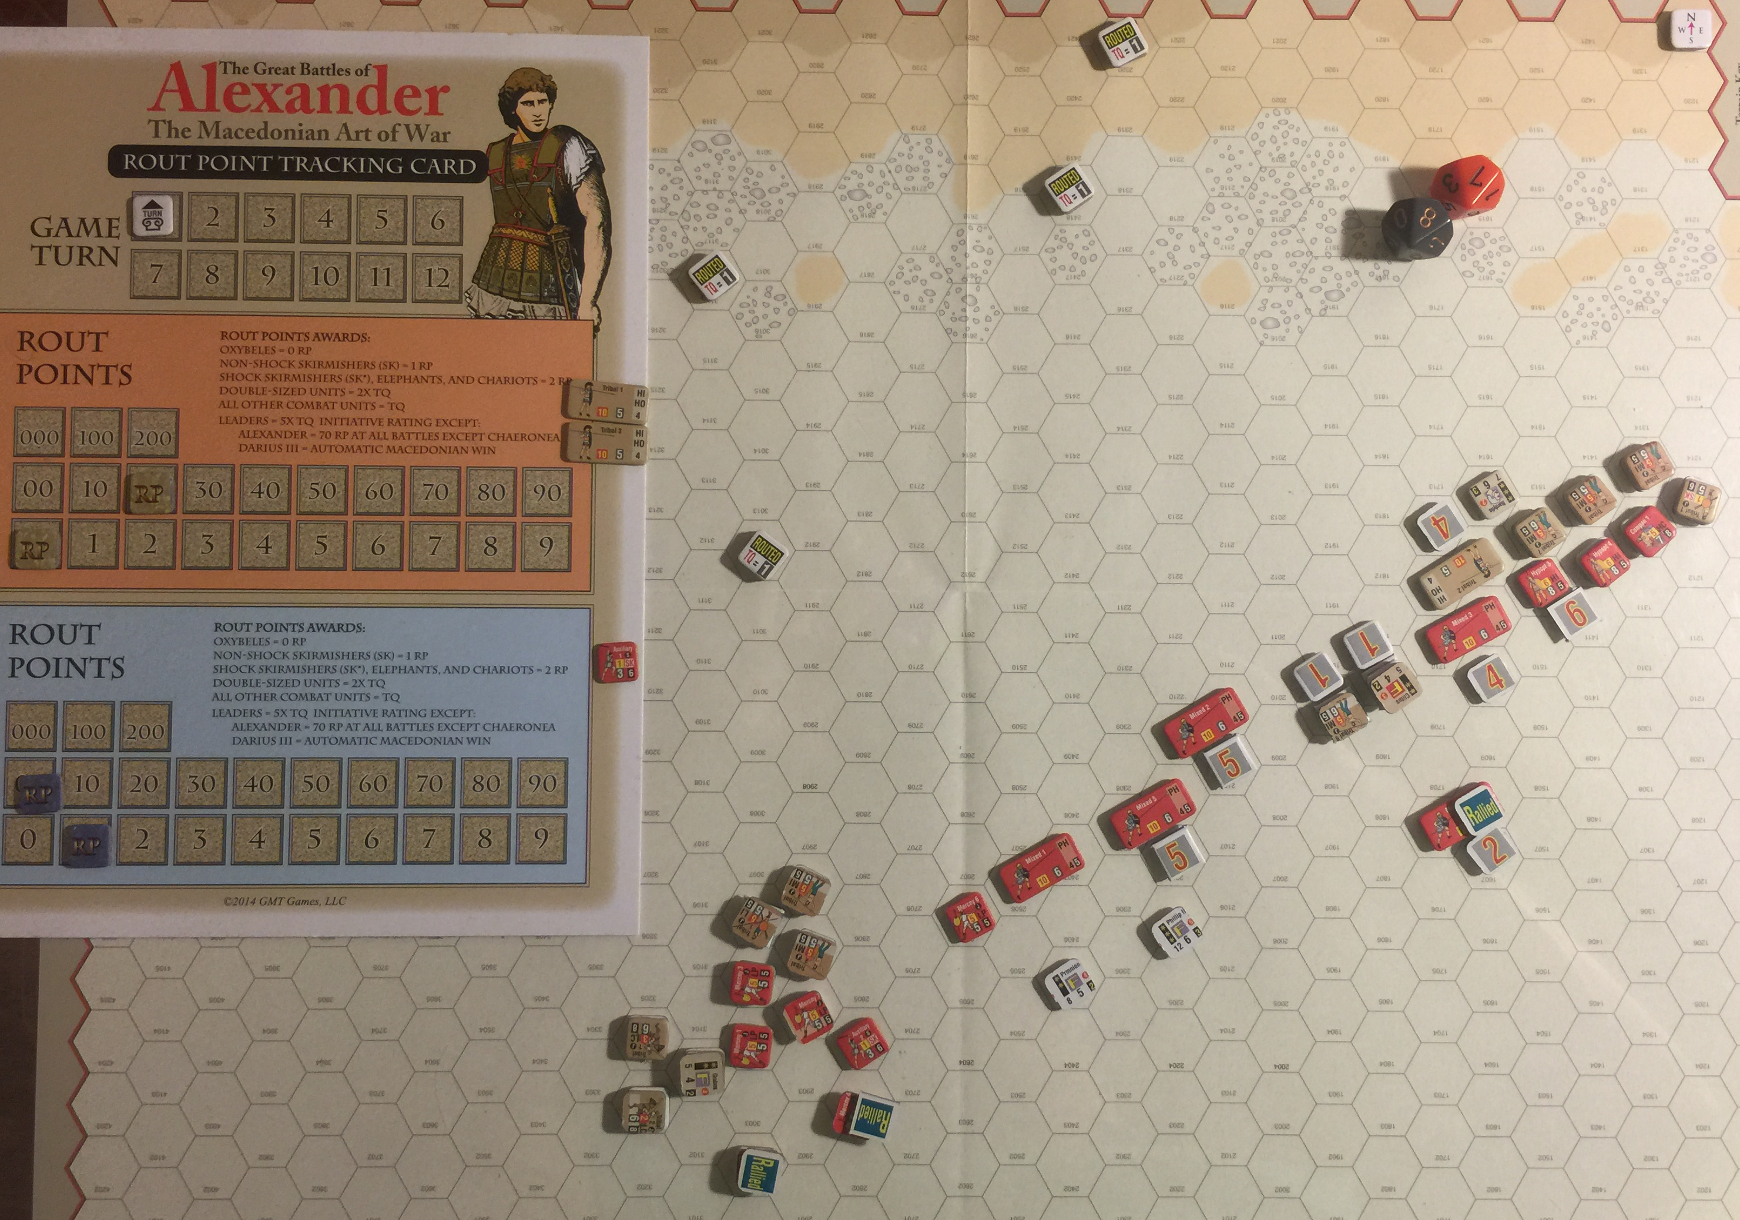
Ugly business.
AAR
The Macedonians rolled a lot of 0s on TQ checks. That sucks as their units are almost all better in every way in any case.
The Illyrians have more initiative points, but less range, and overall less TQ for roughly even forces. The biggest lesson learned here is not to blindly charge into Macedonian phalanxes (or hypaspists). Figure out a smarter way to battle Philip II.
Blunders
This is a pretty complex, or least very different, system compared to all the other games in my collection. One ramification of this difference is I don’t yet know enough one turn in to even see many blunders. As I progress through the game, I’m sure I’ll find many.
-
Per 10.13, multiple units can attack a defender, and be resolved in one combat resolution. What I did above is attack one Macedonian with two separate MI Tribal units. While this may be allowed in the rules, it’s definitely not advantageous as the attacking units will take more cohesion hits otherwise.
-
The Illyrians get -2 on TQ rolls for this scenario, which I did correctly at the beginning, and forget to do on the second, when Bardylis closed. This probably would have kept at least one of the 2 hex HI hoplites on the board.
-
Movement induces a cohesion hit of 1 in most units, per 6.13. I didn’t do this until half way into Turn 2.
-
Not using the result multiplier for Position Superiority. I didn’t do this for either side, so it probably balanced out.
-
Not checking rout on units with cohesion TQ - 1 during Push of Shields. This may not have mattered as it comes into play with units remaining in EZOC, but it probably could have helped the Illyrians.
Final thoughts
GBoH is a really interesting tactical system. Not so much as it is really different from the standard panzer pushing. This first scenario was on the table about a month, with the first two shock combats stalling everything out. Once I figured out the system, and how to write it up in this play-by-play, everything went a lot faster. I knocked out the rest of it over the course of a few days.