Kasserine Pass OCS style
Some notes on how I’m playing this first game:
- Combat mode only. I don’t think the Germans can even come close to winning this unless they use movement mode, possibly even strat mode, but I want to play it out anyway to see what happens.
- Trace supply only. I realize this totally breaks the whole notion of OCS, but there are a lot of other mechanics in the OCS rules which I would like to master first. For example, the basic movement, combat and ZOC rules will provide enough challenge for this first play.
The result of these simplifications will be interesting, and likely worthy of some discussion.
The risk is that I will learn the rules “wrong,” and have to unlearn to proceed further. But the rules aren’t so much the issue as learning bad strategy and tactics. Still, trying to digest the whole of OCS rules all at once is just a little much.
What the system needs is a set of scenarios like Operation Starlite in Vietnam 1965-1975, a single turn (or 2 or 3) with very low unit count and simple victory conditions. These scenarios don’t even need to be balanced. Central America Scenario 1 is similar.
Turn sequence, for convenience.
Game Turn
Briefly summarize the upcoming turn for both sides.
Pre-Turn Phase
- Weather determination (2.3, probably on map)
- First player determination, roll d6 highest has initiative, reroll for tie (2.3).
Axis Turn
Brief summary of Axis goal this turn.
Aircraft refit
Cost 1T to refit any air base regardless of level or number of aircraft (15.1B)
Reinforcement
Per scenario specification or reinforcement track.
Movement
- Breakout segment (12.8e) Check trace to friendly units in supply.
- Movement segment (6.0): 1/2 for DG (5.10), 1/4 for Reserve (5.7)
- Air/Naval Barrage segment (10.2, 10.3)
Supply
This phase does:
- Determine which units are in or out of Trace Supply (12.6)
- Replenish low or exhausted internal stocks (12.10)
It does not deal with the “On Map” supply provided by “S” and “T” counters.
Reaction phase
- Non-phasing player releases Reserves (5.7), destroy dumps (12.11).
- Non-phasing player barrage (all types, 10.0) and transport.
Combat phase
- Artillery barrage (10.1, no Air/Naval)
- Combat segment (9.0, artillery units strength [1] per 13.4b)
Exploitation phase
Exploitation mode is defined in Section 5.9, with Exploition Phase details defined in Section 11.0.
- Movement segment (6.0), overruns cost 3 MP (8.1a, 8.1e prohibits Exploitation result).
- Barrage segment
- Combat segment
German clean Up phase
- Remove DG and Exploitation markers.
- Flip or remove Fueled markers.
- Remove train-busting placed by Allied player.
Allies Turn
Brief summary of Allies goal this turn.
Aircraft refit
Cost 1T to refit any air base regardless of level or number of aircraft (15.1B)
Reinforcement
Per scenario specification or reinforcement track.
Movement
- Breakout segment
- Movement segment
- Air/Naval Barrage segment
Supply
This phase does:
- Determine which units are in or out of Trace Supply (12.6)
- Replenish low or exhausted internal stocks (12.10)
It does not deal with the “On Map” supply provided by “S” and “T” counters.
Reaction phase
- Non-phasing player releases Reserves, etc.
- Non-phasing player barrage
Combat phase
- Artillery (no Air/Naval)
- Combat segment (9.0, artillery units strength [1] per 13.4b)
Exploitation phase
- Movement segment
- Barrage segment
- Combat segment
Allies clean Up phase
- Remove DG and Exploitation markers.
- Flip or remove Fueled markers.
- Remove train-busting placed by Axis player.
End of Turn
I’m taking on the three turn Kasserine scenario in Tunisia. This is going to take quite a while I’m sure, but what’s not started never finishes.
Because the phasing is so complicated, it won’t be listed out here initially. The focus instead is on basic moving and shooting, and fitting the supply constraints for both.
The Axis need to get enough force through Tebessa while stopping defensive action by US and French forces (but mostly US). How they do this is the central puzzle to this situation.
Game Turn 1, February 15, 1943
Pre-Turn Phase
- Weather determination: lasts for entire game turn. Determined from weather chart. (17.0)
- First player determination: each player rolls 2 dice, higher wins, re-roll when tied.
In this scenario, Axis moves first on first turn.
Axis Turn 1
The Germans need to figure out how to get through Tebessa while staving off Allied defensive blocking.
Aircraft refit
(Not using aircraft this first game.)
Reinforcement
1 SP reinforcement at B43.34.
Movement
- Breakout segment
- Movement segment
- Air/Naval Barrage segment
Axis moves first, and we’re opening with Superga’s charge (overrun) on elements of and attached to the US 34th Inf. Will our brave Italians carry the day, or will they be repulsed?
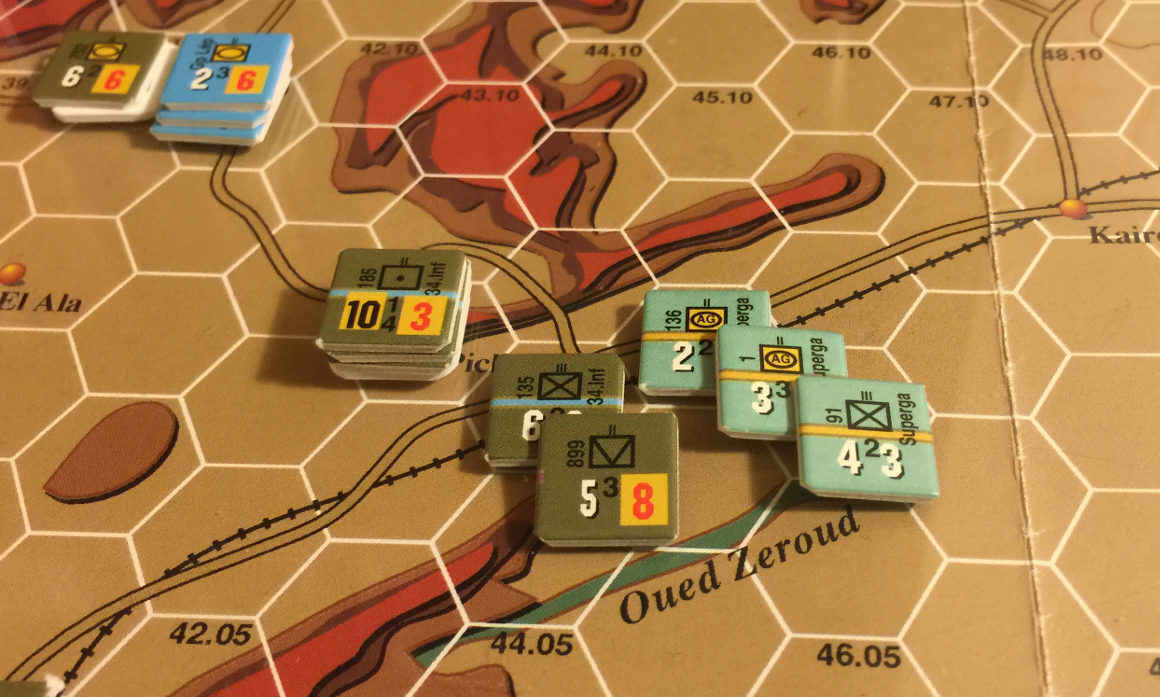
The stack with the 185th artillery is misplaced. It was just plopped down on the map during the initial setup lacking any better notion of what to do. The hill might be a great place for the artillery, but not for the supplies and organic truck underneath it.
Notes:
- Superga is in supply by scenario if it can trace to A46.08, which is its starting location.
-
Roll for surprise: 7 + 4, so no surprise either way.
- Attacking, action rating 3:
- 136th Assault Gun Batt. CF3 x 2 for armor in the open: 6
- 1st Assault Gun Batt. CF2 x 2 for armor in the open: 4
- 91st Inf. Reg. 4
- Total: 14
- Defending, action rating 3:
- 135th Inf. Reg. (34th Inf): 6
- 889 Anti tank Batt.: 5
- Total: 11
- Odds are 1:1, no drm, roll 8 open terrain
AL1Do1. In this case, I’ll take a step loss for each, allowing the defender to hold the ground. The two units taking the step loss are 899th Antitank Batt. for the Allies, and the 1st Assault Gun Batt. for the Italians. Since the Superga doesn’t have enough MP to continue the overrun, this combat is over.
Possible blunder: the 91st Reg. probably didn’t have enough movement to participate in this overrun. Oops.
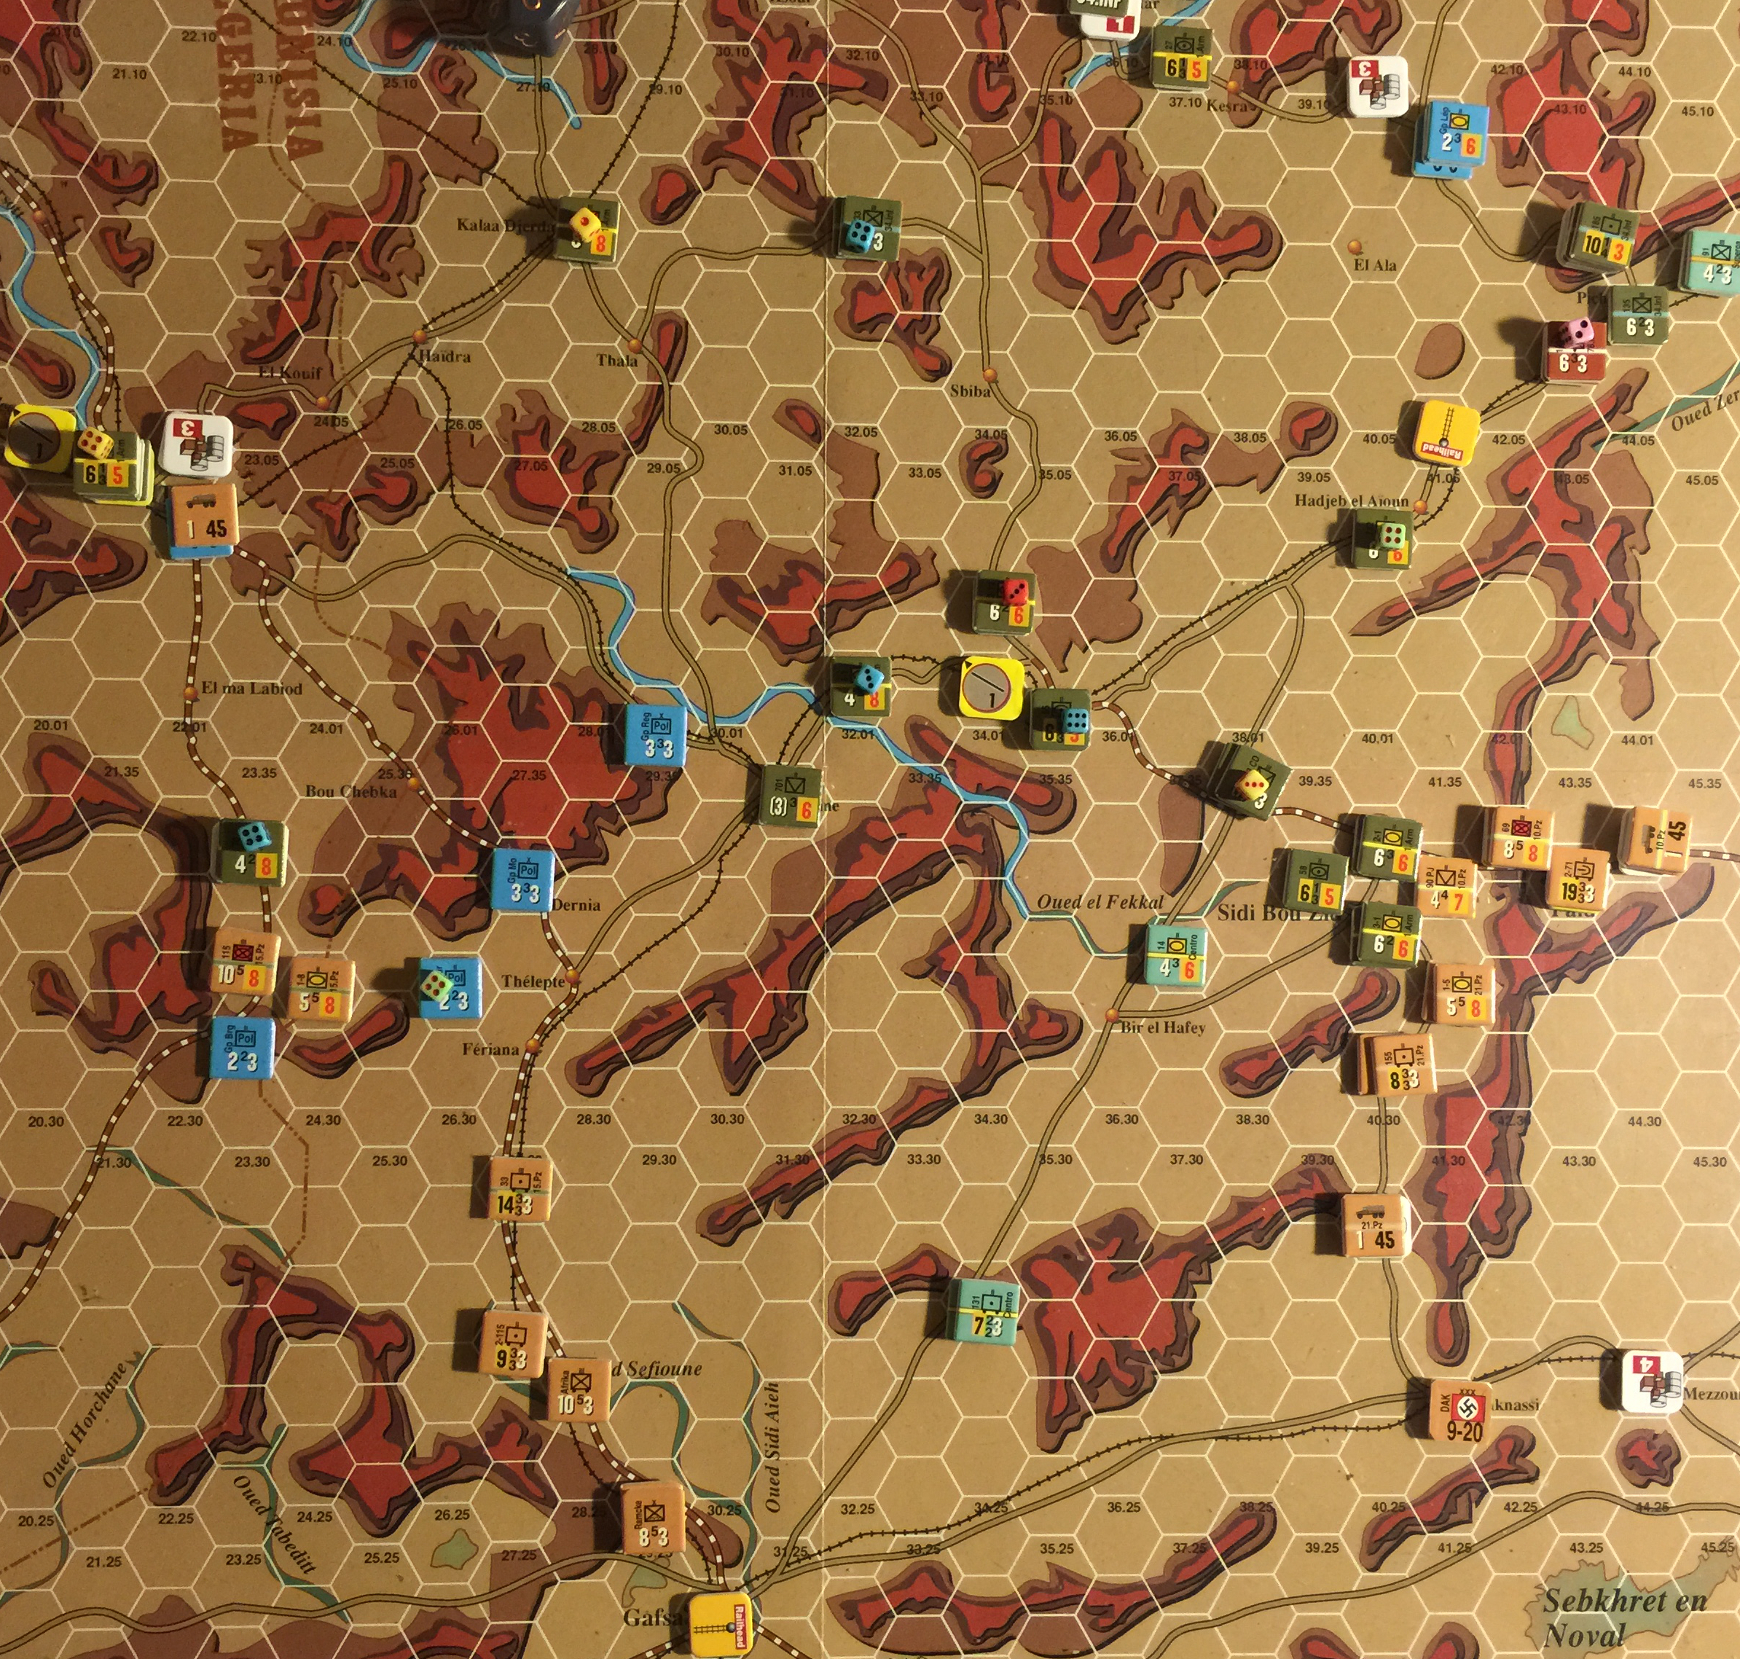
Continuing on with Axis movement phase, next up is 10th Pz.
10th Pz is sitting on 8 SP, and I believe the first thing I can do is spend an SP and fuel up the entire division. Some other things to note are that the US is pretty strong at Sidi Bou Zid, and the US 1st Armor did well there historically. 10Pz has a huge supply dump in its rear area, so it can’t really go driving around the US. It’s going to have to find a way to either clear or keep the US occupied while 15Pz is operating in its rear area. The choice is made: engage the US with 10 Pz.
21 Pz is directly south of the US, and it chooses to move to engage 1st Armor as well. Both 10 and 21 Pz stay in combat mode.
15 Pz is the tough one for me: I have no idea what to do with this division. Recap: raod movement is 1/3 MP on primary road, 1/2 MP on secondary road. The Italians head north to attempt to flank 1 Army units to prevent them from moving west through Kasserine. The rest of 15 Pz moves northwest to Fériana to blast the Rangers and the French out of the way.
This conclude Axis movement phase, now it’s time to check for Trace Supply.
Supply
This phase does:
- Determine which units are in or out of Trace Supply (12.6)
- Replenish low or exhausted internal stocks (12.10)
It does not deal with the “On Map” supply provided by “S” and “T” counters.
All Axis units are in Trace Supply to Sfar.
Reaction phase
- Non-phasing player releases Reserves, etc.
- Non-phasing player barrage
Allies have no units in Reserve, and will not barrage this turn.
Combat phase
- Artillery (no Air/Naval)
- Combat segment
Two main areas of attack: 15 Pz at Fériana and 10 and 21 Pz at Sidi Bou Zid.
- Fériana: defending is Ranger (AR 5) and French (AR 2) with
total defensive factor of 6. Attacking is 3 German units with strength
- Round Rule (4.1) gives this 4:1. Except that these are all
armored, so it’s really 42:6 which is 7:1. The next column up in the
clear is 9:1, so there is one unit left over which I won’t use in this
attack.
* Lead unit for Germans: 1-8, 15 Pz.
* Lead unit for Allies: 1 Ranger.
* Suprise roll: 8, neither.
* Combat roll 9 no DRM yields
Ae4/DL1o2(See 9.10 for retreat/step loss). This reads “Attacker gets exploit if Action Rating (AR) is 4 or more, the defender loses 1 step from the lead unit, and is required to take 2 option results, which can be either retreat or step loss.”
The defense chooses to retreat 2 hexes towards Dernia, Exploit 4 markers placed on attacking units.
- Round Rule (4.1) gives this 4:1. Except that these are all
armored, so it’s really 42:6 which is 7:1. The next column up in the
clear is 9:1, so there is one unit left over which I won’t use in this
attack.
* Lead unit for Germans: 1-8, 15 Pz.
* Lead unit for Allies: 1 Ranger.
* Suprise roll: 8, neither.
* Combat roll 9 no DRM yields
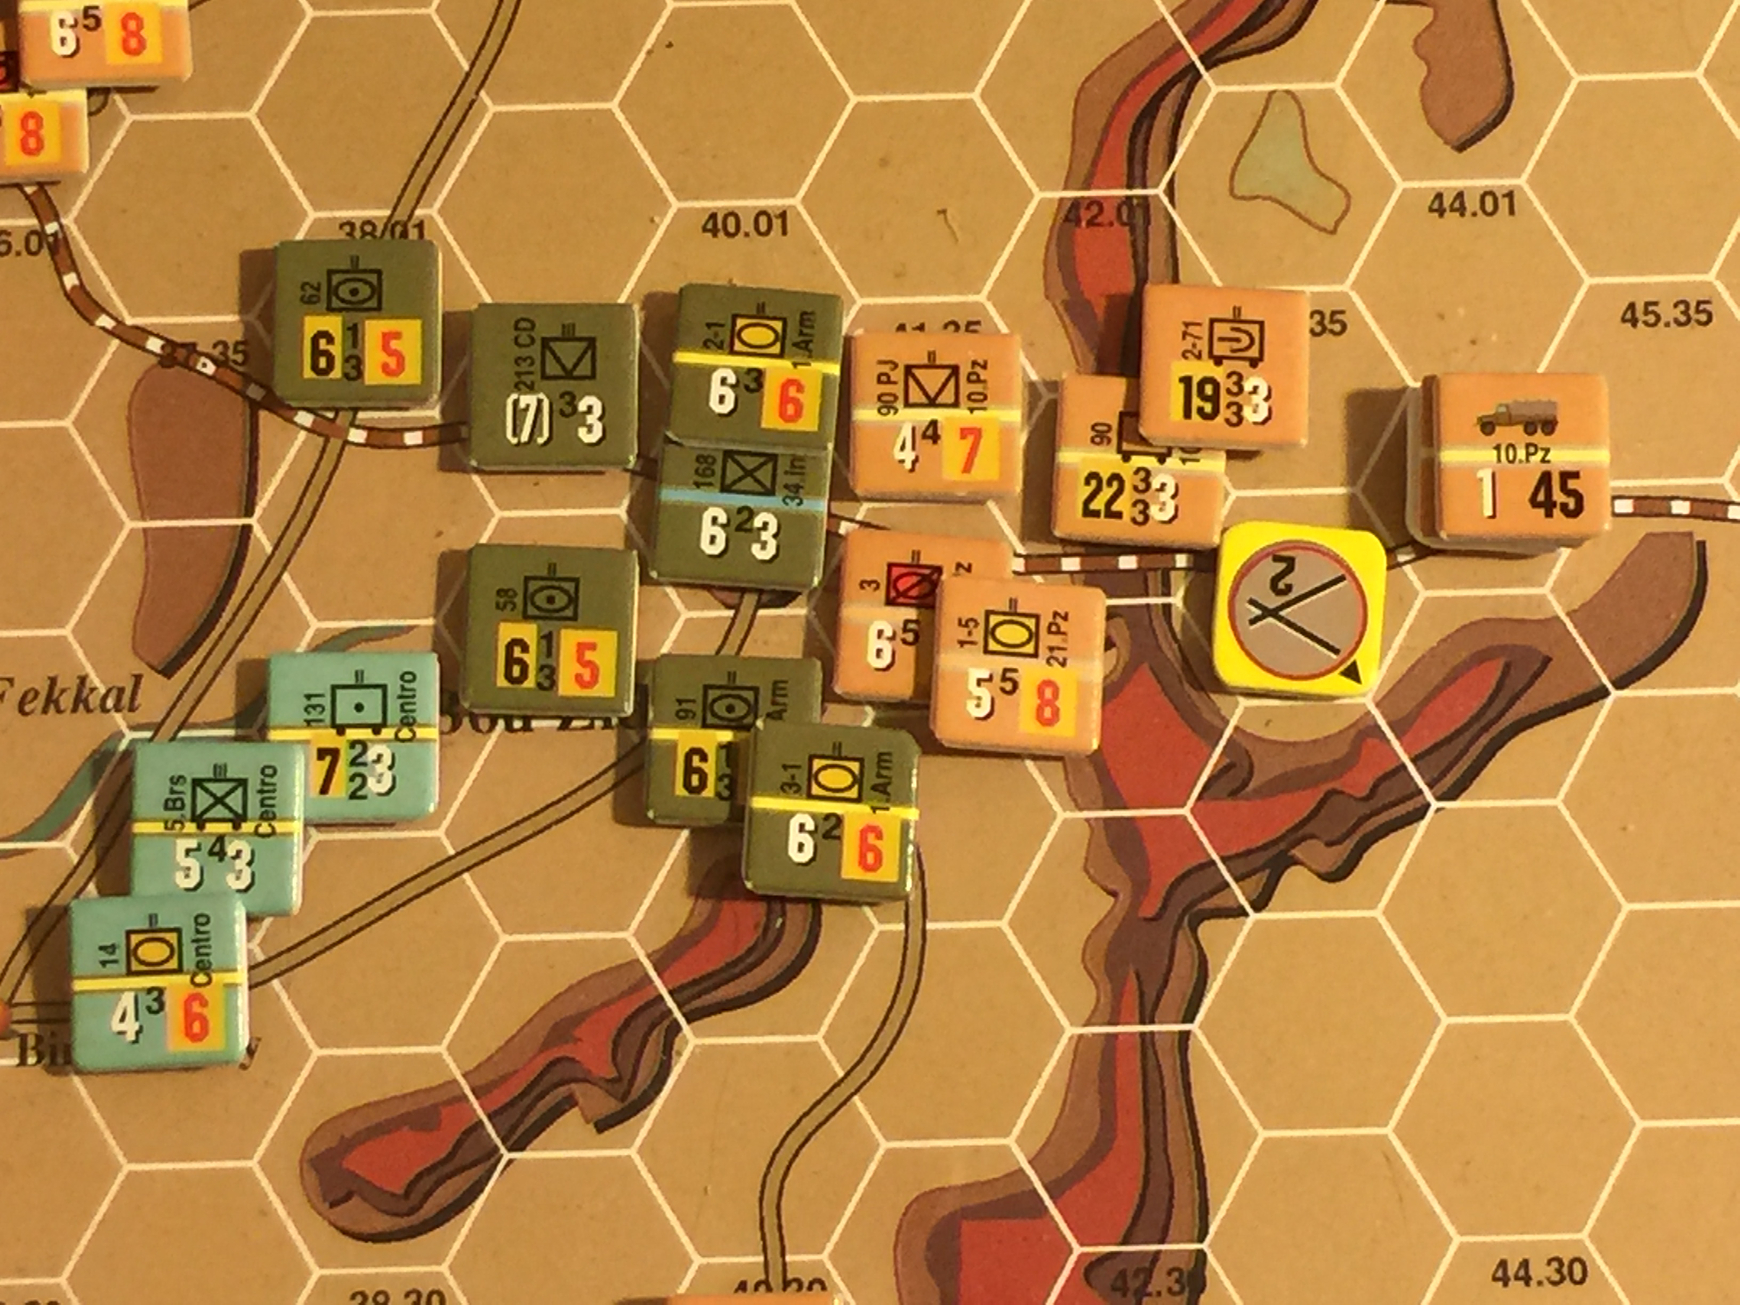
- Sidi Bou Zid: defending is 168 Reg and 701 AT with total defense 9.
Attacking is 1-7 Pz Bn, 10 and 69 motorized Bns with attack
strength 19, no armor or mechanized bonus as the fight is on hill
terrain.
- Lead for Germans is 69 M, AR 5
- Lead for US is 701 AT, AR 3
- Surprise roll 3,3 + 2 for 8, no surprise.
- Combat roll at 2:1 (close) 4 + 2 for 6 yields
AL1o1Do1what a disaster for the Germans here. The defender does not have to retreat and indeed, chooses not to.
Germans choose to retreat, which leaves 90 PJ exposed. This certainly wasn’t what I was expecting.
That’s enough combat for now. Let’s move to exploitation mode and see what kind of surprises are in store.
Exploitation phase
- Movement segment
- Barrage segment
- Combat segment
Units from the Fériana attack move to west of Thelepte to confront a
huge stack of US 1st Army armor lodged in the valley. Nothing else seems
viable, the US units are too strong to attack with defenive strength 15.
The armor shift does allow doubled for mech as well, but only for
attack. Actually it would go 3:1 in open terrain…let’s do it…no
surprise…roll 9 + 2 on 3:1 (open) Ao1DL1o1 works for me…Germans
take the loss in the 605 PJ, Allies in 81 Recon. The Allies take the
retreat, leaving behind a truck and 1SP. Since we’re not concerned with
supply this game, it’s not a problem.
But let’s take a look at capture rules. First, we need to deal with the truck. Aha. The truck is organic to 1st Army so it will retreat along with it (9.12d Tagalongs).
Clean Up phase
- Remove DG and Exploitation markers.
- Flip or remove Fueled markers.
- Remove train-busting placed by Allied player.
The Germans actually got further along in the south than I had anticipated. Balancing that is getting an unanticipated bloofy nose up at Sidi Bou Zid.
Allies Turn 1
The Allies are doing pretty well here.
Aircraft refit
Not using aircraft this game.
Reinforcement
- 2 SP at A21.05
- A41.11 78 Inf (1 Gds Inf Bde, 132 Art. Bn)
Movement
- Breakout segment (12.8e) Check trace to friendly units in supply.
- Movement segment
- Air/Naval Barrage segment
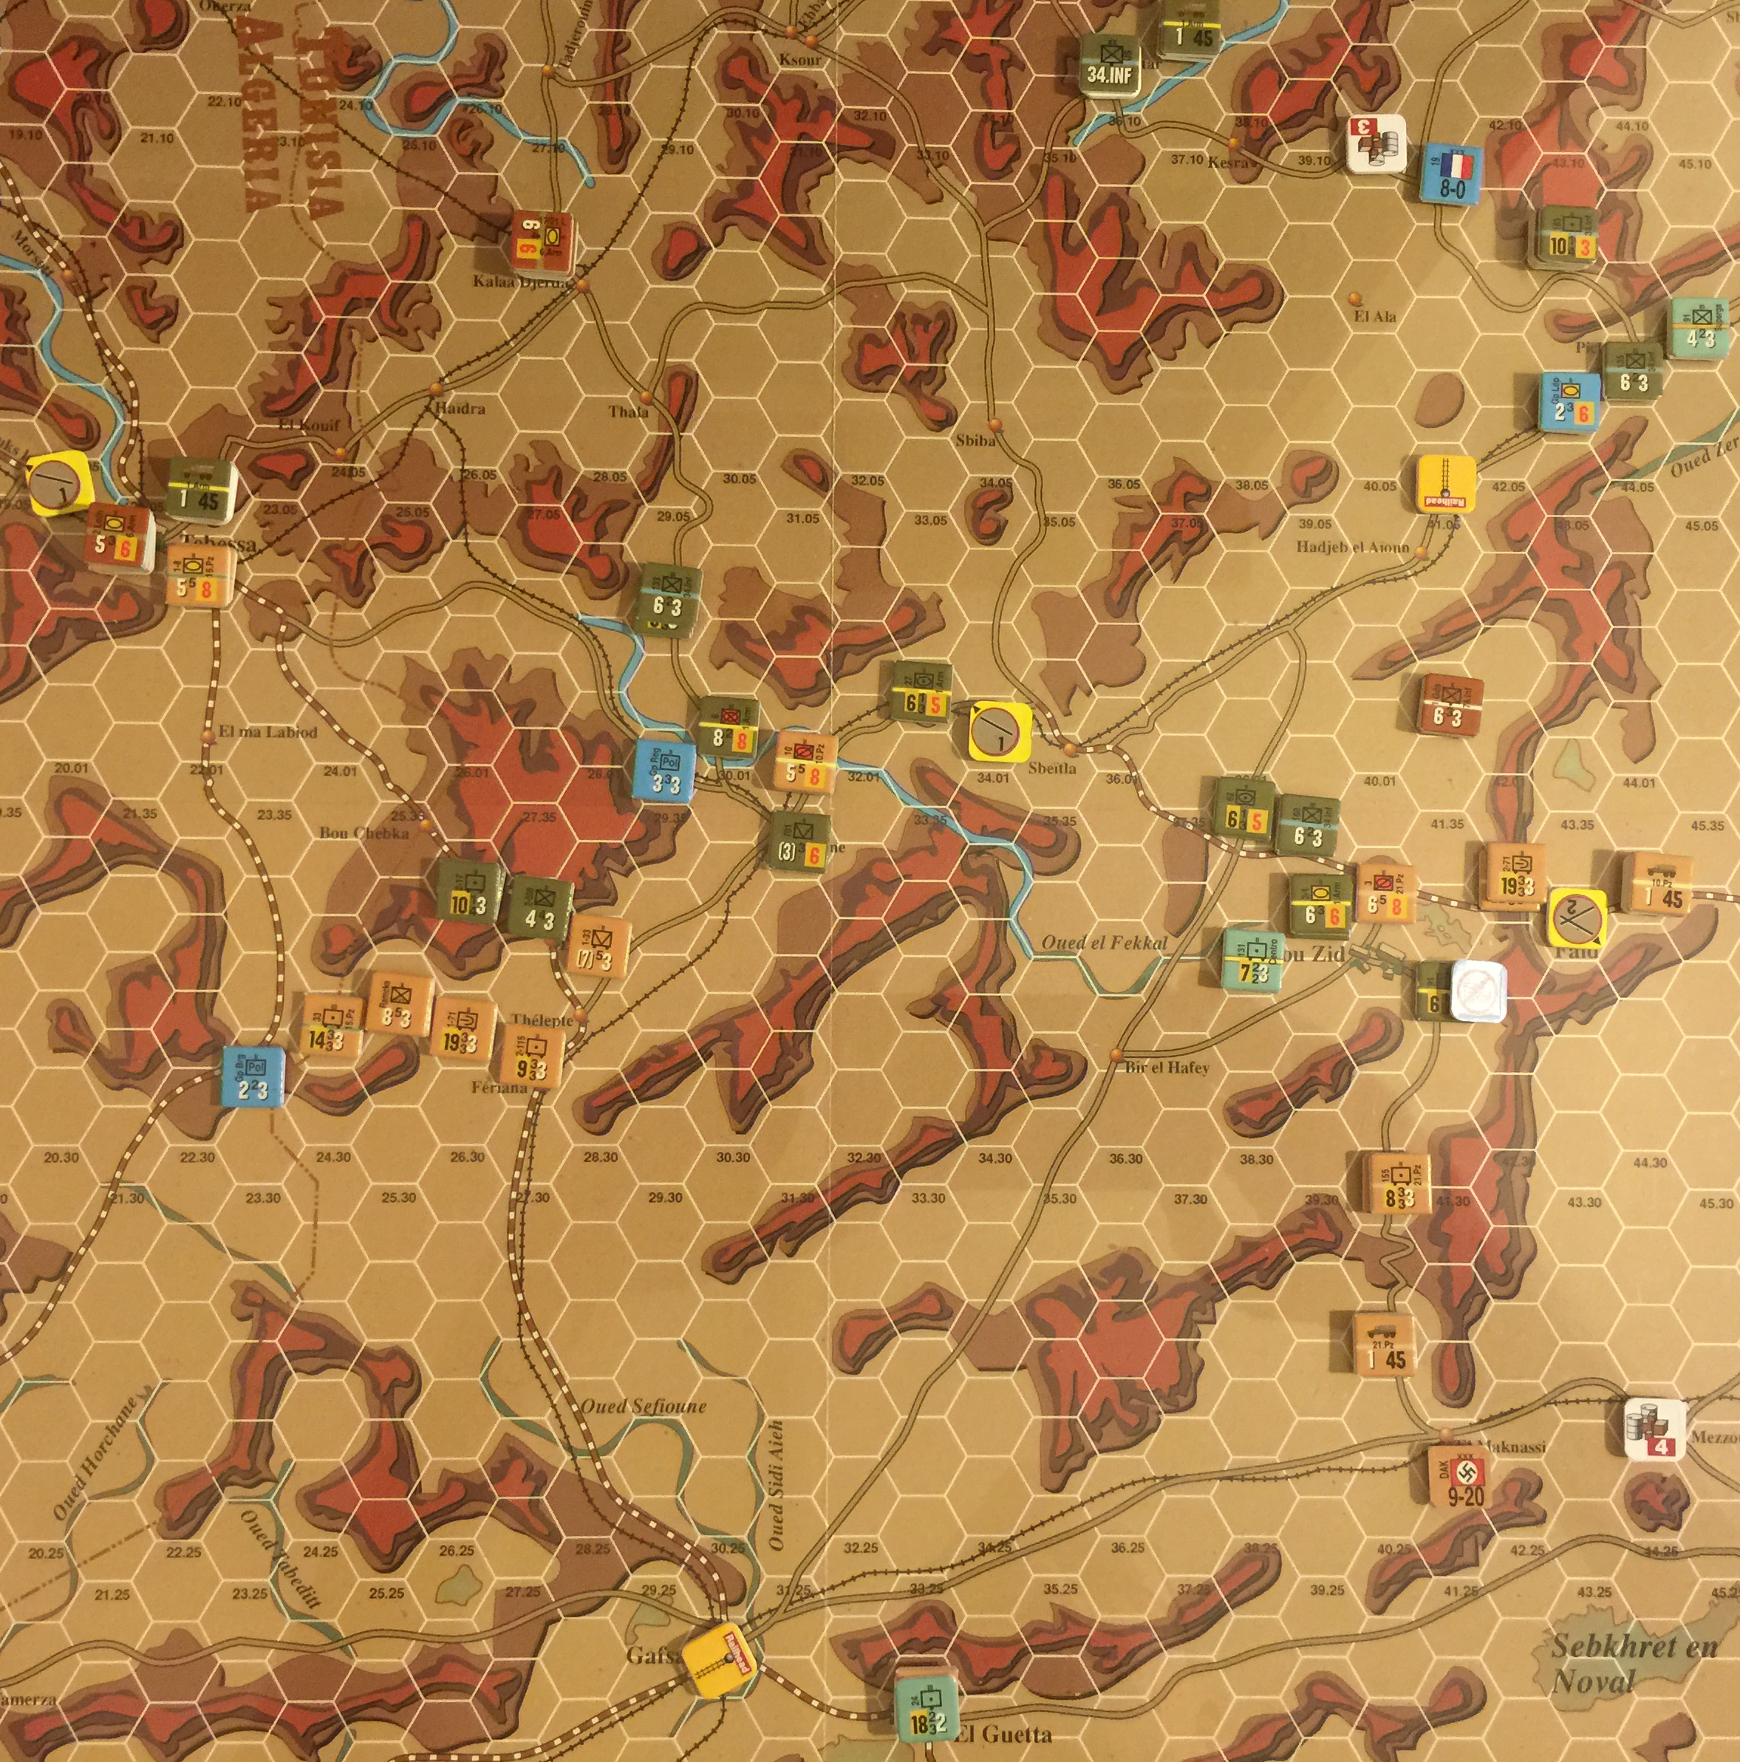
Allies move to block all escape routes and shore up defenses leading to Tebessa. Germans will have a hard time getting through or around the Allies after this turn.
Supply
This phase does:
- Determine which units are in or out of Trace Supply (12.6)
- Replenish low or exhausted internal stocks (12.10)
It does not deal with the “On Map” supply provided by “S” and “T” counters.
All Allied units are in Trace Supply.
Reaction phase
- Non-phasing player releases Reserves, etc.
- Non-phasing player barrage
Germans aren’t using any reserve this turn.
Combat phase
- Artillery (no Air/Naval)
- Combat segment
- US 175 and 185 from 34 Inf fire on Italian 91 and 136. No effect. Given that 34 Inf defended at cost of 2T during the German phase, this would run these units out of combat supply.
No other combat for Allies, this turn is all about setting up blocking positions.
Exploitation phase
- Movement segment
- Barrage segment
- Combat segment
Nothing to do here.
Clean Up phase
- Remove DG and Exploitation markers.
- Flip or remove Fueled markers.
- Remove train-busting placed by Axis player.
Nothing to do here.
End of Turn 1
This was interesting. There is no way at all for the Germans to meet the victory conditions using only combat mode, and that’s going to put them within range of Allied units which do not have to come out of combat mode to engage. The Germans have to cut off a lot of ground here to interdict Allied trace supply.
Turn 2, February 19, 1943
Briefly summarize the upcoming turn for both sides.
Pre-Turn Phase
- Weather determination (2.3, probably on map)
- First player determination, roll d6 highest has initiative, reroll for tie (2.3).
Will assume clear for game purposes, and not using any air in any case.
Germans roll 3, Allies 2, German initiative for Turn 2.
Axis Turn 2
Brief summary of Axis goal this turn.
Since the US moved into blocking positions, the main goal is to break through the US positions. Which really isn’t going to happen, but we’ll play it out anyway.
Aircraft refit
Cost 1T to refit any air base regardless of level or number of aircraft (15.1B)
Not using aircraft this game.
Reinforcement
Per scenario specification or reinforcement track.
1 SP at 43.34.
Movement
- Breakout segment (12.8e) Check trace to friendly units in supply.
- Movement segment (6.0): 1/2 for DG (5.10), 1/4 for Reserve (5.7)
- Air/Naval Barrage segment (10.2, 10.3)
No breakout or barrage, just plain old movement this turn.
- The remainder of 15 Pz heads into Thelepte.
- The panzer battalion and armored recon battalion from 10 Pz head into Kasserine. These units will likely be cut off from trace supply next turn, but I want to fight them to see what happens.
- Parts of 21 Pz move to Sidi Bou Zid to engage from the east.
- Elements of Centro head to Sidi Bou Zid to engage from the west.
Looks nasty.
Supply
This phase does:
- Determine which units are in or out of Trace Supply (12.6), roll for attrition if necessary (12.8, see table on charts folio)
- Replenish low or exhausted internal stocks (12.10)
It does not deal with the “On Map” supply provided by “S” and “T” counters.
33, 115, 1-8 Pz Bns are out of supply in the pass between Thelepte and Tebessa. They will go back into trace supply after the combat phase, but I’m not sure how that works for suppy purposes during the Allies phases.
33 and 115 pass their attrition roll.
Reaction phase
- Non-phasing player releases Reserves (5.7), destroy dumps (12.11).
- Non-phasing player barrage (all types, 10.0) and transport.
No reaction moves.
Combat phase
- Artillery barrage (10.1, no Air/Naval)
- Combat segment (9.0, artillery units strength [1] per 13.4b)
-
Thelepte: Afrika motorized regiment attack French Gp Jur Pol Bn. This will not go well for the French. Odds are 20:2 which is 10:1 with German mech factor, surprise roll 11 shift 1 for 11:1, roll 6 + 3 DRM for 9 which is
Ae3DL202DGi.e., eliminated. -
South of Tebessa, 33 and 115 attack 70 and 3-13 US armor Bns. This will probably not go well for the Germans as they are out of trace supply. Raw odds are 16:10 accounting for doubled armor bonus with halved attack factor from out of supply, which is 2:1. Need 8 for surprise, roll 3 shift 6, bummer because this is defender surprise which is going to roll on the 1:5 table. Germans need high, roll 9 + 2 yields
AL1o1Do1, about as good could be expected. What a blow for the Germans. -
Sbeitla: 10 Recon and 1-7 Pz Bn 776 and 65 Arty. This will probably not go well for the US units. Raw odds 11:6, with armor factor this is 22:6 which is 3.66:1 that is 4:1 in OCS. AR differential is +2 Germans, need 8 for surprise roll 8 shift 2 for 6:1, roll roll 8 + 2 yield
Ae4DL1o2. Lead unit is eliminated, artillery unit (65 sp) retreats 2. -
Sidi Bou Zid (west) 14, 5 Brs and 131 Centro units attack 58 Arty. Not sure what the odds on this one will be, but probably not good for the US in any case. Odds 13:1 with armor bonus to Italians, roll snake eyes shift 1 for surprise! Dang! At least it’s only a single shift left, but it moves from the 13:1 column to the 11:1 column, roll 5 + 3 yield 8
Ae4DL1o2. Will hold tight on the attacking hex to exploit against another unit. -
Sidi Bou Zid (east) 1-5 Pz, 3 armored recon and 90 PJ attack US 2-1 armor and 168 Inf. The US is on a hill, so this will be “close” odds which will be helpful. Probably won’t go well for the Germans. Raw odds 15:12, with armor factor 26:12 for 2:1, AR +2 German favor, roll for surprise, fail, roll combat 9 + 2 yields
Ao1Do1, attacker choose to retreat. This should have actually been fought on the Close odds at 1:1 which nullifies the armor factor as the defender chose to fight from rough terrain. That yieldsAL1Do1. Bummer. Germans are getting whipped pretty good this game.
Exploitation phase
- Movement segment
- Barrage segment
- Combat segment
-
The Italians chose not to advance after combat, and will use this exploit phase to close with US 3-1 armor and 91 Art. As understand it, only 14 Bn armor will be able to overrun as it has 6 MP. The mech unit is in leg mode with 3 MP, and the last unit is 131 Art. which is also in leg mode for 3 MP. Attacking we have 4 x 2 for 8 against 6+1 which is 1:1, roll for surprise need 8 rolled snakes and 1. This is the second time I’ve rolled 3 1s on surprise. Could be worse, could have been 1,1, shift 6. Combat roll 11 (!) + 1 for 12 on the 1:2 table in Open yields
Ao1DL1o1. The Italians will take the loss to enforce theo1on the defender, which is 91 SP Art Bn having to retreat through EZOC of 3/21 Pz (Recon) Bn. It’s a pity the other two Italian units can’t participate in the overrun, but I’m now wondering if they can actually move during the movement phase. That feels a bit like cheating, but still, it would be good to know. They could likely move elsewhere and attack, but that could be dicey. Actually the 131 Art. could barrage with 7 costing 2T, so let’s try it, need a 9 or more, roll 6, no dice.The Italians are done.
-
Germans at Sbeitla have 1-7 Pz and 10 armored Recon both from 10 Pz which will continue their attack on 65 SP Art. This is an overrun in the clear with armor against a DF 1 artillery unit, AR is +5 so minimum roll is 6 which is a
DL1for 65 SP. The German units have MP 8 and get 8/2 for exploit movement, and spend 3 MP to advance into the vacated hex. If they had more movement, they could continue the overrun against the US 1-1 armor Bn. They will instead fight. Putting 10 Bn in lead with AR 5 against defending AR 2 roll for surprise get 2,2 no surprise. Raw odds 22:4 which is 4.5:1 which is 5:1 in open terrain roll 7 + 3 for 10 yieldsAe4Dl1o2. The Germans are cleaning up. However, this unit will be out of supply next German phase. -
Germans at Thelepte, move towards Kasserine, except no, they can’t as these units are all leg movement with 3 MP, so they move up the road to Dernia to face off against the French blocking the pass to Tebessa. Attacking here would be at 1/2 strength, with 2:1 final odds fighting in close terrain. Would have to roll a 6 to prevent any German loss. I could pay 4T for a huge barrage with a 6+ to DG, but the US forces could easily nullify any gains here by moving units up from Tebessa. Let’s try it anyway, surprise roll 8, yes, shift 1 (?! jeebus this is like the 4th time in a row the red shift die has rolled a 1). So the attack is at 3:1 in close, roll 9 + 2 yields
Ao1DL1o1which is fine, the Germans will take a 1 hex retreat here: the road over the mountains is open, at least for now.
German clean Up phase
- Remove DG and Exploitation markers.
- Flip or remove Fueled markers.
- Remove train-busting placed by Allied player.
All Exploitation markers removed.
Allies Turn 2
Brief summary of Allies goal this turn.
The Allies are still looking pretty good to win this. They will likely lose more units, but it will be pretty hard for the Germans to bash through. And that’s the strategy for this turn: make it harder for the Germans to bash through.
Aircraft refit
Cost 1T to refit any air base regardless of level or number of aircraft (15.1B)
Reinforcement
Per scenario specification or reinforcement track.
Movement
- Breakout segment
- Movement segment
- Air/Naval Barrage segment
Hrm. Turns out there isn’t much useful in Tebessa, some artillery, a motorized and some French leg. This is not good. In any case, the artillery is going to move up to barrage the stack of Germans at Thelepte. Foolish Germans, should not be stacking like this. Had they stayed spread out, the barrage would have had a 1L shift.
Other Allied units move to block Axis advance, and to engage 10 Pz units between Sbeitla and Kasserine, who suddenly find themselves in a world of hurt.
Supply
This phase does:
- Determine which units are in or out of Trace Supply (12.6)
- Replenish low or exhausted internal stocks (12.10)
It does not deal with the “On Map” supply provided by “S” and “T” counters.
All Allied units are in supply.
Reaction phase
- Non-phasing player releases Reserves, etc.
- Non-phasing player barrage
No reserves for German player. However, the Germans decide to spend 4T and barrage the US artillery stacked in the pass. Not sure if the Germans actually have 4T here to spend, but they could spend a bit less to get even odds on a good result. Now it’s the US who is foolishly stacked. Roll for barrage 6 yields DG, so US artilley is out of action for now.
Another barrage at Sidi Bou Zid, Germans pay 5T for barrage strength 41, roll 11 and US 2-1 and 752 armor is DG.
Combat phase
- Artillery (no Air/Naval)
- Combat segment (9.0, artillery units strength [1] per 13.4b)
Going to fight the DG units at Sidi Bou Zid anyway, even though they’re
low AR and half strength; the armor will help make up for it. Raw odd
against 90 PJ is 18:4 which 5:1, roll for surprise need 11 roll 9 no
surprise, combat open terrain roll 6 - 1 yields Ao1Do1, US units
choose to retreat here. (These units should have attempted overrun
during movement.)
At Kasserine, we have a valiant attempt by the US to entrap elements of
10 Pz. Should they fight? Morale is low, these are not elite US units,
and if they get defender surprise, could be very ugly. But they decide
on the course of valor! Fight! 1-13 and 2-13 bring 20 AF to the battle,
attacking from the open into open. 6 Mech and 720 armor attack across
wadi hexside for 8/2 and 6/2 for 7 total. Hence, 27:11 is 2.45:1 or 2:1.
Surprise roll 2,2 shift 2! Attack is at 1:2 with -3 DRM! Yoikes!
Proceeding, roll 9 - 3 yields AL1o1Do1. The defender gets to ignore
his Do1 result, which is good as these units are surrounded (and will
likely be out of supply next turn.
Exploitation phase
- Movement segment
- Barrage segment
- Combat segment
Nothing to exploit.
Allies clean Up phase
- Remove DG and Exploitation markers.
- Flip or remove Fueled markers.
- Remove train-busting placed by Axis player.
Remove 3 DG markers.
End of Turn 2
The Allies may be in trouble in Tebessa, which turns out to not have much combat capability. The Germans almost surely will be unable to exit any units, but may well be able to take Tebessa.
Game Turn 3, February 22, 1943
Briefly summarize the upcoming turn for both sides.
The German are definitely going to make a push for Tebessa. Getting any units off the map seems out of reach. For the Allies, if they can get initiative this turn, they may be able to reinforce both the north end and Tebessa to further frustrate the Germans.
About now, if I were playing with the full combat supply rules, both sides would probably be running out of SP.
Pre-Turn Phase
- Weather determination (2.3, probably on map)
- First player determination, roll d6 highest has initiative, reroll for tie (2.3).
Assuming clear for weather.
Allies get initiative!
Allies Turn 3
Brief summary of Allies goal this turn.
The Allies main goal is strengthening the exit area to deny Axis to northern AO, and to reinforce Tebessa with combat capable units.
Aircraft refit
Cost 1T to refit any air base regardless of level or number of aircraft (15.1B)
No aircraft in this game.
Reinforcement
Per scenario specification or reinforcement track.
- 2 SP at A21.05
- A27.11 6 Arm Div (2 Loth, 17/21 L Arm Bn, 10 Rfl Bn Organic truck), 1 SP (This was supposed to come in last turn.) This unit is coming in with enough SP to fuel it, but maybe not enough to fight it without going to internal stock, which wouldn’t matter for this game.
Movement
- Breakout segment
- Movement segment
- Air/Naval Barrage segment
Brits move into Tebessa allowing US unit to move forward again to engage German units in pass. 10 Pz will be re-engaged at Kasserine, and this time it would be fighting on internal stocks, probably exhausted stocks as it’s cut off from combat supply.
Other units closing to attack wherever possible.
Supply
This phase does:
- Determine which units are in or out of Trace Supply (12.6)
- Replenish low or exhausted internal stocks (12.10)
It does not deal with the “On Map” supply provided by “S” and “T” counters.
91 Self-propelled is out of supply, surrounded by 21 Pz and Centro units.
Reaction phase
- Non-phasing player releases Reserves, etc.
- Non-phasing player barrage
Germans need to barrage to survive. These would be expensive, and not sure if they would have enough SP to barrage, and to move during their phase. Let’s do it anyway.
- At Thelepte, 42 at 5T roll 5 for DG on US artillery.
- Sido Bou Zid, 41 at 5T roll boxcars, DG on US armor.
Combat phase
- Artillery (no Air/Naval)
- Combat segment (9.0, artillery units strength [1] per 13.4b)
This is going to go pretty fast.
-
Barrage, strength 8 on Germans at Thelepte, roll 4 no effect.
-
Kasserine: 19:11 which is 2:1, roll for surprise 7 - 3 defender surprise again, with 1L shift (lucky), so 1:1 in open roll 5 - 3 yields
AL2, not good. -
South of Tebessa US has 4:1 because out of supply halves the German defense. It would be in combat supply (9.5a). Roll 5 - 2 for surprise, defender surprise shift 4, so 1:1. Bummer for US. Roll 3 (ugh) - 2 yields
AL2, the road to Tebessa is open! -
Sidi Bou Zid, 5:1 on 90 PJ, let’s finally kill this unit. Boxcars across the board, which is attacker surprise with 12 - 2 for 10. And a shift of 6, so 11:1 roll 5 - 2 yields
Ao1DL1o1. The attackers take the retreat, but 90 PJ is gone. And the US is still in de facto control of Sidi Bou Zid.
That’s all the combat for the Allies on this last turn.
Exploitation phase
- Movement segment
- Barrage segment
- Combat segment
Nothing to exploit.
Allies clean Up phase
- Remove DG and Exploitation markers.
- Flip or remove Fueled markers.
- Remove train-busting placed by Axis player.
All done.
Axis Turn 3
Brief summary of Axis goal this turn.
The only thing worth dealing with is seeing if 1-8 Pz and 115 PG can take Tebessa, so they move up to get there just barely. If they weren’t out of supply, they could attempt overrun.
Aircraft refit
Cost 1T to refit any air base regardless of level or number of aircraft (15.1B)
No aircraft this game.
Reinforcement
Per scenario specification or reinforcement track.
1 SP at B43.34
Movement
- Breakout segment (12.8e) Check trace to friendly units in supply.
- Movement segment (6.0): 1/2 for DG (5.10), 1/4 for Reserve (5.7)
- Air/Naval Barrage segment (10.2, 10.3)
Move 1-8 Pz and 115 PG to Tebessa.
Supply
This phase does:
- Determine which units are in or out of Trace Supply (12.6)
- Replenish low or exhausted internal stocks (12.10)
It does not deal with the “On Map” supply provided by “S” and “T” counters.
We’ll assume this is back in supply which they would definitely be given one leg unit in move mode.
Reaction phase
- Non-phasing player releases Reserves (5.7), destroy dumps (12.11).
- Non-phasing player barrage (all types, 10.0) and transport.
The US made a mistake here, and should have pulled the artillery back to protect Tebessa. They would have a chance to DG the Germans.
Combat phase
- Artillery barrage (10.1, no Air/Naval)
- Combat segment (9.0, artillery units strength [1] per 13.4b)
Being back in supply, and assuming 2T (or internal stocks, really)
available, we have 10 armor and 5 mechanized, which are both doubled in
the open with 8 defending for 4:1, +2 DRM. Roll for surprise 7 + 2 = 9,
no surprise, which is too bad because 6 shift. So 4:1 in the open roll 4
+ 2 yields Ao1Do. The Germans can take 1-8 as a loss, and the Allies
retreat into Tebessa.
Exploitation phase
Exploitation mode is defined in Section 5.9, with Exploition Phase details defined in Section 11.0.
- Movement segment (6.0), overruns cost 3 MP (8.1a, 8.1e prohibits Exploitation result).
- Barrage segment
- Combat segment
No exploitation, called the game here.
German clean up phase
- Remove DG and Exploitation markers.
- Flip or remove Fueled markers.
- Remove train-busting placed by Allied player.
Game called.
End of Turn 3 and game
And that’s a wrap. The Tebessa fight boiled down to the luck of the die, with something like 50/50 (max) for Germans to get an exploitable result, then exploit successfully.
As can be seen, the Germans did not achieve their goals.
AAR
A win for the Allies.
What’s crystal clear after Turn 1 is that there is no way for the Germans to achieve victory conditions using only combat mode with “strict” EZOC. They must go into movement mode and figure out how to swing around EZOCs to position themselves appropriately. The Allies, on the other hand, can move into blocking positions while staying in combat mode. This makes it even harder for the Germans as they will have to defend in move mode.
I suspect that getting the first turn right will allow the Germans to conduct the remaining two turns in combat mode, providing they can survive the Allies first turn counter attacks. If the Germans can get the Allies rocked back a bit, and keep up the momentum, they may be able to succeed.
Blunders
Manifold and varied.
-
Turn 1, the primary blunder was not putting the mechanized infantry into Truck mode and getting them around the back of the French at Fériana to cut off retreat and protect trace supply. A related blunder was not putting the leg infantry into strat mode for the same reason. I think this is just 1 para unit attached to 15 Pz, but it still would have been very useful to have on the next turn, given that it would be well-protected by the mechanized units. Acually, this wasn’t a blunder, I’m specifically playing this game in combat mode only. But this would be a blunder if I were using all modes.
-
Not using EZOC negation to get 10 Pz around Sidi Bou Zid. In truth, this won’t matter as much with only combat mode. Using a move mode, this would be imperative. That would have the added benefit of putting the US units there out of supply.
-
In the combat following exploitation (Turn 1), one of the US units is tracked artillery, with strength of 6. This may not have been allowed in the battle without spending extra supply is there had been supply. This would have put the odds at 5:1 for
Ae4DL1o2, significantly different! However, I think since the Combat factor is not parenthesized, I did it right. -
Units retreating 2 steps go into DG mode (5.10a.B). The French unit from Turn 1 combat should have been put into DG.
Some notes
-
Trace supply status affects unit strengths independently of combat supply concerns, and any reductions are cumulative.
-
B) Pay 1 SP per HQ to fuel an HQ itself and all independent units within its throw range (see 12.5e). This payment lasts until the next Friendly Clean Up Phase. Mark this with a Fueled marker on top of the HQ.
- Determine how many HQ on map
- Determine which independent units belong to which HQ.
- Allocate SP per HQ.
- How would kampfgruppes operate with respect to hq and fueling?
- Check motorized units traveling combat/leg need fuel.
Axis
- Superga
- 10, 8 SP
- 15, 3 SP
- 21, 1 SP
- DAK, 4 SP
16 SP, 64 Ticks
Allies
- 1st Armor, 2 Sp
- French HQ, 3 SP
- 34th Inf, 1 SP
- 14 Corps, 7 SP
13 SP, 52 Ticks